


F-Series | Getting started
8
Starting your Navman
Normal start: A warning message will display. After accepting the warning message, the Main Menu
screen will display (if no route is planned) or a navigation map will display if a route is planned.
If for any reason your Navman does not start up correctly, press the Reset Button on the bottom of the device.
First-time start: You will be guided through some steps to set up your Navman. This guided start
occurs only the very first time you start your Navman, or after a complete reset to factory default
settings.
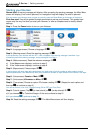
Step 1: Press the Power button to turn on your Navman.
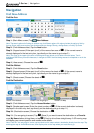
Screen: Language Screen: Maps Screen: Voice
Step 2: (Language screen) Choose a language £.
Step 3: (Warning screen) Read the warning message
£.
If you tap Decline, your Navman will turn OFF. It will not operate if the warning message is declined. If you
accidentally decline the warning message, simply start again from Step 1.
Step 4: (Welcome screen) Read the welcome message ¥.
a) If the Maps screen displays, continue to step 5.
b) If the Voice screen displays, continue to step 6.
Step 5: (Maps screen) Choose maps
£.
In some regions with large map data requirements you might need to limit the number of active maps to ensure
optimum performance. Your Navman will alert you to reduce the number of maps selected if the file size is too large.
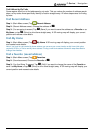
Step 6: (Voice screen) Female or Male ¥.
Step 7: (Units screen) Kilometers or Miles
¥.
Step 8: (Time screen) Choose an option
choose a setting £. (Repeat for each option and
then tap
¥ to continue to step 9.)
You can set Format (12 or 24 h), Daylight Saving (ON or OFF) and Time Zone.
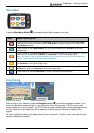
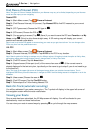
Step 9: (Tutorial screen) Tap £ (to view tutorial) or (to skip tutorial) ¥.
a) If you choose
£, a Tutorial will begin. At the end continue to step 10.
b) If you choose
, continue to step 10.
Step 10: Read the settings message £. The Main Menu screen will then display.