


7
ENGLISH
302NE
6 Settings
6.1 Setting the country and city
After it has successfully received the Meteotime signal, the display shows in the information window ‘SELECT
COUNTRY’. After a few more minutes, the information shows the default city ‘FRANKFURTH’.
• Press the SET - button to switch between displaying the “cities sunrise & sunset time” or the “time & date”.
• Press and hold the SET - button for 3 second. ‘COUNTRY’ (LAND INST), is displayed.
• Press the up or down button to select another country.
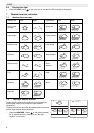
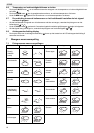
A complete list of available countries and cities can be found at the last pages of this user guide.
• Press the SET - button to confirm the country.
• Press the up or down button to select your nearest city.
• Press the TEST - button to confirm. The first city will be stored.
• Press the up or down button to select another city (up to 5 cities can be stored).
• Press the TEST - button to confirm or press the SET - button to exit. ‘EXIT’ (INST VERL) is displayed.
6.2 Display more cities information
If you have selected more than one city:
• Press the SET - button repeatedly until the first city name is displayed.
• Press the up or down to switch between the stored cities.
6.3 Remove the selected cities from the memory list
• Press the SET - button to switch between displaying the “Cities Sunrise & Sunset time” or the “Time & Date”.
• Press and hold the SET - button for 3 seconds. ‘COUNTRY’ (LAND INST) is displayed.
• Press the up or down button to select the stored country.
• Press the SET - button to confirm the country.
• Press the up or down button to select the stored city.
• Press the TEST - button to remove the city from the memory list.
• Repeat, if necessary, to remove other cities.
• Press the SET - button to exit.
6.4 Personalize a place name
• Press and hold the SET - button for 3 second. ‘COUNTRY’ (LAND INST), is displayed.
• Press the up or down button to select the stored country.
• Press the SET - button to confirm the country.
• Press the up or down button to select the city.
• Press the MEM - button . A cursor flashes on the first position of the Information Window.
• Press the up or down button to select a character.
• Press the SET - button to confirm the character and jump to the next position.
• Press the TEST - button to delete a wrongly entered character.
• Press the SET - button twice to store the new name and exit the setting.
6.5 Setting the time zone, language and display contrast
• Press and hold the SET - button for 3 second. ‘COUNTRY’ (LAND INST), is displayed.
• Press the SET - button again. The time zone ‘ZONE +00 H’ is displayed.
• Press the up or down button to change the time zone.
• Press the SET - button to confirm. The actual display language is displayed.
• Press the up or down to select one of the next display languages: German, English, Spanish, French,
Italian, Dutch or Swedish (German is the default language).
• Press the SET - button to confirm. The display contrast is displayed.
• Press the up or down button to select the desired display contrast.
• Press the SET - button to confirm and exit the setting.
REMARK: If you do not have any selection into the setup mode up for 60 seconds, it will automatically exit the
setup mode.
6.6 Indoor / outdoor temperature and humidity
• Press the IN/OUT - button to switch between displaying the indoor or outdoor temperature and humidity .
• Press the MEM - button to read the record of the maximum and minimum temperature
• Press and hold the MEM - button to clear the maximum and minimum temperature.
6.7 Linking the outdoor sensor with the main unit if the signal is lost
• If the main unit cannot receive the outdoor sensor signal, the outdoor signal icon will change to .
• Press and hold the IN/OUT - button for 3 second, and then the wave icon will flash.
• If the signal has been received again, the outdoor signal icon will be .
4
4
8 7
4
8 7
10
8 7
10
4
4
8 7
4
4
8 7
4
8 7
10
4
4
8 7
4
8 7
3
8 7
4
10
4
4
4
8 7
4
8 7
4
8 7
4
24
3
3
29
29