


Installation Instructions
1. Turn off the faucet. Remove the filtering appliance by turning
it counter clockwise until it is upside down. Pull the filtering
appliance and filter from the spout of the faucet.
2. Remove the old filter from the filtering appliance and discard.
3. Remove plastic wrap. Install the new filter into the filtering
appliance by wetting the outlet ports with water and then
inserting into the round filter ports on the faucet head. Outlet
ports must be fully inserted into the filter ports. Install the fil-
ter and faucet head assembly on to the spout by wetting the
faucet head o-ring seal and rubber spacer and then careful-
ly sliding the free end of the filter into the spout. The head
will need to be initially turned approximately 1/2 turn counter
clockwise from its normal position to slip past the safety
catch. Lock the head into place by simultaneously pushing
and twisting the head clockwise. When properly installed the
head will feel secure, and will be correctly oriented on the
spout.
4. Reset the filter life indicator by pushing the filter button 3
times. Wait 10 seconds. You should not be running water
while resetting the filter life indicator because the filter button
will remain depressed with the first push as it switches to filter
mode. The filter life indicator has been correctly reset if a short
series of rapidly flashing green light occurs, indicating that the
new filter flushing period has begun.
5. Flush the filter with cold water in the filtering mode. The indi-
cator will flash green/amber while the unit is flushing. The
faucet is ready for use when the light flashes green only
(approximately 5 minutes.)
Caution - Do not filter water above 100ºF (37ºC).
Note: The faucet will function correctly in unfiltered stream mode
with or without a filter installed. The faucet will not function cor-
rectly in filter mode without a filter. If a filter is not installed and
the filter button is pressed, unfiltered water will flow from both the
filtered water outlet and the stream outlet aerator, and the filter
button will automatically release.
Use only MicroTech 400 or 600 filter cartridges with the
PureTouch
Classic
Filtering Faucet system. The Microtech filters
are high performance carbon block filters developed specifically
for the PureTouch system.
To order replacement filters, please call -
1-877-DRINK H2O (1-877-374-6542)
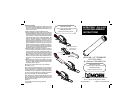
Outlet Ports
Filtering Appliance
Faucet head o-ring seal
Filter
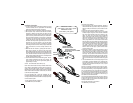
MicroTech™ 600
(Cloro Sabor y Olor, plomo, quistes)
MicroTech™ 400
(Cloro Sabor y Olor, plomo)
FILTERING APPLIANCE
APARATO DE FILTRACIÓN
OUTLET PORTS
ORIFICIOS DE
LA SALIDA
FILTER
FILTRO
Instrucciones para la instalación
1. Cerrar la mezcladora y retirar el aparato de filtración girándolo en
sentido antihorario hasta que quede boca abajo. Tirar del aparato de
filtración y del filtro para retirarlos de la pieza de salida de la mez-
cladora.
2. Retirar el filtro usado del aparato de filtración y desechar.
3. Retirar el envoltorio de plástico. Instalar el filtro nuevo en el aparato
de filtración mojando con agua los orificios de salida e insertándolo
luego en los orificios redondos del filtro en la cabeza de la mez-
cladora. Los orificios de la salida deben quedar completamente
adentro de los orificios del filtro. Instalar el conjunto del filtro y la
cabeza de la mezcladora en la pieza de salida mojando el sello del
anillo en "O" y el espaciador de caucho de la cabeza de la mez-
cladora y luego deslizando con mucho cuidado el extremo libre del
filtro hacia adentro de la pieza de salida. Será necesario girar inicial-
mente la cabeza aproximadamente 1/2 vuelta en sentido antihorario
desde su posición inicial para deslizarlo pasado el retén de seguri-
dad. Trabar la cabeza en su lugar empujándola y girándola
simultáneamente en sentido horario. Cuando esté instalada correc-
tamente la cabeza se notará segura y estará orientada correcta-
mente en la pieza de salida.
4. Reposicionar el indicador de vida del filtro empujando 3 veces el
botón del filtro. Esperar 10 segundos. Mientras se esté reposicio-
nando el indicador de vida del filtro no se deberá hacer correr agua
porque el botón del filtro permanecerá oprimido la primera vez que
se lo empuja dado que cambia al modo de filtrado. Cuando se ha
reposicionado correctamente el indicador de vida del filtro, se encen-
derán una serie corta de luces verdes destellando rápidamente, indi-
cando que ha comenzado el nuevo período de lavado con agua del
filtro.
5. Lavar abundantemente el filtro con una descarga de agua fría en el
modo de filtrado. El indicador destellará con luz verde/ámbar mien-
tras la unidad se está lavando. Cuando la luz que está encendida es
solamente verde la mezcladora está lista para el uso (en aproxi-
madamente 5 minutos).
Precaución - No filtrar agua que esté por encima de los 37ºC (100ºF).
Nota: Cuando se encuentre en el modo de flujo sin filtrar la mezclado-
ra funcionará correctamente, ya sea que tenga instalado un filtro o no;
pero, si no tiene instalado un filtro y se encuentra en el modo de filtra-
do, la mezcladora no funcionará correctamente. Si no hay instalado un
filtro y se oprime el botón de filtrado, el agua sin filtrar fluirá tanto por la
salida de agua filtrada como por el aireador de la salida de flujo y el
botón del filtro se soltará automáticamente.
Con el sistema de Mezcladora filtrante clásica Pure Touch utilizar car-
tuchos de filtros MicroTech 400 ó 600. Los filtros Microtech son filtros
de bloque de carbón de alto rendimiento desarrollados específica-
mente para el sistema Pure Touch.
Para pedir filtros de repuesto por favor llamar al
1-877-DRINK H2O (1-877-374-6542)
SPACER
ESPACEADOR
FAUCET HEAD O-RING SEAL
SELLO DE ANILLO EN-O DE LA CABEZA
DE MEZCLADORA