10/13/04 2 93120-MAN07
Physical Characteristics
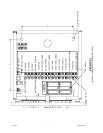
Weight: 10lbs (4.5 kgs.)
Height: 81/4 inches (210 mm)
Width: 8 5/16 inches (211 mm)
Depth: 4 5/16 inches (110 mm)
Installation
1. Locate the area where the Remote Status Alarm Panel (RSAP) will be installed. The
monitor should be within 300 feet (91 meters) of the UPS.
2. Mount the monitor to the wall using the four pre-drilled holes in the back. Use
appropriate hardware for the installation.
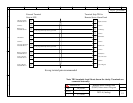
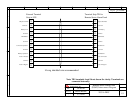
3. Wiring requirements are: 7 twisted pair 16 AWG cable run in metal conduit. Use Belden
Catalog No. 1485B (8 twisted pair) or equivalent. All electrical and mechanical
connections to be made per local and/or national electric codes.
4. Connect the conduit to the RSAP by punching the appropriately sized hole in a
convenient location.. Caution! Care should be taken not to damage any internal
components when drilling hole for conduit.
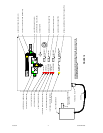
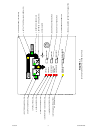
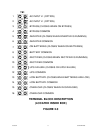
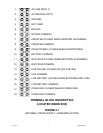
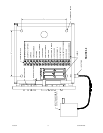
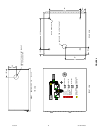
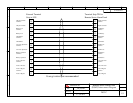
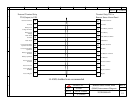
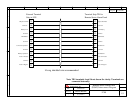
5. Refering to Figure 2.0, 3.0, and the corresponding UPS wiring diagram, connect the
seven (7) pairs of twisted wire from the RSAP to the customer accessible alarm contact
terminal bar in the UPS module. (Refer to the UPS’ owner’s manual for location)
6. Refering to Figure 3.0, install (6) AA batteries (included). Batteries will provide about 8
hours of run time in the event of an AC power failure. Replace these batteries yearly for
optimum performance.
7. Refering to Figure 1.0, connect the power supply adapter into the corresponding jack
located on the bottom left-hand side of the RSAP enclosure. Plug the power supply into a
convenient 120V/60Hz wall receptacle. Failure to connect to a suitable wall outlet will
drain the RSAP’s internal batteries and/or result in damage to the monitor. (If supplied
with the hardwire version, please refer to Figure 3.1 for AC input terminal block layout.
Connect L1, Neutral, and Ground with minimum of 18awg wire.)
Caution!
The monitor must be installed by a qualified electrician. Installation to be inspected
by an Authorized UPS Service Engineer at the time of UPS startup.


