


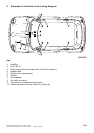


EN/8
Retrofit/installation kit No.: 82 83 0 136 491
Installation instruction No.: 01 29 0 139 395 Status: 06.2001
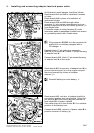
5. Installing amplifier
0
0
0
0
0
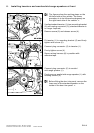
Unscrew Torx screws (1).
Remove connector (2), white 18-pin connector
housing, together with retaining fixture from
carrier (5).
Remove sticker (3) and clean adhesion point
with spirits.
Cut out mounting bracket for controls (4) in
marked area (arrows)!
3
0
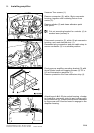
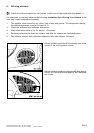
Disconnect connector (2), white 18-pin connector
housing, and route behind strut (1).
Reconnect plug connection and use cable strap to
secure connector (2) in a suitable position.
0
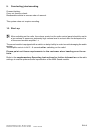
Firmly secure amplifier mounting bracket (3) with
three fillister head self-tapping screws (2) 3.5 x
9.5 as illustrated on amplifier (1).
Remove protective film from adhesive strip (4).
0
Attach branch
A4
, 25-pin socket housing, of adap-
ter lead
A
to connector strip (a) and, using a slot-
ted screwdriver (b), press in the direction indicated
by the arrow until it can be heard to engage in the
amplifier housing.
A4
a
A4
A
b
F 53 0025 M