


Disconnect the negative battery terminal to
prevent an accidental short circuit. Remove
the ashtray. Unclip the radio trim bezel and
disconnect the wiring. Remove (4) Phillips
screw
s securing the factory head
unit/cupholder assembly, slide the assembly
out and disconnect the wiring.
Disconnect the negative battery terminal to
prevent an accidental short circuit. Unclip
the radio trim bezel (upper dash). Remove
(4) Phillips screws from the factory head
unit, slide the unit out and disconnect the
wiring. Remove the ashtray and unclip the
trim bezel (lower dash). Remove (4) Phillips
screws from the factory pocket/cupholder
assembly and remove the assembly. (Metra
recommends
ordering the 88-00-8000 or
88-00-9000
to fill the space left in the upper
dash
location).
Locate the faceplate supplied with the
aftermarket head unit. Place the faceplate
into the recessed opening in the Radio
Housing.
If the faceplate fits easily into the
opening with no interference, leave the
Housing intact. If the faceplate does NOT fit
easily into the opening, trim away the ribs
located on the top and bottom of the opening
("A").
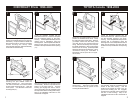
Convert the Radio Housing by cutting and
removin
g the pins located under the
equalizer opening ("A"). Trim no less than
1/8"
and no more than 1/4" from the bottom
of each upper mounting tab ("B"). Snap the
Prizm
Spacers onto the back of the lower
mounting tabs ("C").
Remove the cupholder from the factory head
unit assembly. Slide the cupholder into the
bottom of the Radio Housing until the
locating pins engage the slots in the kit.
(Once the locating pins are engaged, PUSH
the cupholder into the Housing until it stops).
Skip to the Installation Instruction for ALL
VEHICLES on Page #3.
Remove the cupholder from the factory head
unit assembly. Slide the cupholder into the
bottom of the Radio Housing until the
locating pins engage the slots in the kit.
(Once the locating pins are engaged,
maneuver the cupholder until it is flush with
the face of the Housing). Skip to the
Installation Instruction for ALL VEHICLES on
Page #3.
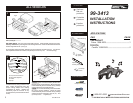
CHEVROLET Prizm 1998-2003 TOYOTA Corolla 1998-2002
1 1
4
4
2 2
3
1
2
Locate the v-cut along the top lip of the
Radio
Housing. Using the v-cut as a guide,
cut and remove the top portion of the
Housing as indicated above.
3
"A"
"A"
"C"
"A"
"B"
"C"