


From the advanced Personal Safety System
to the bountiful amenities, every Sable
seeks to provide you with safety, comfort
and enjoyment on the road. In order to help
you fully appreciate the countless features
of your new Sable, we invite you to explore
this easy-to-use Quick Reference Guide.
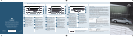
Using the image of the instrument panel
located in the center of the guide, locate
the feature you would like to learn more
about. Each numbered feature is briefly
described to the left of the instrument
panel image. For more information,
please consult your Owner’s Guide.
Headlamp and Panel Dimmer Control
Rotate clockwise to the first position to turn on the parking
lamps, instrument panel lamps, license plate lamps and tail lamps.
Rotate to the second position to also turn on the headlamps. While
the headlamps are on, pull the control toward you to activate the
foglamps (if equipped). Rotate counterclockwise to activate
autolamp (if equipped), which provides light-sensitive automatic on-off control of the exterior lights
and keeps the lights on for a fixed period of time after the ignition is turned OFF. Use the panel
dimmer control, located to the right of the headlamp control, to adjust the brightness of the
instrument panel during headlamp and parking lamp operation.
Turn Signal & Wiper/Washer Control
Push down to activate the left turn signal or up to activate
the right turn signal.
Rotate the end of the control away from you to increase or toward
you to decrease the speed of the wipers. Pushing the end of the
stalk briefly causes a single swipe (no wash). Push and hold to
activate the washer.
For extended wiper blade quality, occasional cleaning of the wiper blades is required.
Service Engine Soon Warning Lamp
Momentarily illuminates to ensure the system is functional. If the light comes
on after the engine is started, refer to your Owner’s Guide. To help prevent activation,
always secure your fuel cap by turning it clockwise
1
/
8 of a turn after it stops.
Please note that if the fuel cap is not properly installed, the "Check Fuel Cap" indicator will
also illuminate.
Power Adjustable Foot Pedals (if equipped)
Press and hold the rocker control to adjust the accelerator and brake
pedals toward you or away from you. Adjust the pedals only when the vehicle is
stopped and the gearshift lever is in the P (Park) position. The adjustment allows
for approximately three inches of maximum travel.
Hazard Flasher Control
Press to activate the hazard flashers. Press the control again to turn the
flashers off.
ABS Warning Lamp
Illuminates briefly when the ignition is turned to the ON position. In an
emergency, apply continuous force on the brake to prevent wheel lock when braking
on slippery surfaces – do not pump your brakes. Any pulsation or noise you may
feel or hear is normal.
Traction Control (if equipped)
This system helps your vehicle make better use of available traction,
especially on slippery road surfaces. The system defaults to ON, however,
should you become stuck, try switching the traction control system off. For more
information, please consult your Owner’s Guide.
Audio Systems
Please see reverse side for more details.
Automatic Climate Control System (if equipped)
Please see reverse side for more details.
Auxiliary Power Point
Located under the climate control on the lower portion of the instrument panel,
the auxiliary power point is an additional power source for electrical accessories.
Improper use of the power outlet can cause damage not covered by your warranty.
Gearshift/Overdrive Control
Overdrive is the normal drive position for the best fuel economy. Switch
to the second drive position only when driving with a heavy load, towing a
trailer up or down steep hills, or when additional engine braking is desired.
This vehicle is equipped with a brake-shift interlock feature that
prevents the gearshift lever from being moved from P (Park) when the
ignition is in the ON position unless the brake pedal is depressed. If your
vehicle is equipped with a console-mounted gearshift lever, you must also press the
thumb button on the side of the gearshift lever to move the gearshift lever from P (Park).
Speed Control (if equipped)
To operate, the speed control must be ON and the
vehicle's speed must be at or above 25 mph. To set a speed, press SET
+. To set a higher speed, press SET + again. To set a lower speed, press
CST–. Pressing RES will return to a previously set speed. To turn the
speed control off, press the OFF button or depress the brake pedal
to disengage.
Interior Trunk Control (if equipped)
Press to release the trunk. The control is located on the instrument
panel to the left of the steering wheel.
Brake Release
Pull the release lever to release the parking brake. To set the
parking brake, press the parking brake pedal down until the pedal
stops. The BRAKE warning lamp in the instrument cluster will illuminate
(when the ignition is turned ON).
Hood Release
Pull the hood release handle (rearward) located under the bottom
left corner of the instrument panel. Next, release the auxiliary latch located
under the front center of the hood, and then lift the hood until the lift cylinders
hold it open.
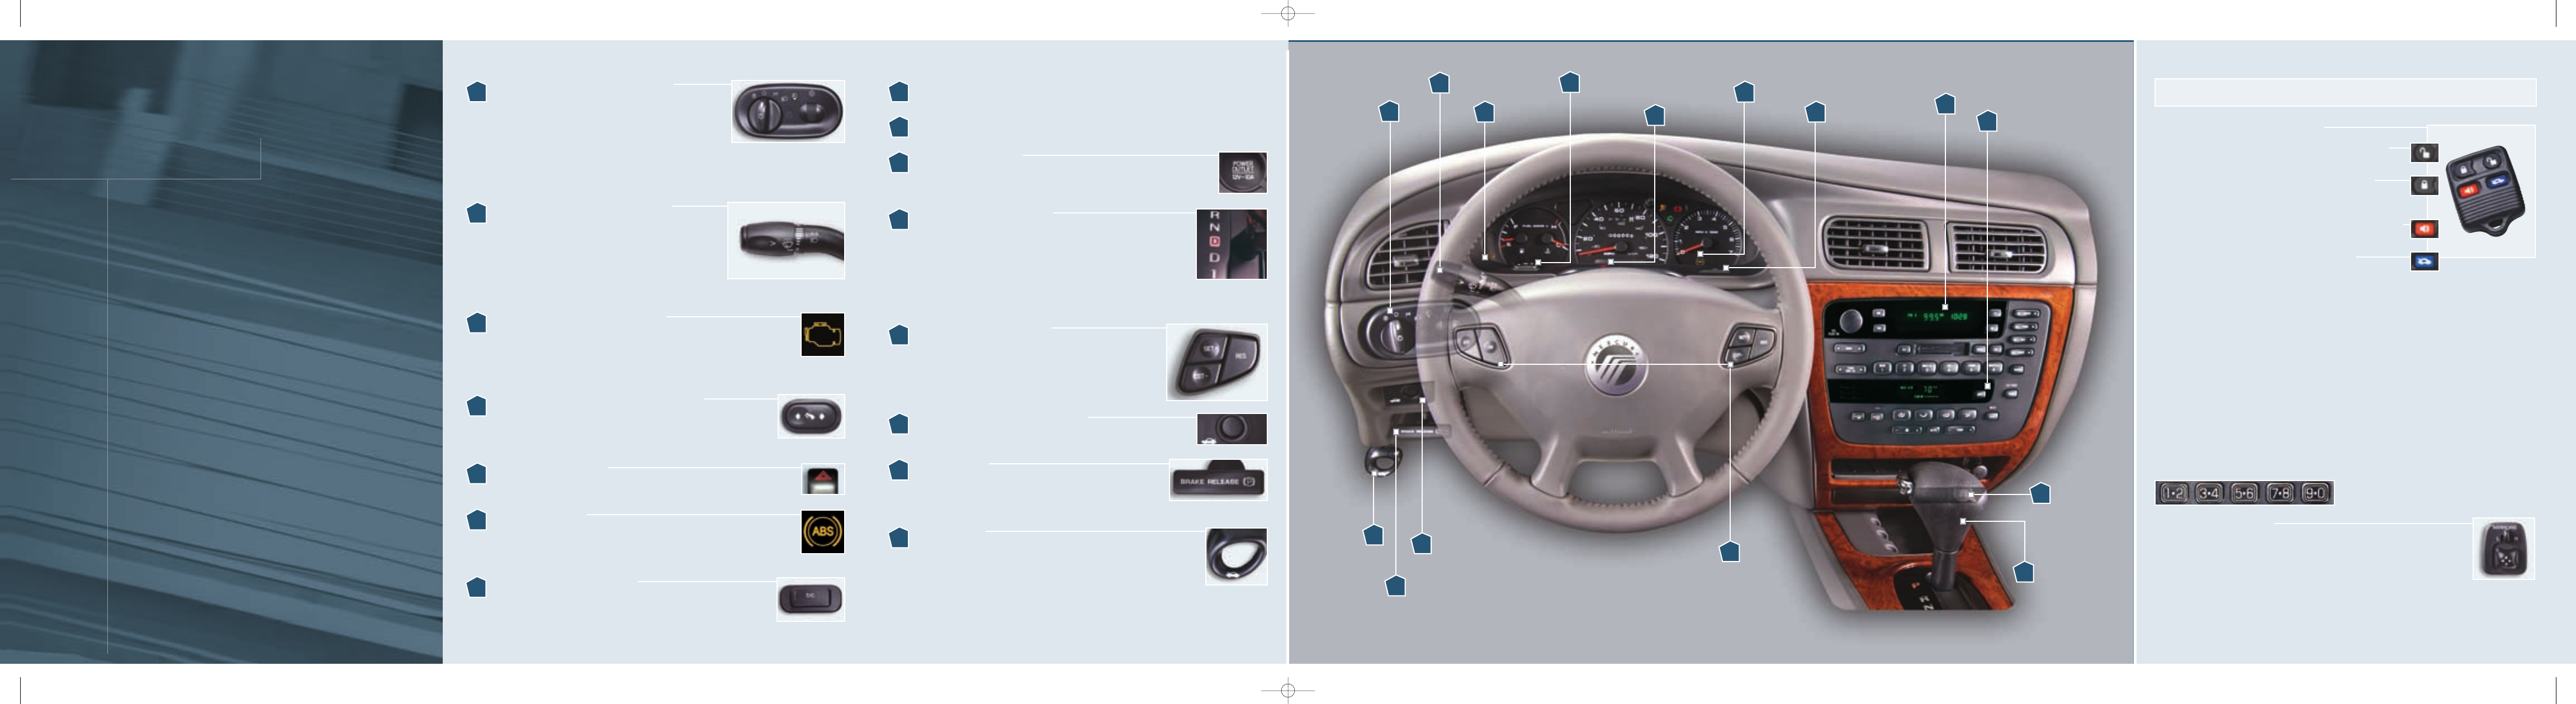
Remote Entry System (if equipped)
Press this control once to unlock the driver’s door, and
twice to unlock all doors and liftgate (wagon only).
Press this control once to lock all doors and liftgate
(wagon only). Pressing the control a second time will chirp
the horn to confirm that all doors are closed and locked.
Press this control to activate the panic alarm. To deactivate,
press the control again, or turn the ignition to ON.
Press this control to unlatch the trunk or liftgate
(wagon only).
The interior lights will turn on when the remote is used to unlock the doors or sound
the panic alarm. The interior lights will turn off if the ignition switch is turned to the ON
position, or after 25 seconds of illumination. The dome lamp control must not be set to
the OFF position for the illuminated entry system to operate. The remote-control entry
features only operate with the ignition in the LOCK position.
SecuriLock™ Passive Anti-Theft System
The SecuriLock passive anti-theft system is an engine immobilization system. This system
prevents the engine from being started unless a coded key programmed to your vehicle is
used. Please note that for security purposes, your coded keys cannot be copied. If you
would like spare coded keys, they can be purchased from your dealership.
Keyless Entry System (if equipped)
With this control you can unlock the trunk/liftgate or lock/unlock the doors without
using a key. First, enter your five-digit program code, which will unlock the driver's door
only, and then press the corresponding quick key:
Side View Mirror Control
Move the mirror selector control to L to adjust the left mirror, or R to
adjust the right mirror. Next, move the mirror control in the direction you
wish to tilt the mirror. Return the selector control to the center position
to lock the mirrors in place.
Additional Features
Service
Engine Soon
Warning Lamp
Turn Signal &
Wiper/Washer Control
Headlamp and
Panel Dimmer
Control
ABS
Warning
Lamp
Traction
Control
(if equipped)
Audio
Systems
Gearshift/Overdrive
Control
Automatic Climate
Control System
(if equipped)
Auxiliary
Power Point
Speed
Control
(if equipped)
Interior
Trunk Control
(if equipped)
1
MERCURY SABLE
2
3
7
8
9
10
11
12
1
7
8
9
10
12
13
14
15
2
3
4
5
6
Hood
Release
Brake
Release
13
Unlock all doors and the liftgate (wagon only)...3-4
Unlock the trunk or liftgate (wagon only)..........5-6
Lock all doors...............7-8 and 9-0 simultaneously
11
Power Adjustable
Foot Pedals
(if equipped)
4
14
15
6
5
Hazard
Flasher Control
18490 Sable_Ref_Guide 12/21/02 1:35 PM Page 7