


11
11
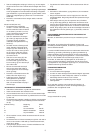
• Hang the heater head on the wall bracket. The mounting
bracket on the upper part of the rear of the heater head
should hang in the angled part of the wall bracket, and the
mounting screws (7) should be placed in the holes at the
bottom of the wall bracket and pressed down, until the heater
head is firmly fixed.
• Check that the patio heater is firmly fixed in place before
using it.
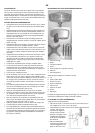
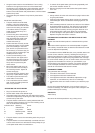
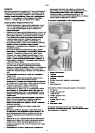
Model with stand (670-201)
• The patio heater should be sited
at least 1m from the nearest wall.
The heater head should be at least
30cm from the ceiling, and at least
1.8m above the floor. The patio
heater should stand firmly on a
horizontal floor.
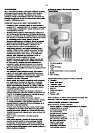
• Put the lower part of the stand (b)
in the base (a), lay the base on its
side, and fasten the stand to the
underside of the base with the
washer and screw (c).
• Position the base correctly so that
the stand is upright. Put the middle
part of the stand (d) in the lower
part, and fix it in place with one of
the screws (e). In the same way, fix
the upper part of the stand (f) in the
middle part with a screw.
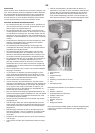
• Put the curved stand (h) in the
white socket on the upper end of
the stand. Pass the collar (g) down
over the curved stand and screw
firmly with into place using the
white socket.
• Mount the heater head on top of
the curved stand with the help of
the mounting screws. Tighten all
screws thoroughly.
• Check that the patio heater is stan-
ding firmly in place before using it.
• The cable may be secured in the
cable holder on the stand.
• The curved stand can be rotated
360° so that the heating head can
face in any direction.
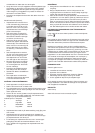
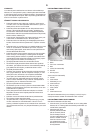
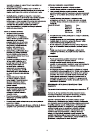
OPERATING THE PATIO HEATER
• Plug in and switch the power on.
• Set the heater head at the desired angle.
o If the patio heater has a base, then the height of the heater
head can be adjusted by loosening the collar and pulling the
curved neck up and down.
• The patio heater is switched on, setting selected and swit-
ched off by pulling the string (4). The current setting can be
seen in the function indicator (3):
Indicator value Meaning Power
0 Switched off 0
L Low power 650 W
M Medium power 1350 W
H High power 2000 W
• The patio heater is set to the next setting each time you pull
the string.
• The patio heater is not thermostatically controlled and conti-
nues to emit heat until it is switched off. Always keep an eye
on the patio heater while it is switched on.
• To switch off the patio heater, pull the string repeatedly until
the function indicator shows “0”.
• Remove the plug from the wall socket when patio heater is
not in use.
CLEANING
• Always switch off at the wall socket and unplug it before clea
-
ning the patio heater.
• Clean the patio heater using a damp cloth and, if necessary,
a little detergent. Never use abrasive cleaning agents or sol-
vents.
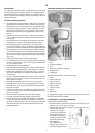
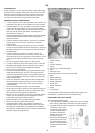
• After extended periods of use dust can collect on the reflector
and tubes behind the grille (2). The grille can be removed by
loosening the four small screws on the reverse side of the
heater head and carefully removing the grille. Dust can now
be brushed off with a soft brush. Never use compressed
air since damage to the quartz tubes or reflector can result.
Replace the grille and check it is secure.
INFORMATION ON DISPOSAL AND RECYCLING OF THIS
PRODUCT
Please note that this Adexi product is marked with this symbol:
This means that this product must not be disposed of together
with ordinary household waste, as electrical and electronic waste
must be disposed of separately.
In accordance with the WEEE directive, every member state must
ensure correct collection, recovery, handling and recycling of
electrical and electronic waste. Private households in the EU can
take used equipment to special recycling stations free of charge.
In some member states you can, in certain cases, return the used
equipment to the retailer from whom you purchased it, if you
are purchasing new equipment. Contact your retailer, distributor
or the municipal authorities for further information on what you
should do with electrical and electronic waste.
GUARANTEE TERMS
The guarantee does not apply:
• if the above instructions are not followed
• if the appliance has been interfered with
• if the appliance has been mishandled, subjected to rough
treatment, or has suffered any other form of damage
• if faults have arisen as a result of faults in your electricity sup
-
ply.
Due to the constant development of our products in terms of
function and design, we reserve the right to make changes to the
product without prior warning.
IMPORTER
Adexi Group
We cannot be held responsible for any printing errors.