


5
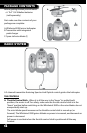
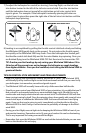
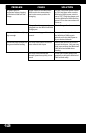
B. Tail Rotor Control Stick - Will spin the Whirlwind 3000 clockwise or counter
clockwise depending on the control input. Note: You can only use the tail rotor
control stick when throttle input is given.
C. Tail Rotor Trim Button - This adjusts for straight and stable flight when the tail
rotor control stick is in the neutral position.
D. Charging Cord - Located inside a compartment at the base of the transmitter and
used when charging the Whirlwind 3000.
E. Channel Switch - This switch is marked with the letters A and B to indicate the
channel that the Whirlwind 3000 is operating on. You must always make sure that
the channel switch is set to the correct channel or the Whirlwind 3000 will not
operate properly. Please see the Whirlwind 3000 or box for indication of the proper
channel.
F. Power & Charge LEDs - The bottom most LED illuminates green when the
transmitter is in the charging mode. When the top most LED illuminates red, the
transmitter power is ON and you have adequate power to control your Whirlwind
3000. If the red LED light becomes dark, flashes or does not glow on the transmitter,
the transmitter batteries are low and must be replaced. Never attempt to y when
the red LED light is dim, flashing or does not glow! This will result in loss of control
and a possible crash. Contact our service center at 201-662-8500 if you think there
may be a problem with your radio system.
G. Power Switch - Turns your controller on and off.
IMPORTANT NOTE: The transmitter has an auto shutoff feature. If the transmitter
power is left ON for 10 minutes without any control input or charger output,
the transmitter will turn off. This is to prevent the transmitter batteries from
discharging if the transmitter was left ON in error. You will need to flip the power
switch OFF and ON to reset the transmitter.
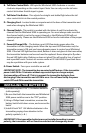
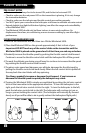
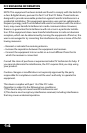
INSTALLING THE BATTERIES
Transmitter requires 6 “AA” 1.5V alkaline batteries
(sold separately)
1) Be sure that both the transmitter and Whirlwind
3000 power switches are in the “OFF” position.
2) Using a Philips Head screwdriver, unscrew the
battery hatch hold-down screw, and remove the
hatch.
3) Install 6 fresh “AA” 1.5V alkaline batteries in the
transmitter, paying close attention to the
polarity symbols. (+ & -)
IMPORTANT! If the transmitter batteries are not installed according to proper
polarity, the transmitter will not function and electrical damage may occur.