


PA RTS LIST - HEDB2
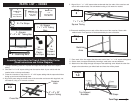
5. Align all four 1” x 1” x 23” square tubes underneath the four ends of the cross bar and
secure with medium bolts, nuts and washers using a 9/16 wrench or socket.
6. Place each stabilizing arm on each of the short arms of the cross bar. Secure with
medium bolts. Exact position will be determined by the size of the bike.
Step
5
Step
6
1” x 1” x 23”
Square Tubing
Stabilizing
Arms
1 - Cross Bar
6 - Tie Straps
Tire
Support
Brackets
4 - Square
1” x 1” x 23” Tubing
Bars
6
Small Size
1 1/2”
Carriage Bolts,
Nuts, Washers
2
Large Size
3 1/2”
Carriage Bolts,
Nuts, Washers
8
Medium Size
2 1/2” Carriage
Bolts, Nuts,
Washers
14 -
1” Square
Plastic
End Caps
1 - Square
2” x 2” x 23” Tubing Bar
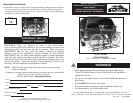
Assembly Instructions for Town & Country Bike Carrier
(Read Instructions and Follow Diagram)
1. To begin assembly, place the 14 plastic end caps into the open ends of the square
tubing.
2. Slide the 2” x 2” x 23” square tubing into the receiver hitch of your vehicle with the
smaller holes on the top and bottom.
3. Place the cross bar on top of the 2” x 2” x 23” square tubing with the square bolt holes
facing up and round holes facing down.
4. Align the 2 parts using the center holes of the cross bar and secure with large bolt, nut
and washer, using a 1/2” wrench or socket.
Receiver
Hitch
Cross Bar
Steps
2-4
2” x 2” x 23”
Square Tubing
7. Place each of the tire support brackets onto each of the 1” x 1” x 23” square tubing bars.
8. Secure each tire support bracket by inserting a small bolts, nuts and washers.
9. Attach two of the straps through the loops of the stabilizing arms. Attach the other four
straps to the tube where your bike’s back and front tires will be placed.
Steps
7-9
Tire Support
Brackets
Tie Straps
2 - Stabilizing Bars
Turn Page
4 -