


LTR-GPS Installation and Setup Guide
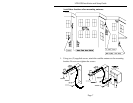
2. If you have Lathem’s Installation Kit (P/N GPS-INSTALL-TOOLS sold
separately), then connect the 9v battery plug to the LTR-GPS’ power jack and
the piezo beeper to the exposed shunt pins: Red to (+) and Black to (-).
Connect the antenna cable to the LTR-GPS Module. Hold the antenna in its
intended mounting position. If the antenna has exposure to the GPS satellites,
within three (3) minutes the LED will flicker and the beeper will ‘chirp’ once
per second. Afterwards, the LED should start flashing once per minute, and
the beeper will ‘beep’ for 1-second. These signals confirm proper antenna
placement and system functionality, prior to anchoring the antenna bracket.
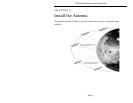
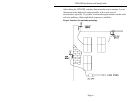
3. One method is to attach the bracket-mounted antenna to the outside of your
building or on the roof’s parapet with antenna facing skyward and unblocked
by architectural impediments. An alternate method is to mount the antenna
indoors, beneath a “skylight” window. Do not mount the antenna directly on
the roof surface where it might get submerged by storm water. Its enclosure is
rain-proof when properly installed, but is not designed for submersion.
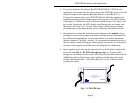
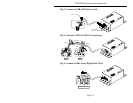
4. Insert supplied nylon tie-wrap through raised loop of the plastic clamp at the
end of the unit (Fig. 1). Do NOT close the tie-wrap yet. If plastic cable
clamps are not already secured to the LTR-GPS unit, then attach where shown
in Fig.1 by peeling off protective paper backing and adhering to the metal
surface with firm pressure. Allow the adhesive to set for 5 minutes before
securing the cables.
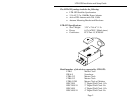
200 SELIG DRIVE SW, ATLANTA, GA 30336 USA
GPS RECEIVER / SYNCHRONIZER
(800) 241-4990
LATHEM TIME CORP.
LTR-GPS
Fig. 1 - LTR-GPS Unit
Page 8