


2
Manual No. 701-154M 06/25/07
Land Pride
Assembly Instructions
■
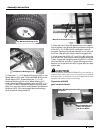
2. Place two 1" x 1-1/2" Machine Bushings (#19) on the
Wheel Mount (#17) shaft. Slide the Wheel (#18) on the
Wheel Mount (#17). Slide another two 1" x 1-1/2"
Machine Bushings (#19) on the Wheel Mount (#17)
shaft. Secure the Wheel assembly with one 5/32" x 1-1/
2" Cotter Pin (#20). Repeat this step on the other side.
Note: You may only need to install some of the Machine
Bushings (#19). Only use enough Machine Bushings
(#19) to ensure a snug wheel fit.
Two Machine Bushings (# 18)
Two Machine Bushings (# 18)
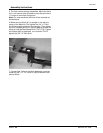
3. Place the Pivot Tube (#3) between the front support
rails as shown in the picture above and attach using one
of the 3/8" x 2-1/4" Bolts (#12) and Nylock Locknuts
provided. Tighten fully and then back off turn or just until
the Pivot Tube (#3) can rotate inside the support rails.
4. Install one of the 3/8" 2-1/2" Lock Pins (#8) in the rear
hole of the Pivot Tube (#3) as shown and then attach the
Trailer Tongue (#2) using the remaining 3/8" x 2-1/4" Bolt
(#12) and Nylock Lock Nut. Tightent securely and then
back off turn or just until the railer Tongue (#2) can rotate
side to side.
!
CAUTION
Be aware that the GOUND CLEARANCE of your machine is
reduced. This could result in a loss of control of your machine
and cause injury or death. Do not exceed 5 Mph with the hitch
installed and remove it before trail riding.
Square Nut ALWAYS
goes inside of channel.
Must Pivot At These two Points
Square NutAlwaysGoesInside
of Channel
One Flatwasher (#14)
Above The Eyebolt
(#8) & One Below