


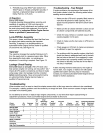

Maintenance Schedule
These required maintenance procedures should be performed at the frequency stated in the table. They should
also be included as part of any seasonal tune-up.
Every
100
Hours
I
Frequency
I
Maintenance Required
Change Oil.
Remove cooling shrouds and clean cooling areas’.
Daily or Before
Starting Engine
Everv200 Hours
Every 25 Hours
Check oil cooler fins, clean as necessary (if equipped).
Check spark plug condition and gap.
Change oil filter.
Check fuel gauge on propane
(LPG)
tank. Fill gasoline tank (dual-fuel units only).
Check oil level.
Check air cleaner for dirty’, loose, or damaged parts.
Check air intake and cooling areas, clean as necessary’.
Service precleaner element’.
Replace air cleaner element’.
Replace spark plugs.
Annually or
Every
300
Hours
Annually or
Every 500 Hours
Every 1500 Hours
Check all lines (high pressure/vacuum) including fittings for leaks.
Have electric starter serviced2.
Have lock-off/filter serviced3.
Have combustion deposits removed if using non-synthetic oil (not on dual-fuel engines).
Drain regulator of accumumulated fuel deposits (Nikki regulators only).
Have regulator disassembled, cleaned, and reset3.
‘Perform these maintenance procedures more frequently under extremely dusty, dirty conditions.
2Have a Kohler Engine Service Dealer perform this service.
3Must be performed by an Authorized Kohler Engine Dealer or qualified
L
P personnel
on&
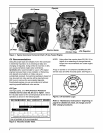
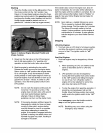
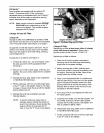
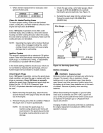
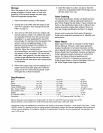
Check Oil Level
The importance of checking and maintaining the
proper oil level in the crankcase cannot be
overemphasized. Check oil
BEFORE EACH USE
as
follows:
1.
Make sure the engine is stopped, level, and is
cool
so
the oil has had time to drain into the sump.
2.
To keep dirt, debris, etc., out of the engine, clean
the area around the dipstick before removing it.
3.
Remove the dipstick; wipe oil off. Reinsert the
dipstick into the tube and press all the way down.
4.
Remove the dipstick and check the oil level.
The oil level should be up to, but not over, the
“F
mark on the dipstick. See Figure
6.
“F”
Mark
I
Operating
I
Figure
6.
Oil Level Dipstick,
5.
If the level is low, add oil of the proper type, up to
the
“F
mark on the dipstick. (Refer to “Oil Type”
on page
4.)
Always check the level with the
dipstick before adding more oil.
NOTE: To prevent extensive engine wear or
damage, always maintain the proper oil
level in the crankcase. Never operate the
engine with the oil level below the
“L”
mark or over the
“F’
mark
on
the dipstick.
9