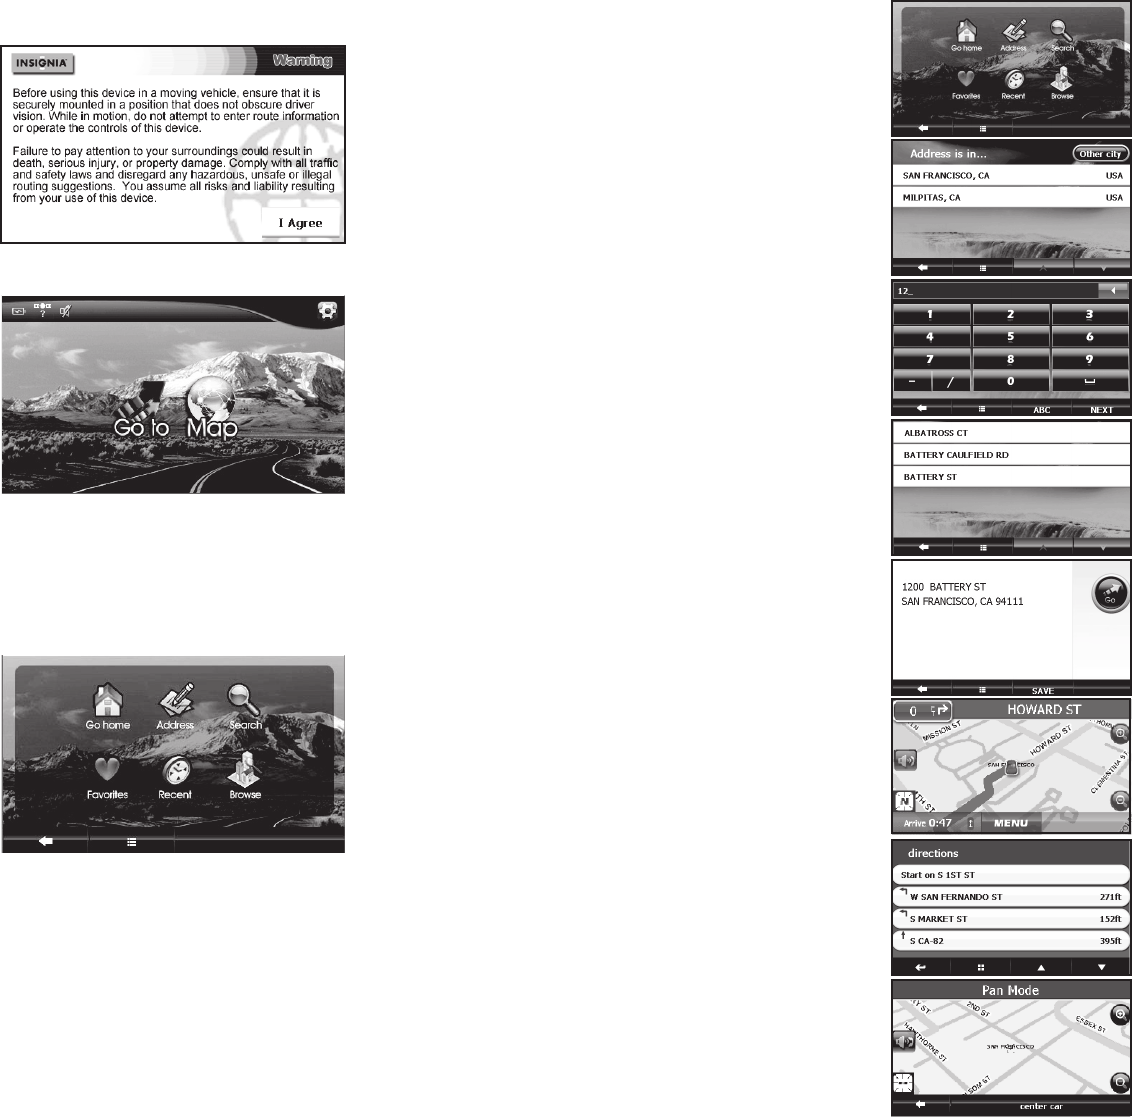
Creating a route to an address
1 Touch Go to on the Home screen. The Main menu opens.
2 Touch Address on the Main menu. The city in which you are
located is displayed, along with cities to which you have recently
navigated. If this is the rst time you are using the GPS, only the
name of the city of your current GPS location is shown.
3 Touch the name of the city to which you want to navigate.
The Enter House number keypad opens.
- OR -
To go to a city that is not listed, touch Other city to open the
Enter City name keypad, then enter the name of the city you want
and touch Next.
The Enter House number keypad opens.
4 Enter the house number, then touch Next. The Enter Street Name
keypad opens.
5 Enter the name of the street. After entering a few characters, the
GPS displays a list of street names that include those characters.
6 Touch the street name you want. If the street name is not on the
list, touch the back arrow and re-enter the street name, then
touch Next.
The address card for your destination opens.
7 Touch Go. The GPS calculates your route. When the calculation is
complete, the route is highlighted on the map view and the voice
prompts begin.
• To view the turn-by-turn maneuvers, touch the distance to next
maneuver button at the top left of the map view.
• To zoom in, touch the + button on the right side of the screen.
• To zoom out, touch the - button on the side of the screen.
• To pan across the map and view portions that are beyond the
limits of the screen, touch the map anddrag your nger. When
you do this, the GPS displays “Pan Mode” at the top of the
screen.
• To return to your last known location from Pan Mode, touch
center car at the bottom of the screen.
• To return to the Map view, touch the back arrow at the bottom
left of the screen.
ENGLISH 09-0446
© 2009 Best Buy Enterprise Services, Inc. All rights reserved. INSIGNIA is a trademark of Best Buy Enterprise Services, Inc. Registered in some countries. All other products and brand names are trademarks of their respective owners.
Getting started
Using your GPS
1 Turn on the GPS. When you turn it on for the rst
time, the Time zone screen opens.
2 Touch the time zone where you are currently
located, then touch OK. A splash screen appears for
a few seconds, then the safety Warning appears.
3 To continue on to the device features, touch
I Agree at the bottom right of the screen. The
Home screen appears.
Using the Home screen
From the Home screen, you can see where you are,
nd a route to a place of interest, or change settings.
• To see where you are, touch Map
- OR -
To nd a route:
1 Touch Go to. The Main menu opens.
2 Touch Address. A keypad opens.
3 Enter an address. The GPS automatically calculates
the best route choice to direct you to that address.
See Creating a route to an address in your User Guide for more detailed instructions.
• To change settings, touch the settings icon at the top right corner of the screen. To learn more about these
settings, see Setting up your GPS device preferences in your User Guide.
Using the Main menu
• Go home — touch to calculate a route to your
home address from wherever you are.
To learn more about setting your home address,
see your User Guide.
• Address — touch to navigate to an address or
intersection near the address.
• Search — touch to enter locations or points of
interest for directions to restaurants, theaters,
public services, and more.
• Favorites — touch to get directions from your location to places you have saved as Favorites.
• Recent — touch to navigate to your most recent destinations without having to enter them again.
• Browse — touch to search categories, including gas , restaurants, and other points of interest.
7
1
2
5
6
