OWNER’S MANUAL
INSTALLATION AND OPERATING INSTRUCTION
AGES 7 & UP
MODEL 88-306
883060001IWTI-03
TM
ROYAL NABOO STARSHIP
ANSWERING MACHINE
ROYAL NABOO STARSHIP
ANSWERING MACHINE
BATTERY SAFETY:
To reduce the risk of fire or personal injury, read and follow these instructions.
1. Use only the following type and size of battery:
5 x 1.5V, LR44 Button Cell.
2. Do not dispose of the battery in a fire. It may explode. Check with local codes for possible special disposal
instruction.
3. Do not open or mutilate the battery. Released electrolyte is corrosive and may cause damage to the eyes and
skin. It may be toxic if swallowed.
4. Exercise care in handling batteries to prevent shorting the battery with such conducting materials as rings, bracelets
and keys. The battery or conductor may overheat and cause burns.
5. Do not attempt to recharge the battery identified for use with this product. The battery may leak corrosive
electrolyte or explode.
6. Do not attempt to rejuvenate the battery identified for use with this product by heating it. Sudden release of
the battery electrolyte may occur causing burns or irritation to eyes or skin.
7. When replacing batteries, all batteries should be replaced at the same time. Mixing fresh and discharged batteries
could increase internal cell pressure and rupture the discharged battery(ies). (Applies to products employing more
than one separately replaceable primary battery).
8. When inserting batteries into this product, the proper polarity or direction must be observed. Reverse insertion
of batteries can cause charging, and it may result in leakage or explosion. (Applies to products employing more
than one separately replaceable primary battery).
9. Remove the battery from this product if the product will not be used for a long period of time (several months
or more) since during this time the battery could leak in the product.
10.Discard a "dead" battery as soon as possible since a "dead" battery is more likely to leak in a product.
11.Do not store this product, or the battery identified for use with this product, in high temperature areas. Batteries
that are stored in a freezer or refrigerator for the purpose of extending shelf life should be protected from
condensation during storage and defrosting. Batteries should be stabilized at room temperature prior to use after
cold storage.
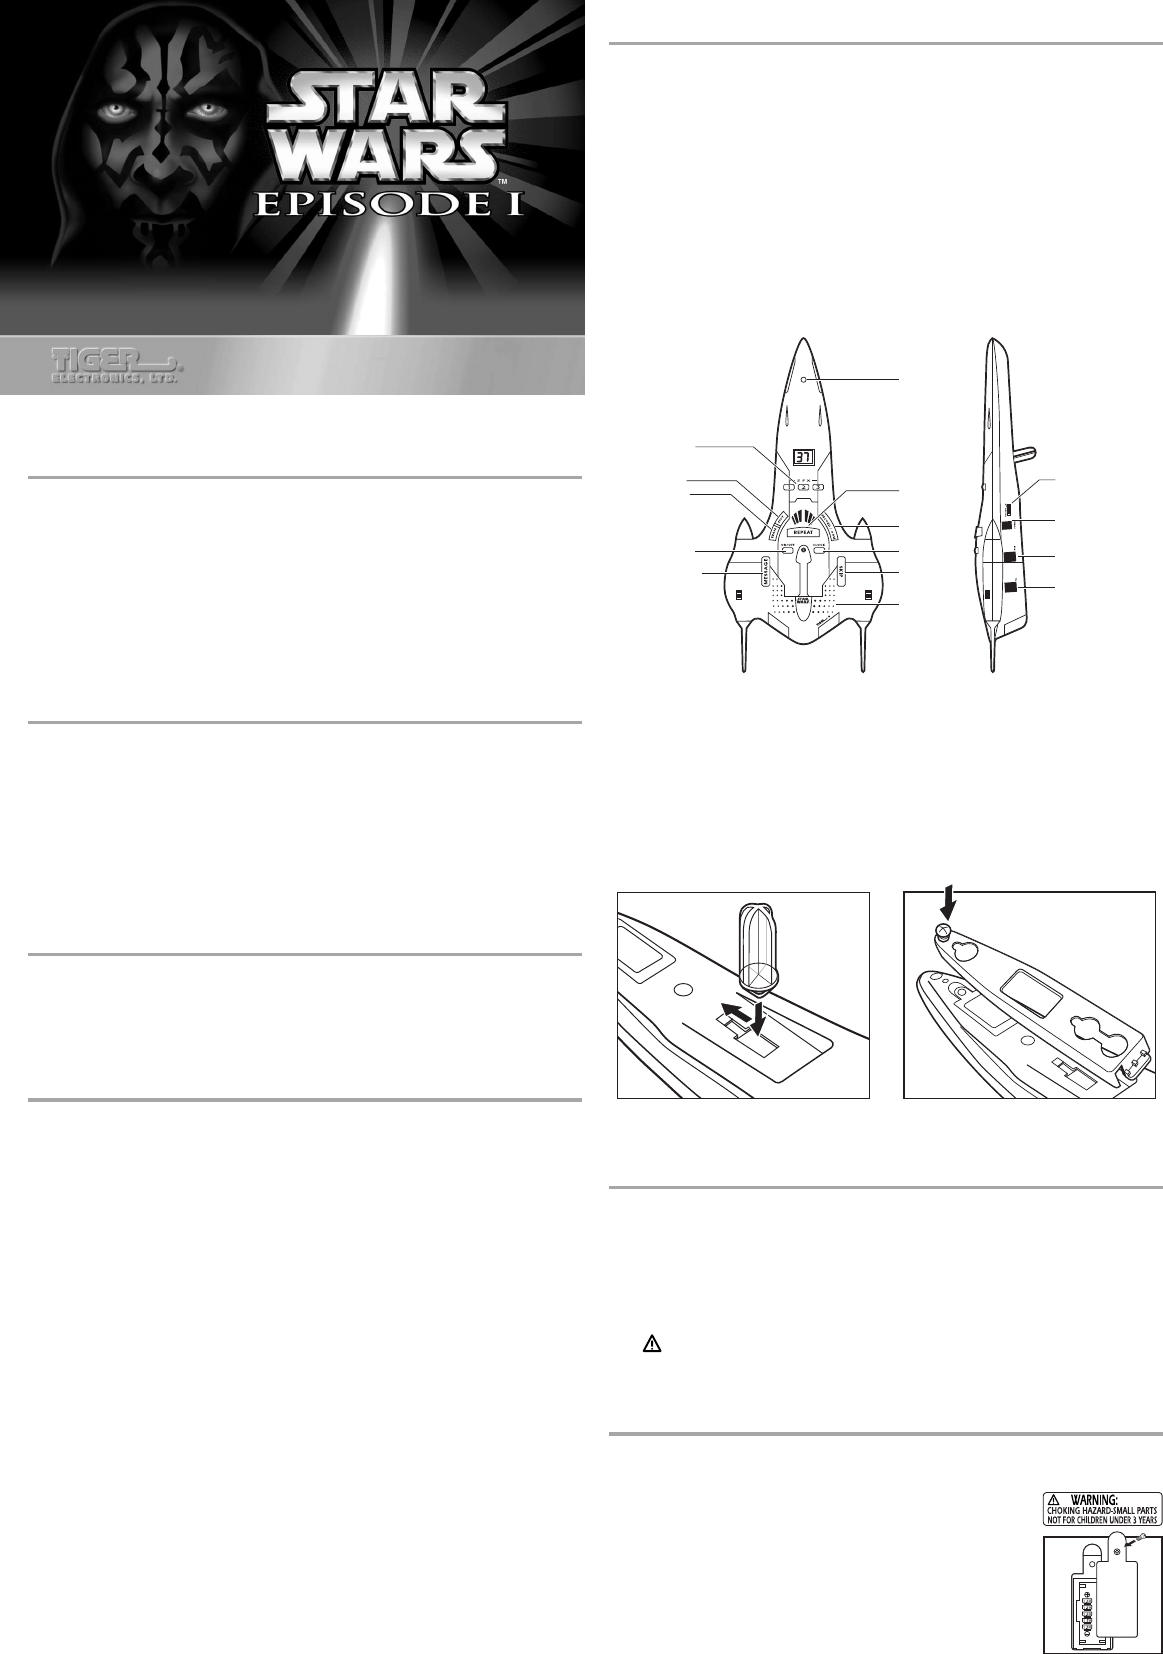
1. Speaker
2. Microphone - Record outgoing message on your Answering System
3. Message button - Press to retrieve incoming messages
4. Skip button - Press to skip forward to hear the next message during playback, and for day/time
adjustment.
5. Record button - Press to record OGM
6. On/Off button - Press to turn answering system On and Off, and pause during message playback
7. Repeat button - Press to repeat the same message during playback
8. Clock button - Press to announce the day/time, and to change clock setting mode
9. Erase - Press and delete all ICM
10.Stop - Press to stop message play or clock setting
11.Message Display - Illuminated digital display shows the number of recorded message and
indicates system status
12.SFX Buttons - Press to generate through the speaker, or record sound effect into your OGM.
13.Speaker Volume Control - Set Speaker Volume
14.AC Adaptor Connection Jack - connect to AC adaptor.
15. Telephone Connection Jack - Connect to telephone
16. Answering System Line Jack - Connect into your house telephone jack
17. Battery Compartment - For storing the 5x1.5V LR44 or G13A button cell used for memory back-up to save
messages in the event of power failure.
GETTING STARTED
Connecting your Answering System
1. Carefully remove your Answering System from its shipping carton. If there is any visible damage, do not attempt
to operate this equipment. Return it to place of purchase.
2. Check to be sure that you have all items that come with this answering system. You should have the answering
system, AC adaptor, standard telephone line cord, wall mounting bracket, clear table mount and Owner's Manual.
3. Insert one end of the telephone line cord into the line jack (marked LINE on the rear side of the Answering
System) and the other end into the house telephone jack.
4. Connect the telephone line cord of your telephone to the telephone connection jack (marked TEL) on the rear
side of the Answering System.
5. Insert the small plug on the end of the AC adaptor into the jack (marked POWER on the rear side of the
Answering System).
Note: Use only with a Class 2 power Source.
Input 120V A.C 60Hz
Output 9V A.C 4VA
6. Plug the AC adaptor into a standard 120V AC wall outllet. A beep will be heard. The message display will count
up from 0 to 15. A beep will be heard and the display will read "0" and "CL" alternatively.
7. Lift the handset of your telephone and confirm that you have a dial tone. ( If you do not hear a dial tone, review
steps 3 through 6 )
INSTALLATION OF BATTERY
The system uses 5x1.5V LR44 or G13A button cells as backup power for the digital memory to prevent loss of messages
during power failure. When the display reads "LO", you should install or replace with new button cells.
To install the batteries:
1. Remove the battery compartment lid by loosening the screw with a screw driver
2. Insert 5 pieces of button cell into the battery compartment with correct polarities.
3. Slide the battery compartment lid into the end slot, then press it down and tighten
the screw with a screwdriver.
TO ENSURE PROPER FUNCTION :
– DO NOT MIX OLD AND NEW BATTERIES.
– DO NOT MIX ALKALINE, STANDARD OR RECHARGEABLE BATTERIES.
– BATTERY INSTALLATION SHOULD BE DONE BY AN ADULT.
– NON-RECHARGEABLE BATTERIES ARE NOT TO BE RECHARGED.
– RECHARGEABLE BATTERIES ARE TO BE REMOVED FROM THE TOY BEFORE
BEING CHARGED (IF REMOVABLE).
– RECHARGEABLE BATTERIES ARE ONLY TO BE CHARGED UNDER ADULT supervision
(IF REMOVABLE).
– ONLY BATTERIES OF THE SAME OR EQUIVALENT TYPE AS RECOMMENDED ARE TO BE USED.
– BATTERIES ARE TO BE INSERTED WITH THE CORRECT POLARITY.
– EXHAUSTED BATTERIES ARE TO BE REMOVED FROM THE TOY.
– THE SUPPLY TERMINALS ARE NOT TO BE SHORT-CIRCUITED.
The Royal Naboo™ Starship Answering Machine is a replica of the ship used by the dignitaries of Naboo when they
travel on official business. Incorporated into the ship's design is a full-feature digital answering machine with three
sound effect keys that play five phrases of actual character speech from the movie allowing you to play them or
record them into your outgoing message.
SPECIAL FEATURES
This Digital Answering System uses the latest technology to provide you with a high-performance tool.
Your new Digital Answering System includes the following special features:
Fully Digital Answering System - Record and receive your messages on a digital voice chip for excellent sound
quality and reliability.
Sound Effects - 3 sound effect keys play 5 phrases of actual character speech.
Pre-recorded Outgoing Message (OGM ) - Automatically answer calls with the pre-record message if no personal
outgoing message is recorded.
Personal Outgoing Message - Record your own message up to 60 seconds in length. Add one of the character
phrases to your message for even more fun.
Extra-long recording capacity - Provides 14 minutes of digital message recording capacity.
Day/Time Stamping - Day and time of the ICM will be announced at the end of each message.
Instant Message Playback - Messages will play back instantly, unlike conventional audiocassette tape systems which
require rewinding.
Instant Skip & Repeat Message - Skip to next message and repeat a message instantly during playback.
Multiple Remote Features - Control all functions of the Answering System -- On/Off, message playback, skip/repeat
and erase message, from a remote touch tone phone. Also change OGM and codes by remote control.
Call Breakthrough - Alert people in your home to answer your remote telephone call.
Memory Backup - saves all messages in the event of power failure. (when optional 5x1.5V LR44 button cell batteries
are installed.)
CONTENTS
Care and Maintenance
Important Safety Instructions
Battery Safety
Location and Function
Wall or Table Mount Assembly
Getting Started
Installing the Batteries
Setting the Clock
Answering System Operation
Preparing for use
Turning the Answering System On and Off
Recording Your Outgoing Message ( OGM )
Checking Your Outgoing Message and Display
Automatic Call Termination
IMPORTANT SAFETY INSTRUCTIONS
When using your telephone equipment, basic safety precautions should always be followed to reduce the risk
of fire, electric shock or injury to persons, including the following:
1. Read and understand all instructions.
2. Follow all warnings and instructions marked on the product.
3. Unplug this product from the wall outlet before cleaning. Do not use liquid cleaners or aerosol cleaners. Use a
damp cloth for cleaning.
4. Do not use this product near water, for example, near a bath tub, wash bowl, kitchen sink, or laundry tub, in a
wet basement, or near a swimming pool.
5. Do not place this product on an unstable cart, stand, or table. The product may fall, causing serious damage to
the product.
6. Slots and openings in the cabinet and the back or bottom are provided for ventilation and to protect it from
overheating. These openings must not be blocked or covered. Ventilation slots should never be blocked by
placing the product on a bed, sofa, rug, or other similar surface. This product should never be placed near or
over a radiator or heat register. This product should not be placed in a built-in installation unless proper ventilation
is provided.
7. This product should be operated only from the type of power source indicated on the label. If you are not sure
of the type of power supply to your home, consult your dealer or local power company.
8. (If provided with a grounded type attachment plug) - This product is equipped with a three wire grounding type
plug, a plug having a third (grounding) pin. This plug will only fit into a grounding type power outlet. This is a
safety feature. If you are unable to insert the plug into the outlet, contact your electrician to replace your obsolete
outlet. Do not defeat the safety purpose of the grounding type plug. (If provided with a polarized attachment
plug) - This product is equipped with a polarized line plug (a plug having one blade wider than the other) This
plug will fit into the power outlet only one way. This is a safety feature. If you are unable to insert the plug fully
into the outlet, try reversing the plug. If the plug still does not fit, contact your electrician to replace your obsolete
outlet. Do not defeat the safety purpose of the polarized plug.
9. Do not allow anything to rest on the power cord. Do not locate this product where the cord will be damaged
by persons walking on it.
10.Do not overload wall outlets and extension cords since this can result in the risk of fire or electric shock.
11.Never push objects of any kind into this product through cabinet slots since they may touch dangerous voltage
points or short out parts that could result in a risk of fire or electric shock. Never spill liquid of any kind on the
product.
12.To reduce the risk of electric shock, do not disassemble this product. Take it to a qualified serviceman when
service or repair work is required. Opening or removing covers may expose you to dangerous voltages or other
risks. Incorrect re-assembly can cause electric shock when the appliance is subsequently used.
13.Unplug this product from the wall outlet and refer servicing to qualified service personnel under the following
conditions:
A. When the power supply cord or plug is damaged or frayed.
B. If liquid has been spilled into the product.
C. If the product has been exposed to rain or water.
D. If the product does not operate normally by following the operating instructions. Adjust only those controls
that are covered by the operating instructions. Improper adjustment of other controls may result in damage and
will often require extensive work by a qualified technician to restore the product to normal operation.
E. If the product has been dropped or the cabinet has been damaged.
F. If the product exhibits a distinct change in performance.
14.Avoid using a telephone (other than a cordless type) during an electrical storm. There may be a remote risk of
electric shock from lightning.
15.Do not use the telephone to report a gas leak in the vicinity of the leak.
SAVE THESE INSTRUCTIONS
Speaker
Volume
ControL
AC Adaptor
Connection
Jack
Telephone
Connection
Jack
Answering
System
Line Jack
Speaker
Microphone
Message
button
Skip
button
Repeat
button
On/Off
button
Record
button
Clock
button
Erase
Stop
SFX
Buttons
Fig. 1 If you wish to place your answering machine on
a tabletop, insert the clear table mount peg into
the square slot located on the underside of the
unit. Slide the peg forward into the slot to secure
(Fig. 1).
Fig. 2 If you wish to mount the answering machine on
the wall, position the bracket as shown in the
illustration. Using the screws supplied, fasten to
the main unit to secure (Fig. 2)
Listening to your Message
To Pause Message playback
To Skip Message playback
To Repeat Message playback
To Erase Message
To Erase all Messages
To Save all Messages
Pin Security & Call Breakthrough ( CBT ) Codes
Power Failure Security
Remote Operation
Remote Operation through Touch Tone Phone
Access to your Answering System using
the Remote Security Code
Other Information
Problem Solving Guide
Care and Maintenance
FCC Requirements
CARE AND MAINTENANCE:
1. Parent should examine the unit and adaptor periodically, in case there is any damage, the toy must not
be used until that damage has been properly repaired.
2. Clean the unit with a soft, damp cloth.
3. Please do not put the unit in direct sunlight or near any source of heat.
4. Please remove the batteries if you won’t be using the unit for a long period of time.
5. Do not use any chemical solvent to clean the unit.
6. Don’t spill anything on the unit.
7. For indoor use only.
8. Do not immerse in water.
5 x “LR44”
OR “G13A”


