


SKU 98480 For technical questions, please call 1-800-444-3353. Page 2
ASSEMBLY INSTRUCTIONS
Read the ENTIRE IMPORTANT
SAFETY INFORMATION section at the
beginning of this document including
all text under subheadings therein
before set up or use of this product.
Assembly
A round 2-1/16” wide hole with at least 2-1/2” 1.
clearance behind is needed to install this
gauge.
At least 18 AWG stranded copper wire must 2.
be purchased for the installation of this
gauge.
Disconnect vehicle battery according to 3.
manufacturer’s instructions. Some vehicles
with air bags or other systems may require
precautions before disconnecting the battery.
Consult your vehicle’s service manual.
Move the cylinder selection switch to match 4.
the number of cylinders on the vehicle (4, 6,
or 8).
Route and secure wires as needed to attach 5.
the Gauge to the desired area; avoid sharp
edges and hot spots.
Night Lamp
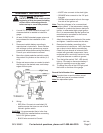
6. Wiring:
RED Wire: Connects to a switched 12V •
positive source that turns on and off with
vehicle’s ignition switch.
CAUTION: It is recommended that a inline fuse
(1Amp/3AG) be installed before connecting
to the 12V ignition system.
BLACK wire connects to Ground.•
WHITE wire connects to the dash lights.•
ORANGE wire connects to the 12V posi-•
tive post.
GREEN wire connects to the to the nega-•
tive side of the ignition coil.
Note: The wiring diagram is for a conventional
ignition system. If the tachometer is being
installed on a vehicle that has an electronic
ignition, or aftermarket high output ignition
box, it is recommended that the ignition box
manufacture be consulted for the correct
tachometer signal point.
Attach the bracket onto the back of the meter 7.
and tighten. Install the meter into the hole.
Reconnect the battery according to the 8.
manufacturer’s instructions. Verify that there
are no short circuits before reconnecting.
Check for loose strands of wire and direct
contact with grounded components. Use a
multimeter with a continuity function to help
verify that there are no shorts to ground.
Turn the ignition switch “ON”, LED should 9.
light up. Be ready to disconnect battery if
arcing or sparking occurs at the meter.
To change the color of the LED light, push 10.
the button on the face of the gauge.
Record Serial Number Here:
Note: If product has no serial number, record
month and year of purchase instead.
Note: No replacement parts.
REV 09e