


Page 12SKU 97964 For technical questions, please call 1-800-444-3353.
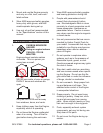
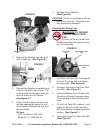
Replace the Drain Plug Bolt and 3.
Drain Plug Washer (69). Replace
the washer, if damaged. Tighten the
plug. (See Figure F.)
Rell the oil to the proper level follow-4.
ing the instructions under the “Start-
ing the Engine” section.
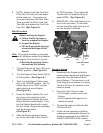
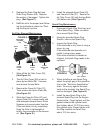
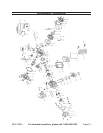
Air Filter Element Maintenance
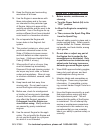
FIGURE G
FOAM
AIR FILTER
(27)
APRON
PLATE
(26)
AIR
FILTER
COVER
(28)
BOLT
(29)
BOLT
(29)
AIR FILTER
HOUSING
(24)
1. Wipe off the Air Filter Cover (28).
(See Figure G.)
The Air Filter Cover (28) is held in 2.
place by two Bolts (29). Unscrew
and remove the two Bolts.
Remove the Foam Air Filter (27). 3.
Then remove the Apron Plate (26).
(See Figure G.)
Wash the Foam Air Filter (27) and 4.
Apron Plate (26) in warm water and
mild detergent several times. Rinse.
Squeeze out excess water from the
Filter and allow it to dry completely.
Soak the Filter in lightweight oil
briey, then squeeze out the excess
oil. (See Figure G.)
Install the cleaned Apron Plate (26) 5.
and Foam Air Filter (27). Secure the
Air Filter Cover (28) with the two Bolts
(29) before use. (See Figure G.)
Spark Plug Maintenance
Disconnect Spark Plug Wire from end 1.
of the Spark Plug. Clean out debris
from around Spark Plug.
Using the provided Spark Plug 2.
Wrench, remove the Spark Plug.
Inspect the Spark Plug: 3.
If the electrode is oily, clean it using a
clean, dry rag.
If the electrode has deposits on it,
polish it using emery paper.
If the white insulator is cracked or
chipped, the Spark Plug needs to be
replaced.
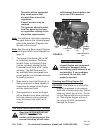
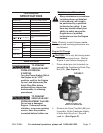
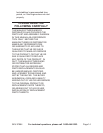
FIGURE H
.027” TO .031”
4. When installing a new Spark Plug,
adjust the plug’s gap to the specica-
tion on the “Technical Specication”
chart. Do not pry against the elec-
trode or the insulator, the Spark Plug
can be damaged. (See Figure H.)
Install the new Spark Plug or the 5.
cleaned Spark Plug into the Engine.
Gasket-style: Finger-tighten until the
gasket contacts the cylinder head,
then tighten about 1/2-2/3 turn more.
Non-gasket-style: Finger-tighten until
the Plug contacts the head, then
about 1/16 turn more.