


Page 5SKU 96406
For technical questions, please call 1-800-444-3353
BOLT-ON INSTALLATION
WARNING! BEFORE DRILLING HOLES, CHECK FOR ANY CHASSIS COMPO-
NENTS WHICH MAY BE INSIDE THE FRAME. LOOK FOR ELECTRICAL LINES
AND WIRES, GAS TANK, GAS LINES, WATER AND HOLDING TANKS, GENERA-
TOR FUEL LINES AND WATER HEATER LINES. MAKE SURE AREA IS CLEAR
OF THESE COMPONENTS BEFORE DRILLING.
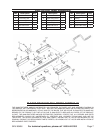
Hold the Jack against the frame and using the Mounting Brackets (9) as a template, mark
the locations of the 8 mounting holes on the RV or Trailer frame. Remove the Jack.
Use a center punch (not included) and hammer (not included) to mark the center of
each hole.
Use a drill (not included) to make a pilot hole 1/8”. Then use a 5/16” drill bit (not in-
cluded) to complete each hole. Use eight 3/8” tapping screws (not included) with eight
lock washers (not included) to attach the Jack to the frame.
WELD-ON INSTALLATION
Refer to “Installation” and steps 1 and 2 under “Bolt-on Installation” on pages 4 and 5
of this manual.
Weld at least four 1” welds on the Jack Mounting Brackets (9) when attaching to the
frame.
OPERATION
TRAILERS, TRAVEL TRAILERS AND 5TH WHEELS
Park on level ground.
Level trailer (travel trailer, 5th wheel) front and back with small carpenter’s level (not in-
cluded), or round bubble level (not included). Place leveling blocks (not included) in front
of one tire on trailer. Slowly pull forward to drive the trailer up onto the blocks. When
the trailer is level, stop and block all tires to keep from rolling forward or backward.
Using Handle Wrench (16) lower the Scissors Jack on the lowest side first to get level.
Use Jacks on opposite sides for best stabilization.
After Jack makes firm contact with ground, turn Handle Wrench (16) twice to insure
Jack will not loosen from trailer during use.
NOTE: When RV or trailer will not be moved for several days, periodically check Jacks to be
sure they have not worked loose.
MOTOR HOMES
Park on level ground and level motor home front and back (see step 2 in previous sec-
tion).
1.
2.
3.
4.
1.
2.
1.
2.
3.
4.
1.