


SKU 93341 For technical questions, please call 1-800-444-3353. Page 4
Installation
1. Secure the unloaded trailer with wheel chocks (blocks) on a hard, flat surface capable of supporting the
weight of the trailer, Trailer Spare Tire Carrier and required tools.
2. Raise the trailer tongue and secure it with two supports, one on each side of the trailer tongue.
3. Position the Mounting Bracket (2) in the correct location against the side of the trailer tongue.
Note: The spare tire will be located to the side of the trailer tongue.
Note: The angled Tire Mounting Plate should be angled upward (above) the position of the Trailer Tongue
Plate.
4. Attach the Mounting Bar (1) to the Mounting Bracket (2). Set the Mounting Bars (1) (containing six holes) flat
against the trailer tongue so that the edges of the Mounting Bars (1) curve out away from the trailer tongue.
Insert four Hex Bolts (3) through the Mounting Plates (1) as close to the trailer tongue as possible. Slide on
Washers (8), Spring Lock Washers (7) and thread on Nut (6). Use a torque wrench to tighten the Nuts (6) to 90
ft./Lbs.
5. Mount the tire on the Tire Mounting Plate with the valve facing outward so that the tire air pressure can be
checked at any interval.
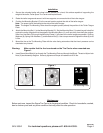
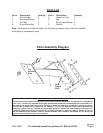
Warning: Make certain that the tire is centered on the Tire Carrier when mounted-see
Figure 1.
6. Insert Round Head Bolts (4) up through the Tire Mounting Plate and through the Wheel. Thread on Nylon Lock
Nuts (5)-see Assembly diagram. Securely tighten and torque all hardware to 90 ft./lbs.
Maintenance
Before each use, inspect the Spare Tire Carrier for its general condition. Check for loose bolts, cracked,
bent or broken parts and any other condition that may affect its safe operation.
Figure 1
unbalanced over Carrier balanced over Carrier Tire Mounting Plate
REV 01/06