


SKU 92426 For technical questions, please call 1-800-444-3353 Page 8
8. Do not throw the battery in a fire or in the general trash. Contact your local hazardous
waste disposal authority for proper disposal.
9. Do not drain the battery completely before recharging. Recharge fully.
Warning: The warnings, cautions, and instructions discussed in this instruction manual
cannot cover all possible conditions and situations that may occur. It must be understood
by the operator that common sense and caution are factors which cannot be built into
this product, but must be supplied by the operator.
Unpacking
When unpacking, check to make sure the following parts are included:
Battery Charger, L-
bracket, and Nut and Screw.
If any parts are missing or broken, please call Harbor Freight
Tools at the number on the cover of this manual.
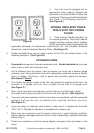
Installation
Caution: Before proceeding, set the vehicle emergency brake and remove the ignition
keys. Do not touch the battery poles with any conductive source.
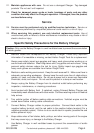
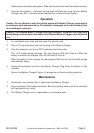
1. Mount the L-bracket (D) to the side of the Battery Charger
(A) using the supplied Screw (B) and Nut (C).
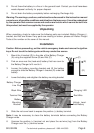
2. Find an area near the (lead-acid) battery that has room for
the Battery Charger to fit next to it.
3. Loosen the battery mounting bracket and lift the battery
enough to slide the Battery Charger L-bracket (D) under the
battery.
4. Lower the battery and retighten the battery mounting bracket.
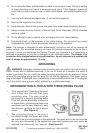
5. Slide the red cover back to expose the positive (+) battery terminal.
Note: It may be necessary to clean the battery terminals before connecting the Battery
Charger wires.
6. Unscrew the positive (+) terminal nut and place the red wire (lug) from the Battery
Charger over the (+) terminal screw.
(A)
(B)
(C)
(D)
Battery
Mounting
Bracket.
Vehicle Lead-
Acid Battery
Terminal Nut
Black Wire
Red Wire
Battery Charger
Charging LED
Battery Charger
Line Plug