


Page 3For technical questions, please call 1-800-444-3353.Item 4065
16. Do not allow any lubricants to make contact
between any part of the Ball Joint Kit and the
part being pressed. Lubricants of any type on
the above mentioned parts will diminish the
ability of the Ball Joint Kit to firmly and safely
grip and hold the Ball Joint Kit in position.
17. Examine the Ball Joint Kit for structural cracks,
bends, and any other condition that may affect
the safe operation of the tool. Do not use the
Ball Joint Kit even if minor damage appears.
18. Read and understand all instructions and safety
precautions as outlined in the manufacturer’s manual
for the vehicle you are servicing. Use the vehicle
manufacturer’s recommended ball joint press points.
19. The warnings, precautions, and instructions
discussed in this instruction manual cannot
cover all possible conditions and situations
that may occur. It must be understood by the
operator that common sense and caution are
factors which cannot be built into this product,
but must be supplied by the operator.
SAVE THESE INSTRUCTIONS.
Operating Instructions
Read the ENTIRE WARNING section at the beginning of this manual including all text under
subheadings therein before set up or use of this product.
Note: Read vehicle service manual to determine how to prepare the ball
joint for removal from a specific vehicle make/model.
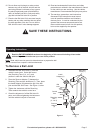
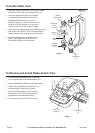
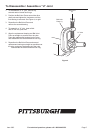
To Remove a Ball Joint
1. Assemble the Ball Joint Press (1) over the
vehicle’s control arm. Select the correct
size Receiving Tube (3, 4, or 5), and
position it under the vehicle’s ball joint.
2. Place the Remove Adapter (7) between the
Receiving Tube and the Jackscrew (2). Then, place
the Install Adapter (6) between the top of the ball
joint and the Ball Joint Press. See Figure 1, below.
3. Tighten the Jackscrew until the Receiving
Tube contacts the vehicle’s control arm.
4. Check the alignment of all the Ball Joint Kit
parts, and continue tightening the Jackscrew
until the vehicle’s ball joint is removed.
Ball Joint
Press (1)
Install
Adapter (6)
Ball
Joint
Jackscrew
(2)
Remove
Adapter
(7)
Receiving
Tube
(3, 4 or 5)
Control
Arm
Figure 1