


Page 5SKU 37481
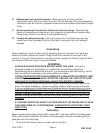
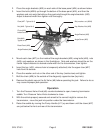
2. Place the angle brackets (#30) on each side of the base panel (#24) as shown below.
3. Insert the bolts (#30A) up through the bottom of the base panel (#24), and then the
washers and nuts onto the bolts as they protrude through the angle brackets (#30).
Adjust to desired width then tighten nuts thoroughly.
4. Mount each claw (#27) on the inside of the angle brackets (#30) using bolts (#48), nuts
(#49), and washers, as shown in the illustrations. Nuts and washers should be on the
inside. Adjust distance to desired cradle width for the transmission, then tighten.
5. Insert the key ( #28 - where chain is temporarily attached) into the upper claw (#27)
hole from the outside.
6. Place the washer and nut on the other end of the key (inside claw) and tighten.
7. Bolt the chain (#26) to the outside of the diagonally opposite claw (top hole).
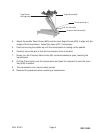
8. Remove the plastic cap on the Air Valve (#9) before operating the jack. Failure to do so
may cause improper jack operation.
Operation
1. Turn the Pressure Valve Knob (#6) counterclockwise to open, lowering tranmission
saddle. Turn Pressure Valve Knob clockwise to close.
2. With the vehicle properly secured and raised to the correct height to remove the
transmission, move the jack into position under the transmission.
3. Raise the saddle by moving the Pump Handle (#11) up and down until the claws (#27)
are just below the front and rear of the transmission.
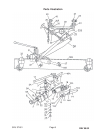
Base Panel (#24)
Angle Bracket (#30)
Claw (#27 - Typical of 4)
Angle Bracket (#30)
Bolt (#49 -
Typical of 4)
Nut (#48 - Typical of 4)
Key, Washer, Nut (#28)
Chain (#26)
bolted to claw
Bolt, washer, nut (#30A)
Angle Screw (#25)
REV 09/02