


Page 4
SKU 03343
Timing Light Basics
Automobile engines work by mixing air, fuel and a spark to ignite the fuel/air mixture,
creating an explosion, that powers the vehicle. Maximum power from the explosion must
be delivered to the engine at a precise instant. Attaining that precise instant is called
“Timing”. Timing is essential to fuel economy and power. Automobile engine
manufacturers determine the exact timing necessary for every engine they build. Normal
engine and ignition system wear causes the timing to change, reducing both fuel efficiency
and power..
Engine manufacturers use two terms when describing timing, “advanced” and
“retarded”. Timing is advanced when the spark occurs before the piston reaches the top of
a cylinder. Timing is retarded when the spark occurs after the piston has started down in
the cylinder. Timing is changed by adjusting the ignition distributor. To set timing, the
engine manufacturer provides “timing marks” on either the engines vibration damper, fan
pulley, or on the engine flywheel. Read your vehicle’s manual or contact the
manufacturer for the location of timing marks on your engine. Also, refer to your
vehicle’s manual or contact the manufacturer for the timing specifications for your
particular engine.
Preparation for timing
1. Locate your engine’s timing mark by referring to the vehicle’s engine manual or
contacting the manufacturer.
2. Refer to your vehicle’s manual or contact the manufacturer for the timing specifications
for your particular engine.
3. Start the engine and run the engine until achieving normal operating temperature. This
may take from 10-15 minutes. Stop engine.
4. If your vehicle specifications and instructions require it, locate the vacuum line that
attaches to the ignition distributor vacuum advance and disconnect the line and plug the
end of it. A golf tee or small pencil may be used to plug the line.
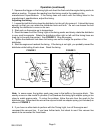
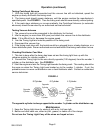
5. Connect the timing light by one of the two options below, as shown in FIGURE 1.
6. Start the engine and operate it at normal speed.
Warning! Be careful working around the engine while the engine is running. Moving belts
and the fan can cause severe injury if contacted. Metal engine parts release tremendous
heat. Do not come in contact with any part of the engine with your hands or body.
Operation
Note: The timing light must be connected to the spark plug for engine cylinder number 1.
Refer to the manufacturer’s specifications to determine the proper plug. See FIGURE 4.
Note: The Inductive Clamp (#4) is used to pick up the spark through the wire or by clamping
directly to the plug, as shown in FIGURE 1.
Inductive
Clamp
Inductive
Clamp
Black Clamp
(Negative)
Red Clamp
(Positive)
Black Clamp
(Negative)
#1 Spark Plug
Red Clamp
(Positive)
#1 Spark Plug
INDUCTIVE PICK UP
DIRECT HOOK UP
To Timing Light
To Timing Light
FIGURE 1