


Warning: The terms of the Garmin Warranty require that the power cable with bare wire leads be
installed by experienced installers having the proper knowledge of automotive electrical systems and
skill in the use of special tools or hardware required for installation.
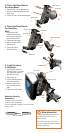
1: Connect Power to the Mount
Select a suitable and secure location to mount the zūmo on your motorcycle based on available
power sources and safe cable routing.
Bare wires with
inline fuse for
power connection
Power connector
About connecting audio
Standard jacks for microphone (2.5 mm) and audio out (3.5 mm) are located on the left side of
the mount (under a weather cap). When connecting your audio system to the zūmo, be sure to
consider the pathways needed to route the necessary cables. For information about hands-free
audio and phone options, refer to the zūmo 500/550 Quick Reference Guide and the zūmo 500/550
Owner’s Manual on disk.
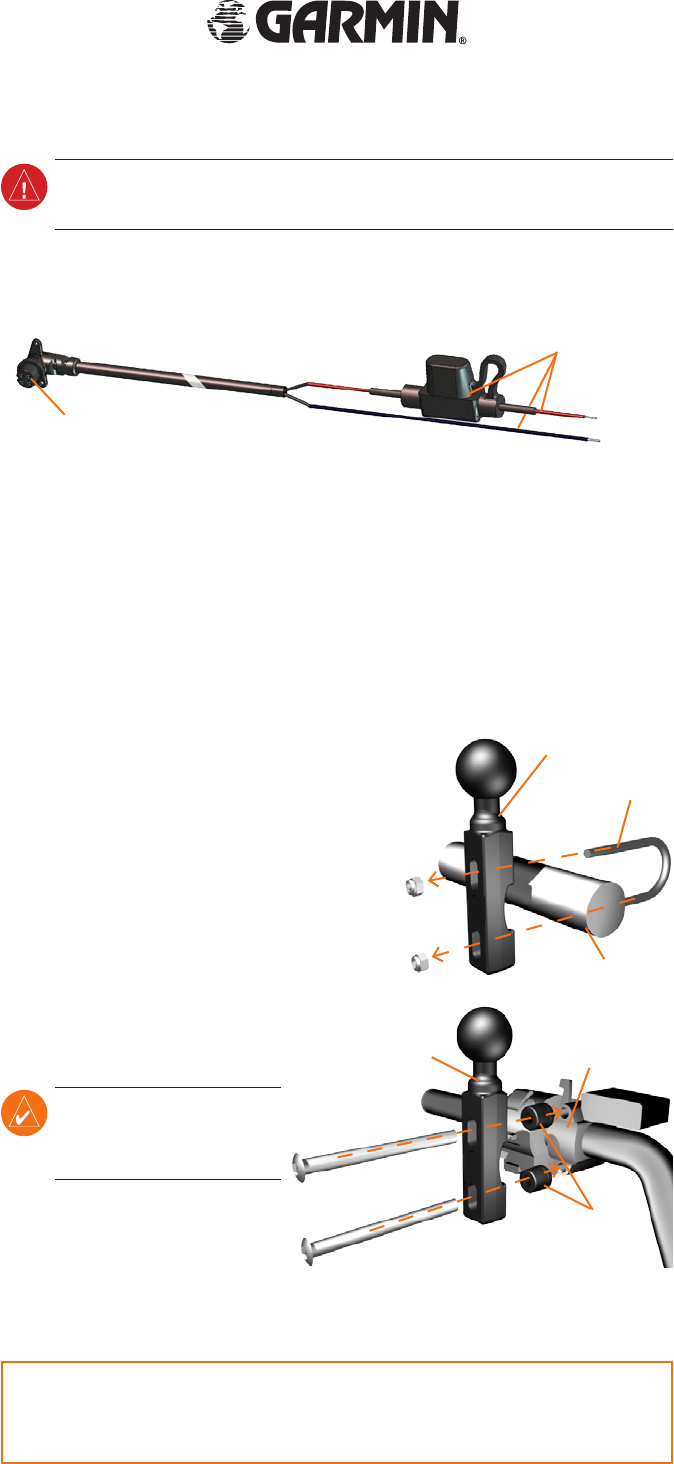
2: Install the Handlebar Base
The zūmo includes parts for two handlebar installation solutions. Custom mounts can require
additional hardware (www.ram-mount.com).
A) To install the U-bolt and handlebar base:
1. Place the U-bolt around the handlebar, and thread
the ends through the handlebar base.
2. Tighten the nuts to secure the base. Do not
overtighten.
B) To install the handlebar base to
the clutch/brake clamp bracket:
note: Both 1/4” standard and M6
bolts are included. Match the size of
the factory bolts on your clutch/
brake clamp bracket.
1. Remove the two factory bolts on your
clutch/brake clamp bracket.
2. Thread the new bolts through the
handlebar base, spacers, and clamp
bracket.
3. Tighten the bolts to secure the base.
zūmo
™
500/550 InstallatIon sheet
Clutch/brake
clamp bracket
Handlebar
base
Spacers
Handlebar base
Handlebar
U-bolt
Garmin
®
is a registered trademark and zūmo
™
is a trademark of Garmin Ltd. or its subsidiaries and may
not be used without the express permission of Garmin.
October 2006 Part Number 190-00697-03 Rev. C Printed in Taiwan