


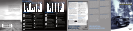

COCK PIT
5
ANTI-LOCK BRAKE SYSTEM (ABS)
WARNING LIGHT (if equipped)
The ABS light
illuminates briefly when the ignition
is turned on. If the ABS light remains on or continues
to flash, a malfunction has been detected, contact your
authorized dealer as soon as possible. Normal braking
(less ABS) is still functional unless the brake warning
light
is also illuminated.
6
SERVICE ENGINE SOON LIGHT
The Service Engine soon light
illuminates
briefly when the ignition is turned on. If it remains
on or is blinking after the engine is started, the On
Board Diagnostics System (OBD-II) has detected a
malfunction. Drive in a moderate fashion and contact
your authorized dealer as soon as possible.
7
MESSAGE CENTER (if equipped)
The message center displays important vehicle
information through a constant monitoring of vehicle
systems. The system will also notify you of potential
vehicle problems with a display of system warnings
followed by long indicator chime. Refer to your Owner’s
Guide for more information.
8
STEERING WHEEL CONTROLS
The appearance and functionality of your vehicle’s
steering wheel controls may vary according to your
option package. Refer to your Owner’s Guide for a
complete description of all possible options.
To set the speed control (if equipped), press and
release ON. Accelerate to the desired speed. Press
and release the SET + or SET - control. Take your foot
off the accelerator pedal. The speed control indicator
light
will illuminate in the cluster. To set a higher
speed: press and hold SET+ until the desired speed is
reached, or briefly press SET+ to increase the speed
by small amounts. To set a lower speed: press and
hold SET- until the desired speed is reached, or briefly
press SET- to decrease the speed by small amounts.
Press RESUME to return to the previously set speed.
To turn speed control off, depress the brake pedal or
press OFF.
Press – VOL + to decrease/increase the audio volume.
Press
to access the previous/next preset radio
station, CD track or preset satellite radio channel
(if equipped).
Press
to activate the voice recognition system.
Refer to your SYNC or Navigation supplement (if
equipped) for more information.
Press MEDIA repeatedly to scroll through all possible
media sources (AM, FM1, FM2, CD ... etc ).
Press
to answer a call if equipped with SYNC. Press
and hold to end a call. Refer to your SYNC supplement
for more information.
9
ELECTRONIC SHIFT 4WD SYSTEM
(if equipped)
Your vehicle may be equipped with an electronic shift
4WD system which allows you to choose between
2WD High, 4WD High or 4WD Low. Choose 2H
(2WD High) to provide power to the rear wheels
only – used mainly for street and highway driving. This
mode provides optimal smoothness and fuel economy
at high speeds. Choose 4H (4WD High) for extra
traction on snow or on icy roads or off-road situations.
(Not intended for dry pavement use.) Choose 4L (4WD
Low) when you need extra gearing to provide maximum
power to all four wheels at reduced speeds. This is
intended for use in situations such as deep sand, steep
grades or pulling heavy objects. Please refer to your
Owner’s Guide for more information.
10
ADVANCETRAC
®
WITH ROLL STABILITY
CONTROL™ (RSC
®
) STABILITY
ENHANCEMENT SYSTEM
Your vehicle is equipped with an AdvanceTrac
®
stability
system. This system focuses on three main areas:
Traction control (which helps avoid wheel spin and
loss of traction), Electronic Stability Control (which
helps avoid skids or lateral slides), and Roll Stability
Control™ (which helps avoid a vehicle roll-over). These
features work together to help you to maintain stability
and steerability of your vehicle during a variety of road
conditions. If your vehicle becomes stuck in the snow,
mud or sand, try turning off the AdvanceTrac
®
system
to allow wheel spin and help increase momentum to
dig the vehicle out. The system defaults to on and the
control will illuminate when turned off. Refer to your
Owner’s Guide for safety information and more details.
11
HAZARD FLASHER
Press to activate the front and rear direction signals
when your vehicle is disabled and is creating a safety
hazard for other motorists. Press again to turn off. The
hazard flashers will operate when the ignition is on
or off.
12
VOICE-ACTIVATED NAVIGATION SYSTEM
(if equipped)
Your vehicle may be equipped with a voice-activated
navigation system which integrates several functions
including voice recognition, destination entry, climate
control, and SIRIUS satellite radio into one easy-to-use
system, displaying them on an 8” touch screen
display. Note: Some features are unavailable while
driving. Refer to your navigation supplement for
more information.
1
HEADLAMPS, FOG LAMPS (if equipped),
PANEL DIMMER CONTROL
Turn the control one position to the right
to turn on the
parking lamps, instrument panel lamps, license plate lamps
and tail lamps. Turn the control to the second position on
the right to turn on the headlamps. Turn the control to
the third position to the right to activate the autolamp
feature, which automatically turns the exterior lamps on and
off, based on available daylight. Pull the control towards
you to activate the fog lamps (if equipped). (The fog lamps
will not operate when the control is turned off (O) or when
the high beams are on). Use the panel dimmer control
to adjust the level of brightness on the instrument panel
during parking lamp and headlamp operation. Move the
control to the full right position, past the detent, to turn on
the interior lamps. Move the control to the full left position,
past the detent, to turn them off.
2
POWER ADJUSTABLE PEDALS (if equipped)
Press the right side of the control
to move the pedals
closer to you or the left side of the control to move the
pedals away from you. The pedals should only be adjusted
when the vehicle is stopped and in Park (P).
3
MULTI-FUNCTION LEVER AND RAIN SENSING
WIPERS (if equipped)
Rotate the end of the control up to increase the speed
of the wipers and rotate down to decrease the speed of
the wipers. Briefly press the end of the stalk for a single
swipe of the wipers without washer fluid. A quick push
and hold results in three swipes with washer fluid while
a longer push and hold activates the wash pattern for up
to five seconds. To turn on the highbeams, push the lever
away from you. Pull the lever toward you to deactivate. Pull
the lever towards you briefly to activate the ‘flash to pass’
feature. Your vehicle may be equipped with Rain sensing
wipers which will turn on automatically when the vehicle
senses moisture on the windshield (provided the wiper
interval is set to any position other than off). The wiper
speed will be adjusted automatically based on the interval
setting and the moisture level on the windshield. Note:
Ensure that the wiper interval is set to off (turned down to
the lowest possible position) prior to entering a carwash.
4
AIRBAG READINESS LIGHT
The air bag readiness light illuminates briefly when the
ignition is turned on. If this light fails to illuminate, remains
on or continues to flash after the engine is started, contact
your authorized dealer as soon as possible. A chime will
also sound if a malfunction in the supplemental restraint
system is detected.
1
2
3
4
6
7
8
8
10
9
11
5
12
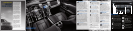
AUDIO
STEREO IN-DASH SIX CD/MP3 SATELLITE
COMPATIBLE SOUND SYSTEM (if equipped)
1
LOAD
To load a CD into the system, press LOAD. When
prompted, select the desired slot (1-6) using the memory
presets and insert the CD into the system. Press and
hold LOAD to autoload up to six discs. Insert the discs,
one at a time, when prompted. To access other loaded
CDs in the system: If you are already in CD mode,
simply press the memory preset (1-6) which corresponds
with the desired CD slot. If you are not already in CD
mode, press CD and then press the desired memory
preset (1-6).
2
DIRECT
Press DIRECT and then, using the memory presets
(0-9), enter in the numbers of the desired station, track,
MP3 folder or satellite channel (if equipped). Memory
Presets (0–9): You can save up to 30 radio stations (10
each in AM, FM1 or FM2) or 30 satellite radio channels,
if equipped (10 each in SAT1, SAT2 or SAT3) in your
memory presets. Tune to the desired station or channel
and simply press and hold a memory preset (0–9) until
sound returns.
3
SCAN
Press for a brief sampling of radio stations, CD tracks
or satellite radio channels (if equipped). Press again
to stop.
4
VOL (Power/Volume)
Press to turn ON/OFF. Turn to increase/decrease volume.
5
AM/FM
Press repeatedly to cycle through AM, FM1 and FM2
frequency bands.
SEEK - Press to access the
previous/ next strong radio station, CD track or satellite
radio channel (if equipped).
6
SIRIUS: Press SIRIUS repeatedly to cycle through
SAT1, SAT2 and SAT3 modes (satellite radio, if
equipped). To access more features, press MENU
(when satellite radio is active) and then press
to
cycle through additional options of SATELLITE RADIO
MENU, CHANNEL LOCKOUT MENU or SONG
SEEK MENU. For a full description of these options,
and SIRIUS Satellite radio, please refer to your
Owner’s Guide.
7
SOUND
Press SOUND repeatedly to cycle through: Bass, Treble,
Fade, Balance, and Speed Compensated Volume. When
the desired selection appears in the display, press
SEEK to make adjustments.
8
CLOCK
Press CLOCK to set the time. The display will read SET
TIME. Use the memory preset numbers (0–9) to enter
the desired time– hours and minutes. The clock will then
begin from that time.
1 2 3 4 5 76 8
THE FORD F-150
BUILT
FOR YOU
The new 2009 F-150 has been
redesigned - inside and out - to give
you unrivaled capability as well as
unprecedented choice with smart
and innovative features like the box
side step, tailgate step, SYNC,
voice-activated navigation, trailer
sway control and an integrated
trailer brake controller among
others. With a bold new design and
an interior that sets new standards
for comfort and flexibility, it is truly
the complete package. F-150’s
rock solid frame is an industry
first made of hyrdroformed and
high-strength steel. That, combined
with an all V-8 engine line up
gives you more power, better fuel
economy and means you’ll never
have to compromise. And if that isn’t
enough, your F-150 can also tow
and haul more than any other truck
in its class.
We’re setting new standards – from
the tough base XL workhorse to
the unrivaled luxury of the Lariat
and Platinum series, it is truly the
most comprehensive lineup of
half-ton trucks. The new 2009 Ford
F-150 – built for more, built Ford
tough – built for you.
This Quick Reference Guide was
designed to quickly acquaint you
with some of the features of your
new F-150. For more detailed
information and important safety
information, please refer to your
Owner’s Guide.
Use extreme caution when using any
device or feature that may take your
attention off the road. Your primary
responsibility is the safe operation of
the vehicle. Only use non-essential
features and devices when it is safe
to do so.