


2009 EXPLORER
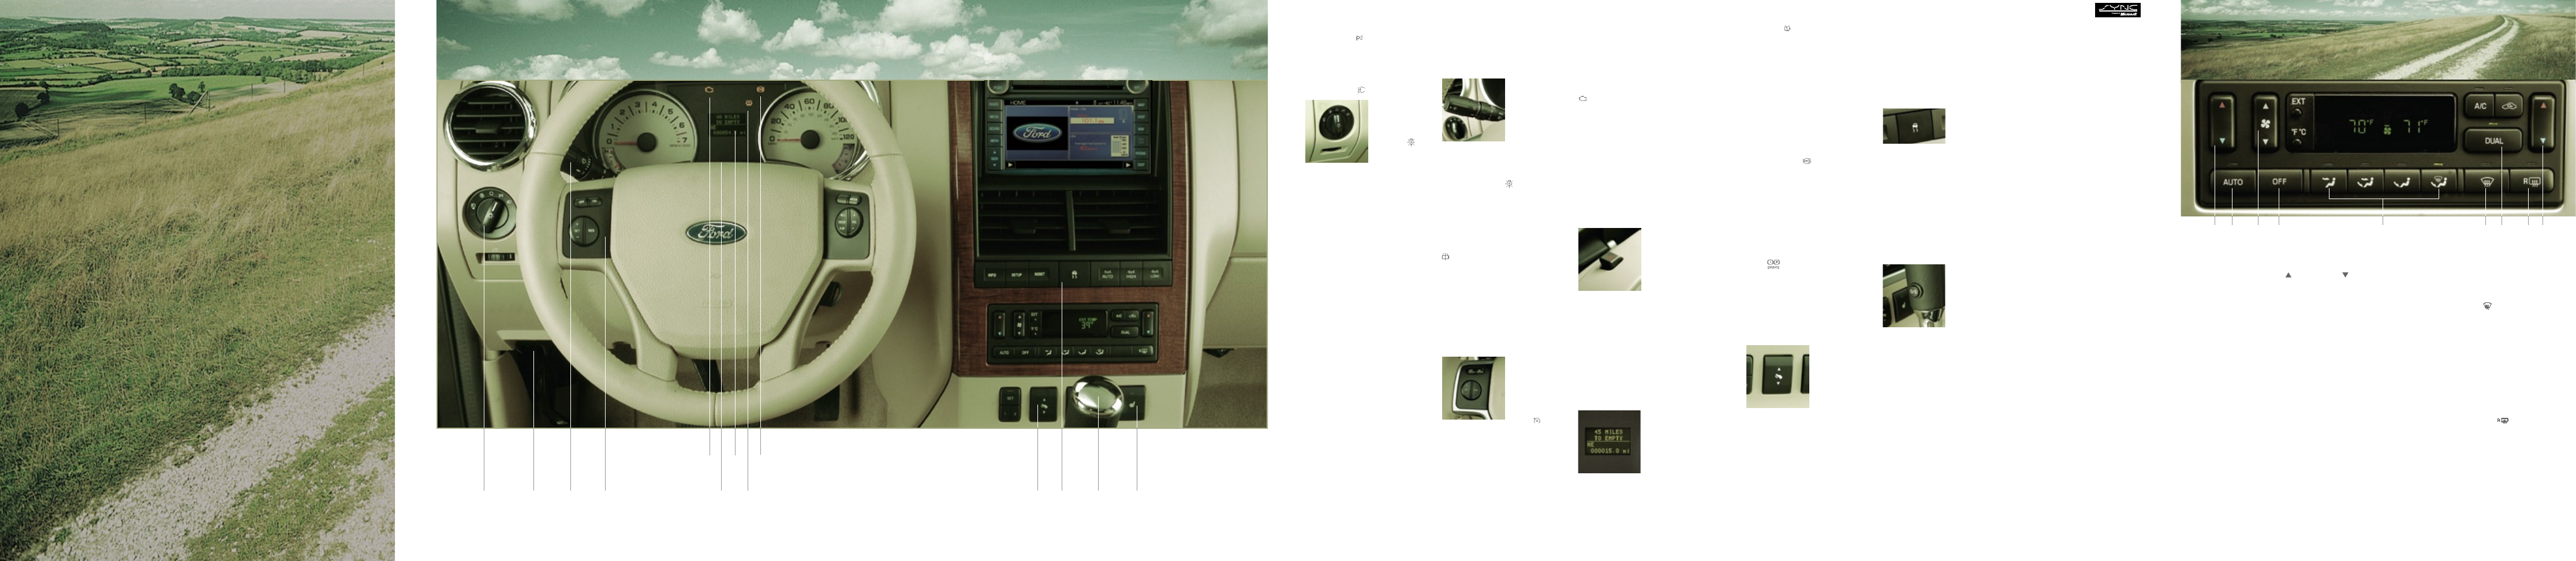
DUAL AUTOMATIC TEMPERATURE CONTROL (IF EQUIPPED)
A
A. Driver/Passenger Side Temperature
Control: Press to increase or decrease the
temperature on the driver or passenger side
of the vehicle. Pressing the passenger side
control will activate dual zone where the
driver and passenger are able to select their
own individual settings. If the passenger side
controls are not activated, the driver side
controls will determine the temperature
setting for the entire vehicle (single zone).
B. AUTO: Press to engage full automatic
operation. The system will automatically
determine fan speed, airflow distribution,
A/C on or off and either outside or
recirculated air to heat or cool the vehicle
to reach the desired temperature.
C. Fan Speed: Press to increase or decrease
fan speed.
D. OFF: Outside air is shut out and the fan will
not operate. Note: If your vehicle is equipped
with the auxiliary climate control system, the
auxiliary fan can still operate with the front
system off.
E. Manual Override Controls: Press to manually
determine where airflow is directed. To return
to fully automatic control, press AUTO.
F. Windshield Defroster : Outside air
is distributed through the windshield
defroster vents.
G. DUAL: Press to activate dual zone mode
where the driver and passenger have control
of their individual temperature settings.
Press again to return to single zone where
the driver’s settings will determine the
temperature for the entire vehicle.
H. Rear Window Defroster : Press to
clear the rear window of thin ice and fog.
The defroster turns off automatically after ten
minutes or when the ignition is turned off.
To manually turn off the defroster before ten
minutes have passed, press the control again.
B C D E F HG A
122552_09_Explorer_QRG_070108.indd 12 7/1/08 4:43:37 PM
8. Low Tire Pressure
Warning Light
This light illuminates when
the ignition is turned on. If
the light does not turn on or
begins to flash, contact your
authorized dealer as soon
as possible. For more
information, please refer
to Tire pressure monitoring
system (TPMS) in the Tires,
Wheels and Loading chapter
of your Owner’s Guide.
9. ABS Warning Light
The ABS light illuminates
briefly when the ignition is
turned on. If the ABS light
remains on or continues
to flash, a malfunction has
been detected. Contact your
authorized dealer as soon as
possible. Normal braking
(less ABS) is still functional
unless the brake warning
light is also illuminated.
10. Power Adjustable Pedals
(if equipped) Press the bottom
of the control
q
to move the
pedals closer to you or the top
of the control p to move the
pedals further away from you.
The pedals
should only
be adjusted
when the
vehicle is
stopped and
in Park (P).
11. AdvanceTrac
®
with Roll
Stability Control
™
(RSC)
Stability Enhancement system
Your vehicle is equipped with
an AdvanceTrac
®
stability
system. This system focuses
on three main areas: Traction
control (which helps avoid
wheel spin and loss of
traction), Electronic
Stability Control (which helps
avoid skids or lateral slides),
and Roll Stability Control
TM
(which helps avoid a vehicle
roll-over). These features
work together to help you to
maintain stability and
steerability of your vehicle
during a variety of road
conditions.
If your
vehicle
becomes
stuck in the snow, mud or
sand, try turning off the
AdvanceTrac
®
system to allow
wheel spin and help increase
momentum to dig the vehicle
out. The system defaults to on
and the control will illuminate
when turned off.
12. Overdrive Control Drive
with the vehicle in Overdrive
(D) for the
best fuel
economy.
You can
deactivate
overdrive by
pressing the
transmission control switch
on the side of the shift
handle. Use this during heavy
city traffic where you are
continuously shifting in and
out of overdrive, hilly terrain,
heavy loads, trailer towing
and when engine breaking
is required. To return to
overdrive, simply press the
transmission control
switch again.
13. Heated Seats (if equipped)
Your vehicle may be equipped
with heated seats. Press to
activate/deactivate.
SYNC
®
Your vehicle may
be equipped with SYNC
®
– a
hands-free communications
and entertainment system
with special phone and
media features. For more
information, please refer
to the SYNC
®
Supplement
or to the SYNC
®
section in
the Navigation Supplement.
Please also feel free to visit
www.SyncMyRide.com.
All Wheel Drive (AWD)
(if equipped)
Your vehicle may be equipped
with All Wheel Drive (AWD).
The AWD system is always
active and uses all four wheels
to power the vehicle, thereby
increasing traction and
enabling you to drive over
terrain and road conditions
that a conventional two-
wheel drive vehicle cannot.
The system is capable of
handling many different road
conditions, including street
and highway driving as well
as off-road conditions such
as deep snow, ice or shallow
sand. Note: If your vehicle
is equipped with AWD, a
spare tire of a different size
(other than the tire provided)
should never be used. Using
a different size could cause
the AWD system to stop
functioning and default to
front wheel drive. Refer to
your Owner’s Guide for
more information.
122552_09_Explorer_QRG_070108.indd 11 7/1/08 4:43:31 PM
1. Headlamps, Fog Lamps,
Panel Dimmer Control
Turn the control one position
to the right to turn on the
parking lamps, instrument
panel lamps, license plate
lamps and tail lamps. Turn the
control to the second position
on the right to turn on the
headlamps.
Turn the
control one
position to
the left to
activate the
autolamp
feature, which automatically
turns the exterior lamps on
and off, based on available
daylight. Pull the control
towards you to activate the
fog lamps. (The fog lamps will
not operate when the control
is turned off (O) or when the
high beams are on). Use the
panel dimmer control to
adjust the level of brightness
on the instrument panel
during parking lamp and
headlamp operation. Move
the control to the full right
position, past the detent, to
turn on the interior lamps.
2. Parking Brake Release
Pull the lever to release the
parking brake. Driving with
the parking brake engaged
will cause the brakes to wear
out prematurely and reduce
fuel economy.
3. Multi-function Lever
Rotate the end of the control
up to increase the speed of
the wipers and rotate down
to decrease the speed of the
wipers. Briefly press the end
of the stalk for a single swipe
of the wipers without washer
fluid. A quick push and hold
results in three swipes with
washer fluid while a longer
push and hold activates
the wash pattern for up to
five seconds. Pull the lever
toward you briefly to activate
the ‘flash
to pass’
feature.
For better
visibility,
your vehicle
will also
automatically turn on your
headlights (during daylight)
if your windshield wipers
and autolamps are on. To
operate your rear window
wiper, turn the rear wiper
control to the 1 or 2 speed
settings or O (off). For a
rear wash cycle, turn the
rear wiper control to the
position. To turn on the
highbeams, push the lever
away from you. Pull the lever
toward you to deactivate.
4. Speed Control
(if equipped)
To set the speed control, press
and release ON. Accelerate
to the desired speed. Press
and release the SET + control.
Take your
foot off the
accelerator
pedal. The
speed con-
trol indicator
light will
illuminate in the cluster. To
set a higher speed: press and
hold SET+ until the desired
speed is reached, or briefly
press SET+ to increase the
speed by small amounts. To
set a lower speed: press and
hold SET- until the desired
speed is reached, or briefly
press SET- to decrease the
speed by small amounts.
Press RES all U/C to return to
the previously set speed.
To turn speed control off,
press OFF.
5. Service Engine Soon Light
The Service Engine soon light
illuminates briefly when
the ignition is turned on. If it
remains on or is blinking after
the engine is started, the On
Board Diagnostics System
(OBD-II) has detected a
malfunction. Drive in a moderate
fashion and have your vehicle
serviced immediately by an
authorized dealer.
6. Hazard Flasher Control
The hazard flasher is located
on the
steering
column,
just
behind
the steering
wheel. Press
to activate all front and rear
direction signals. Press again
to deactivate.
7. Message Center (if equipped)
The message center
displays
important vehicle information
through a constant monitoring
of vehicle systems and will
display features such as: trip
odometer, compass, distance
to empty,
average fuel
economy and
a language
selector. The
system will
also notify you
of potential vehicle problems
with a display of system
warnings followed by a long
indicator chime.
122552_09_Explorer_QRG_070108.indd 10 7/1/08 4:43:23 PM
11 12 1310
122552_09_Explorer_QRG_070108.indd 9 7/1/08 4:43:14 PM
1 3
8
9
6
5
7
42
2009 EXPLORER
INSTRUMENT PANEL
122552_09_Explorer_QRG_070108.indd 8 7/1/08 4:43:06 PM
The 2009 Ford Explorer
was engineered with your lifestyle in mind – tough enough to take on what the
road ahead gives you, yet sophisticated enough to make the trip enjoyable. Please
take a few moments to familiarize yourself with your new Ford Explorer by reading
this Quick Reference Guide, which discusses features, specifications and general
information. For more detailed information including important safety information,
please consult your Owner’s Guide.
Use extreme caution when using any device or feature that may take your attention
off the road. Your primary responsibility is the safe operation of the vehicle. Only use
non-essential features and devices when it is safe to do so.
122552_09_Explorer_QRG_070108.indd 7 7/1/08 4:42:49 PM