


2009 ESCAPE
Your new Ford Escape is about to turn
your everyday driving experience into
an everyday driving adventure.
With its off-road capability and on-road
confidence, Escape can handle whatever
road life lays out before you. This Quick
Reference Guide was designed to help
you quickly get to know the many
features of your new Escape. For more
detailed
information and important
safety information, please refer to your
Owner’s Guide.
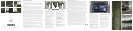
12 3 4 5 6 7 89 14131210 11
1. HEADLAMPS AND (FOG LAMPS [if equipped])–Turn the control one position to the right
to turn on the parking lamps, instrument panel lamps, license plate lamps and tail lamps.
Turn the control to the second position on the right to turn on the headlamps. Turn the
control one position to the left to activate the autolamp feature (if equipped), which
automatically turns the exterior lamps on and off, based on available daylight. Pull the control
towards you to activate the fog lamps (if equipped). (The fog lamps will not operate when the
headlamps are turned off or when the high beams are on).
2. MULTI-FUNCTION LEVER – Rotate the end of the control up to increase the speed of the wipers
and rotate down to decrease the speed of the wipers. Briefly press the end of the stalk for a
single swipe of the wipers without washer fluid. A quick push and hold results in three swipes
with washer fluid while a longer push and hold activates the wash pattern for up to five
seconds. A ‘courtesy wipe’ will automatically occur after the washing cycle to ensure that any
drips have been cleared from your windshield. For better visibility, your vehicle will also
automatically turn on your headlights (during daylight hours) if your windshield wipers and
autolamps (if equipped) are on. To operate your rear window wiper, turn the rear wiper
control to 1 (intermittent speed), 2 (normal speed), or off. For a rear wash cycle, turn the rear
wiper control to the position. To turn on the highbeams, push the lever away from you. Pull
the lever toward you to deactivate. Pull the lever toward you briefly to activate the ‘flash to
pass’ feature.
3. PANEL DIMMER CONTROL – Use the dimmer control to adjust the brightness of the instrument
panel and all applicable switches in the vehicle when the headlamps and parking lamps are on.
Move the control to the full upright position, past the detent, to turn on the interior lamps.
4. SPEED CONTROL – To set the speed control, press and release ON. Accelerate to the desired
speed. Press and release the SET+ control. Take your foot off the accelerator pedal. The speed
control indicator light will illuminate in the cluster. To set a higher speed: press and hold
SET+ until the desired speed is reached, or briefly press SET+ to increase the speed by small
amounts. To set a lower speed: press and hold SET- until the desired speed is reached, or briefly
press SET- to decrease the speed by small amounts. Press RSM to return to the previously set
speed. To turn speed control off, press OFF.
INSTRUMENT PANEL
5. SERVICE ENGINE SOON LIGHT –
The service engine soon light illuminates briefly when the
i
gnition is turned on. If it remains on or is blinking after the engine is started, the On Board
Diagnostics System (OBD-II) has detected a malfunction. Drive in a moderate fashion and contact
your authorized dealer as soon as possible.
6. LOW TIRE PRESSURE WARNING LIGHT – This light illuminates when the ignition is turned
on. If the light does not turn on or begins to flash,
contact your authorized dealer as soon as
possible.
For more information, please refer to Tire pressure monitoring system (TPMS) in the
Tires, Wheels and Loading chapter of your Owner’s Guide.
7. MESSAGE CENTER – (if equipped) The message center, displays important information through
a constant monitoring of vehicle systems. The system will also notify you of potential vehicle
problems with a display of system warnings followed by a long indicator chime. For more
information, please refer to your Owner’s Guide.
8. ABS WARNING LIGHT – The ABS light illuminates briefly when the ignition is turned on.
If the ABS light remains on or continues to flash, a malfunction has been detected.
Contact your
authorized dealer as soon as possible
. Normal braking (less ABS) is still functional unless the
brake warning light is also illuminated.
9. TILT STEERING WHEEL LEVER – Push the lever down to unlock the steering column. While the
lever is down, tilt the steering wheel to your desired position. Then, while holding the steering
column in place, pull the lever up to its original position to lock the steering column.
10. AUXILIARY POWER POINTS (12V) – The 12V power point outlets, located on the instrument
panel and the rear of the center console, are designed for accessory plugs only. Do not insert
any other object; damage may occur and blow the fuse.
11. ADVANCETRAC
®
WITH ROLL STABILITY CONTROL
™
(RSC
®
) STABILITY ENHANCEMENT SYSTEM –
Your vehicle is equipped with the AdvanceTrac
®
stability enhancement system. This system
consists of: Traction control, which helps avoid wheel spin and loss of traction, Roll stability
Control
™
, which helps avoid a vehicle roll-over and Electronic Stability Control, which helps
avoid skids or lateral slides. These features work together to help you to maintain stability and
steerability of your vehicle during a variety of road conditions. If your vehicle becomes stuck in
the snow, mud or sand, try turning off the AdvanceTrac
®
system to allow wheel spin and help
increase momentum to dig the vehicle out. The system defaults to on and the control will
illuminate when turned off. Refer to your Owner’s Guide for safety information and more details.
12. PASSENGER AIRBAG OFF – The passenger airbag off indicator light will illuminate when the
passenger’s front airbag is off. For additional information, please see your Owner’s Guide for
safety information and more details.
13. REVERSE SENSING – (if equipped) Your vehicle may be equipped with a reverse sensing
system which can warn you if there is a large object behind the vehicle that you may be unable
to see. The system will sound a warning tone that increases in frequency as the object gets closer
and will sound continuously when the object is less than 10 inches away. Refer to your Owner’s
Guide for safety information and more details.
14. AUXILIARY INPUT JACK – The auxiliary input jack provides a way to connect your portable
music player to the in-vehicle audio system. This allows the audio from a portable music player
to be played through the vehicle speakers. For more information, please see your Owner’s Guide.
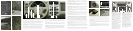
A. POWER SIDE VIEW MIRRORS – Rotate the control clockwise to adjust the right mirror, and
counterclockwise to adjust the left mirror. Then move the control in the direction you wish to
tilt the mirror. Return to the center position to lock the mirror in place.
B. COMPASS – (if equipped) The compass heading (N, NE, E, SE, S, SW, W or NW) is displayed
in the center stack display. The compass reading may be affected when you drive near large
buildings, bridges, power lines and powerful broadcast antennas. For more information, please
see your Owner’s Guide.
C. HAZARD FLASHER – Push the flasher control, located on the steering column, and all front
and rear direction signals will flash. Use it when your vehicle is disabled or is creating a safety
hazard for other motorists. The hazard flashers will operate when the ignition is in any position
or when the ignition is turned off.
FOUR-WHEEL DRIVE (4WD) SYSTEM – (if equipped) Your vehicle may be equipped with an
intelligent 4WD system that continuously monitors vehicle conditions and automatically adjusts
the power distribution between the front and rear wheels. The 4WD system is always active,
requires no input and is capable of handling all road conditions, including street and highway
driving as well as off-road and winter driving.
SATELLITE COMPATIBLE IN-DASH SIX-CD/MP3
RADIO (IF EQUIPPED)
A. LOAD – To load a CD into the system, press
LOAD. When prompted, select the desired slot
(1-6) using the memory presets and, when
prompted, insert the CD into the system. Press
and hold LOAD to autoload up to six discs.
Insert the discs, one at a time, when prompted.
B. ON/OFF/VOL – Press to turn on or off.
Turn to increase or decrease the volume.
C. DIRECT – Press DIRECT and then, using the
memory presets (0-9), enter in the numbers of
the desired station, track, MP3 folder (if
available) or satellite channel (if activated).
D. – Press to access special phone features
if equipped with SYNC. Refer to your SYNC
supplement for more information.
E. SCAN – Press for a brief sampling of radio
stations or CD/MP3 tracks. Press again to stop.
F. AM/FM – Press repeatedly to select AM, FM1
or FM2 frequency band.
G. CD – Press to enter CD/MP3 mode. If a disc
is already loaded into the system, CD/MP3 play
will begin where it ended last.
H. SEEK/TRACK – Press to access the
previous/next strong radio station, satellite
channel (if equipped) or CD track.
I. AUX – Press repeatedly to access LINE
(auxiliary audio mode), or SYNC (if equipped).
J. SIRIUS – Press repeatedly to cycle through
SAT1, SAT2 and SAT3 modes (satellite radio,
if equipped). SIRIUS
®
Satellite Radio is a
subscription-based satellite radio service
that broadcasts music, sports, news and
entertainment programming. For more
information and a complete list of SIRIUS
®
satellite radio channels, visit www.sirius.com in
the United States, www.sirius-canada.ca in
Canada, or call SIRIUS
®
at 1–888–539–7474.
K. MENU – Press repeatedly to cycle through
various menu options such as: AUTOPRESET,
RDS ON/OFF and SATELLITE RADIO MENU (if
satellite radio is active). When SATELLITE
RADIO MENU appears in the display, press OK
and then press / to cycle through further
options of SAVE SONG, DELETE SONG, DELETE
ALL SONGS and ENABLE/DISABLE alerts. For
more information on these features, please
refer to your Owner’s Guide.
L. SOUND – Press repeatedly to access
settings for: Bass, Treble, Fade, Balance,
Speed compensated volume (if equipped)
and ALL SEATS (Occupancy mode, if equipped).
When the desired selection appears in the
display, press I SEEK/TRACK I
to make adjustments.
M. CLOCK – Press to set the time. The display
will read SET TIME. Use the memory presets
(0-9) to enter in the desired time, hours and
minutes. The clock will then start from that time.
N. TUNE/OK – In radio mode, turn to go
up/down the frequency band in individual
increments. If your vehicle is equipped with
SYNC and/or satellite radio, you may need to
press OK to confirm menu selections.
O. EJECT – To eject a CD from the system, press
EJECT and select the desired slot (1-6) using
the memory presets. Press and hold EJECT to
auto eject all loaded discs.
AUDIO SYSTEM
C MB D N OA E KF JG H I L
A
C
B
Use extreme caution when using any device
or feature that may take your attention off
the road. Your primary responsibility is the
safe operation of the vehicle. Only use
non-essential features and devices when
it is safe to do so.