


Congratulations on your decision to acquire a Ford
Windstar, the only vehicle to receive the prestigious
Quadruple 5-Star rating* in U.S. Government
Crash Testing four years in a row. Windstar is
accommodating and responsive with a long list of
thoughtful, family-oriented features.
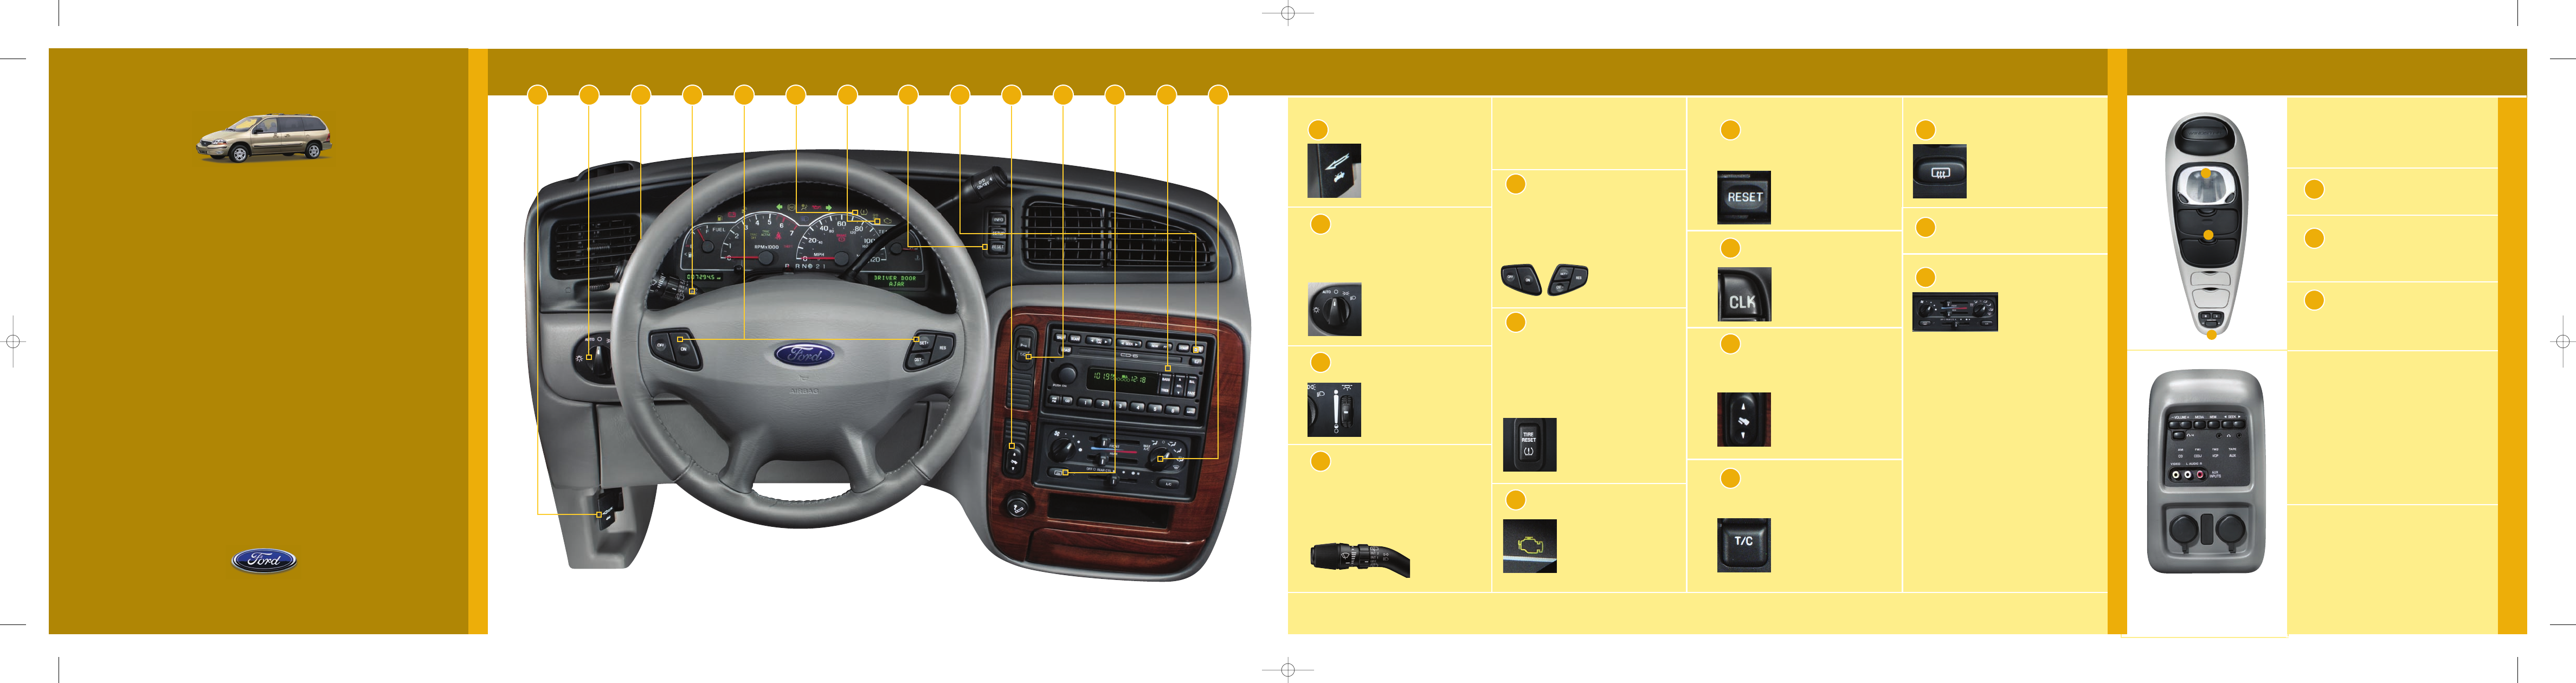
In order to acquaint you with some of the most-
used features of your new Windstar, we invite you
to use this Quick Reference Guide with the
accompanying CD-ROM. Insert the CD into any
audio CD player; find the numbered call-outs on the
instrument panel portion of this guide, then select
the corresponding number on the CD audio track
for a fast, convenient introduction to Windstar.
For more comprehensive information, place the CD
into your computer (the CD jacket will tell you if your
computer meets the minimum configuration
requirements) – or consult your Owner’s Guide.
OVERHEAD CONSOLE
Your overhead console offers convenience
and functionality.
OVERHEAD LAMP
An overhead lamp offers interior illumination.
1
STORAGE COMPARTMENTS
Storage compartments allow you to store
sunglasses, coins or other small items. (This area
also features the Conversation Mirror, if equipped.)
2
POWER SLIDING DOOR CONTROLS
(IF EQUIPPED)
This area contains the controls that allow you to
open and close Windstar’s power sliding doors.
3
HOOD RELEASE
Pull the handle toward you to
release. From the front of your
vehicle, release the auxiliary
latch under the front center of the
hood and lift. Secure with the
prop rod.
2
HEADLAMP CONTROL
The first position clockwise controls the
parking lamps; the second position controls the
headlamps. If your vehicle is equipped with
autolamps, turn the control counterclockwise to
have the light-sensitive system automatically control
your headlamps. To use your high
beams, push the turn signal stalk
forward; pull towards you to
deactivate. To adjust the brightness
of your instrument panel, rotate
the dimmer control up or down.
3
SLEEPING BABY MODE
This thoughtful feature sees to it that a soft
light emanates from the floor of
your vehicle when doors are
opened, not into a sleeping
baby’s face. To activate, rotate the
dimmer control to first position
(dimmest position).
4
TURN SIGNAL AND
WINDSHIELD WIPER WASHER
Push the stalk down to activate your left turn
signal, up to activate the right turn signal.
To mist the windshield, press and release the
end of the stalk once; one or two wiper cycles will
follow
automatically. To wipe the windshield,
rotate the control
up to wipe more
quickly, down to
wipe more slowly.
5
To wash the rear window, rotate the control
down and hold as desired. To wipe the rear
window, choose “INT 1” for ten-second wiper
intervals, “INT 2” for one-second intervals, and
“OFF” when you’re finished.
SPEED CONTROL
To engage your speed control, make sure
you’re traveling at or above 30 mph and press “ON”.
To set a higher speed, press and hold “SET+”;
release when you’ve reached the desired speed.
To set a lower speed, press and hold “CST-”;
release when you’ve slowed to the desired speed.
To return to a previously set speed, press “RES”
(you must be traveling
above 30 mph). To
disengage, slow the
vehicle or press “OFF”.
6
LOW TIRE PRESSURE
WARNING SYSTEM
The Low Tire Pressure Warning Lamp is located
in the upper right of your instrument cluster; this
system monitors tire inflation. If any tire is low, the
light will illuminate. This system is sensitive to tire
pressure changes resulting from bumpy roads, low
traction situations (gravel, snow or slush), tire
chains, heavy loads, trailer towing and uneven
treadwear. It needs to be reset whenever you rotate
tires, install new ones, or
experience any other change in tire
pressure. To reset the system,
press and hold the reset button for
3 seconds. The light will flash 3
times to confirm the system has
been reset.
7
CHECK ENGINE
It’s normal for warning and control lights to
illuminate when you start your
engine. If any lights remain
illuminated after start-up, check
your Owner’s Guide (Instrument
Cluster Warnings & Control Lights
section) for detailed information.
8
OIL CHANGE RESET SYSTEM
(IF EQUIPPED WITH MESSAGE CENTER)
This system monitors oil quality to tell you if you
need to “CHANGE OIL SOON” or change oil
immediately (“OIL CHANGE
REQUIRED”). After changing the
oil, reset the warning light by
pressing and holding the reset
button for 3 seconds.
9
CLOCK CONTROLS
Press and hold “CLK” until “CLOCK SET”
appears in the display. Hold
down the "CLK" button while
pressing “SEEK” to set hours,
press “TUNE” to set minutes;
press “CLK” again to exit this
feature.
10
ADJUSTABLE PEDALS
Your accelerator and brake pedals can be
adjusted within 3” of original placement to provide
you with an extra measure of driving confidence.
Stop your vehicle, put the gearshift lever in P
(Park) and press the rocker
control to adjust the pedals
towards you or away from you;
adjust until you find the position
that offers the greatest comfort
and control.
11
TRACTION CONTROL
This system helps your vehicle maintain
traction on slippery surfaces by detecting and
controlling wheel spin. If you get stuck in snow, try
switching the system off by
pressing the control button, then
cautiously apply gas. (Turning
the traction control system off
may help free the vehicle by
allowing the tires to spin freely;
applying too much gas may worsen the situation.)
12
REAR WINDOW DEFROSTER (IF EQUIPPED)
Push to clear the rear window of
thin ice and fog. The defroster
turns off automatically after 10
minutes, or when the ignition is
turned “OFF”.
13
AUDIO SYSTEM
Please see reverse side for more details.
14
CLIMATE CONTROL SYSTEM
The top controls of this
system manage climate
for the front of your
vehicle; the lower
controls
manage the back.
TEMPERATURE CONTROL – slide left for cooler air, right
for warmer.
FAN SPEED –
turn to control the volume of air circulated.
MAX A/C – uses recirculated air to cool your interior
quickly and economically.
STANDARD A/C – uses outside air; it’s more quiet, but
not quite as efficient.
In vehicles equipped with auxiliary climate
control, rear seat passengers are able to select
temperature, control the volume of air directed to
rear registers and choose between overhead
registers and/or the floor register.
15
1
2
3
*With optional side air bag.
The volume control allows the rear seat passengers
to adjust the volume level of the audio system.
Press the MEDIA control to toggle to any other
desired media source. The memory control allows
you to scroll through radio presets or (with CD’s)
select the next disc. The SEEK control has varying
functions depending on which mode is enabled.
TO PLAY A VIDEO GAME:
Connect the video line from your game device to the
VIDEO jack. Connect the left and right audio cables
to the left (L) and right (R) audio jacks. Ensure that
the system is in AUX mode. The LCD screen will turn
on and the AUX indicator will illuminate. If desired,
press the headphone control and plug a 3.5mm
headphone into the headphone jack.
2003 Model Windstar | Quick Reference Guide
2 3 4 5 6 7 8
9 10 11 12 13 14 15
Interior Features
2003 Model Windstar | Quick Reference Guide
Console Features
AUTOVISION
®
VIDEO ENTERTAINMENT
SYSTEM
(IF EQUIPPED)
Your AutoVision® Video Entertainment System allows
you to watch movie rentals and your favorite home
videocassettes; it also allows you to plug in and play
a variety of standard video games.
1-Windstar QRG_5-21-02FINAL.qxd 10/14/03 4:21 PM Page 7