


With power tuned to its size and handling,
your Ford Ranger is like sheer adrenaline
cast in sheet metal, promising you a
smooth ride on every rugged road. In
order to help you fully appreciate the
countless features of your new Ranger, we
invite you to explore this easy-to-use Quick
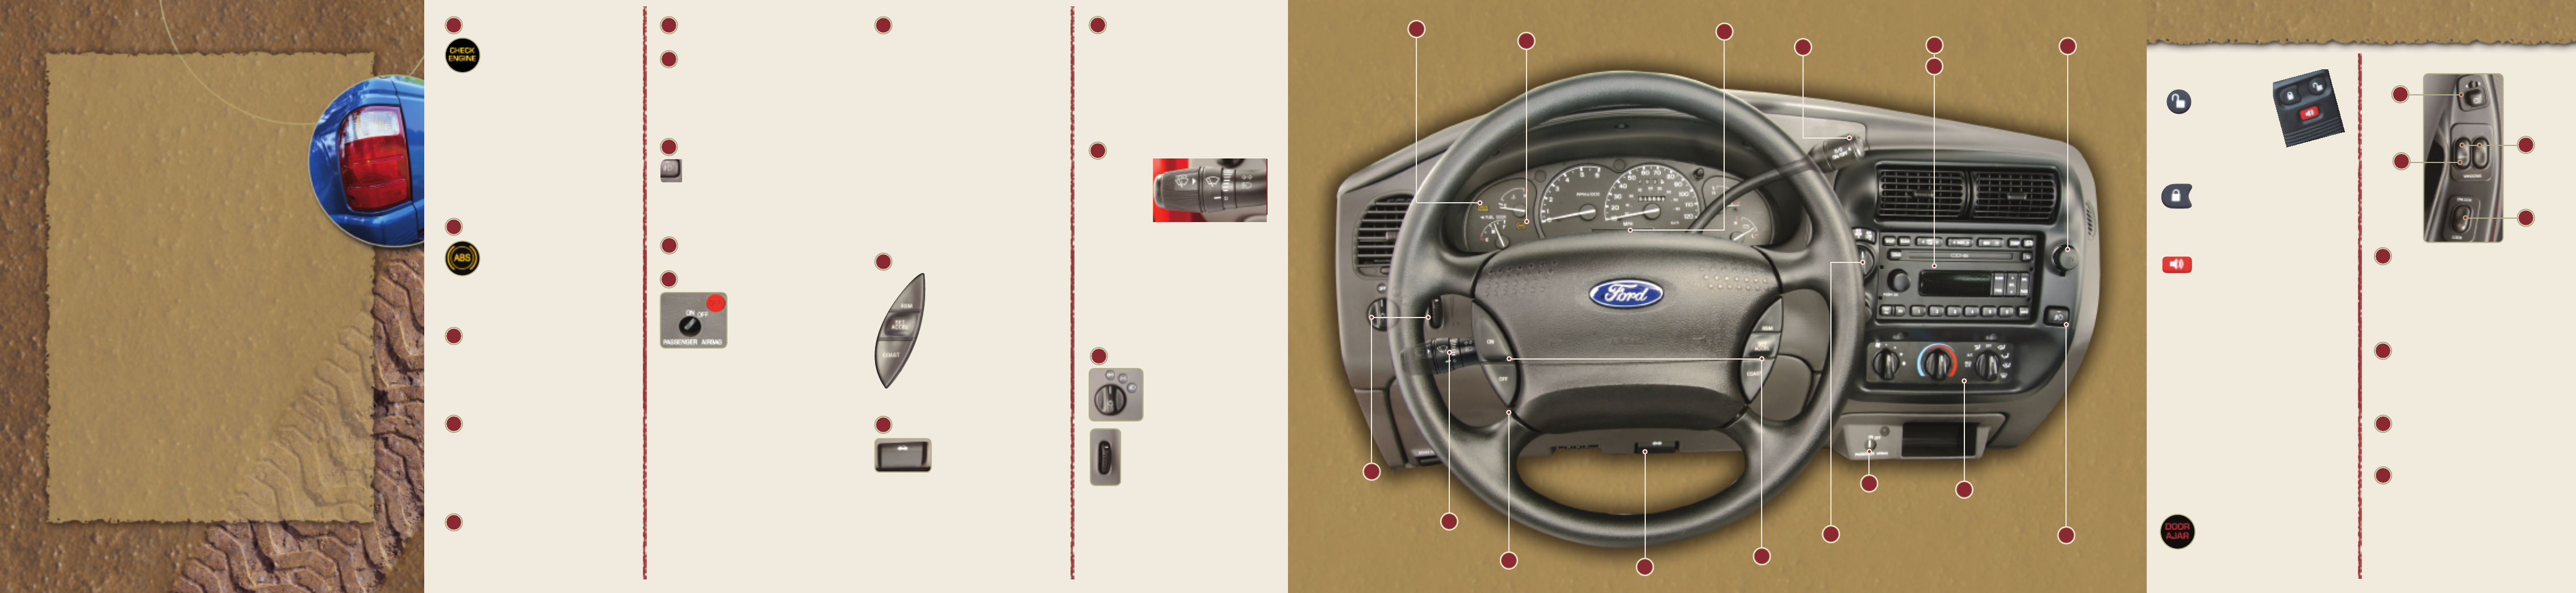
Reference Guide. Using the image of the instrument
panel located in the center of the guide, locate the
feature you would like to learn more about. Each
numbered feature is briefly described to the left of
the instrument panel image. For more information,
please consult your Owner’s Guide. You can also
get additional information by visiting Ford online at
www.ford.com or www.fordvehicles.com.
Premium Dual-Media Radio (if
equipped)
Please see reverse side for more details.
Auxiliary Power Point
This electrical outlet should be used in place
of the cigarette lighter for optional electrical
accessories. Do not hang any type of
accessory or accessory bracket from the plug.
Improper use of the power outlet may cause
damage not covered by your warranty.
Foglamp Control (if equipped)
Press to activate the foglamps
during headlamp operation.
The foglamp indicator light will
illuminate. Press the control again to
deactivate the foglamps. The foglamps
will not operate when the high beams
are activated.
Climate Control System
Please see reverse side for more details.
Passenger Air Bag
ON/OFF Switch
To turn the passenger air
bag off, insert the ignition
key, turn the switch to the
OFF position and hold in
the OFF position while
removing the key. The OFF light will illuminate
momentarily to indicate the deactivation of the
passenger air bag when the ignition is turned
to ON.
To turn the passenger air bag back on, insert
the ignition key and turn the switch to the ON
position. When the ignition is turned to ON,
the OFF light will briefly illuminate to indicate
that the passenger air bag is operational.
The passenger air bag should always be ON,
unless the passenger meets the deactivation
criteria set forth by the National Highway
Traffic Safety Administration. Please consult
your Owner’s Guide before deactivating the
passenger air bag on/off switch.
Check
Engine
Lamp
ABS
Warning
Lamp
Auxiliary
Power
Point
Gearshift/
Overdrive
Control
(if equipped)
Audio
Systems
Electronic
Four-Wheel
Drive (4X4)
Control
(if equipped)
Speed
Control
(if equipped)
Tilt Steering
Wheel Lever
(if equipped)
Turn Signal and
Wiper/Washer
Control
Foglamp
Control
(if equipped)
Climate
Control
System
Electronic Four-Wheel Drive (4X4)
Control
(if equipped)
In 2WD, power is supplied to the rear
axle only. In 4X4 High, power is supplied to
both the front and rear axles for increased
traction. 4X4 Low supplies power to both
the front and rear axles, but at low speeds.
To shift from 2WD into 4X4 High, turn the
control to the 4X4 High position as long as
the rear wheels are NOT slipping. To shift
from 4X4 High back into 2WD, turn the con-
trol to the 2WD position at any
forward speed.
To shift from 2WD into 4X4 Low, 4X4 Low
back into 2WD, or to shift between 4X4
High and 4X4 Low: Bring the vehicle to a
stop, and then depress the brake. Place
the gearshift in N (Neutral) or depress the
clutch, and then turn the control to the
desired position.
Speed Control (if
equipped)
To operate, the speed control
must be ON and the vehicle’s
speed must be at or above
48 km/h (30 mph). To set a
speed, press SET ACC. To set a
higher speed, press SET ACC
again. To set a lower speed, press
COAST. Pressing RSM will return to
a previously
set speed. To turn the speed
control off, press the OFF button
or turn off the vehicle’s ignition, or depress
the brake pedal to disen-
gage.
Hood Release
Inside the vehicle, pull the
hood release handle located
under the bottom of the
instrument panel near the steering column.
Next, release the auxiliary latch located
under the front center of the hood. Lift the
hood and secure it with the prop rod.
Tilt Steering Wheel Lever
(if
equipped)
The tilt steering wheel lever is located to
the left of the steering column underneath
the turn signal. Pull the lever toward you to
move the steering wheel up or down. Hold
the control while adjusting the wheel to the
desired position, then release the control to
lock the steering wheel in position.
Warning: Never adjust the steering wheel
when the vehicle is moving.
Turn
Signal
and
Wiper/Washer Control
Rotate the windshield wiper control to the
desired interval, low- or high-speed posi-
tion. When in the
intermittent position, rotate the control
upward for fast intervals and downward
for slow intervals. Push the control on the
end of the stalk briefly for a single wipe
(no wash). Push and hold for three wipes
with a wash. Push and hold for a longer
wash cycle (up to ten seconds).
For extended wiper blade
quality,
occasional cleaning of the
wiper
blades is required.
Headlamp and
Panel Dimmer Control
Rotate clockwise to the
first position to turn on the parking
lamps. Rotate to the second posi-
tion to also turn on the head-
lamps.
Use the instrument panel dimmer control,
which is located to the right of the head-
lamp control,
to adjust the brightness of
the instrument panel during
headlamp and parking lamp
operation. Rotate up to brighten and
Remote Entry System (if equipped)
UNLOCK – Press
this control once
to unlock the
driver’s door, and
twice to unlock all
of the doors. The
interior lamps will
then illuminate.
LOCK – Press this control once to
lock all of the doors. Pressing the
control a second time will chirp
the horn and flash the lights to con-
firm that all doors are closed and
locked.
ALARM – Press this control to
activate the alarm. Press the
control again to deactivate. The
alarm will only operate when the
ignition is in the LOCK position.
The interior lights will turn on when the
remote is used to unlock the doors or sound
the personal alarm. The interior lights will
turn off if the ignition switch is turned
to the RUN or ACC position, or after 25 sec-
onds of illumination. The dome lamp control
(if equipped) must not be set to
the OFF position for the illuminated entry
system to operate.
The optional power door lock disable
feature helps protect your vehicle from
unauthorized entry. Please refer to your
Owner’s Guide for complete details on
activating/deactivating the power door
lock disable feature.
Rear Doors (if equipped)
Make sure your rear doors are
properly latched. The rear doors
of the Ranger four door must be
securely closed before closing the
front doors.
Door Controls
Power Side View Mirrors (if equipped) –
Move the selector control to the left to
adjust the left mirror, or to the right to
adjust the right mirror. Next, move the
mirror control in the direction you wish to
tilt the mirror. Return the selector control
to the center position to lock the mirrors
in place.
One Touch Down (if equipped) – This
feature allows you to fully open the
driver’s window when you press AUTO
completely down and then release
quickly. Depress again to stop
window operation.
Power Windows (if equipped) – Press
the top portion of the rocker switch to
close the window. Press the bottom
portion to open.
Power Door Locks (if equipped) – Press
the top of the control to unlock all of the
doors and the bottom to lock all of the
doors. The optional power door lock
disable feature helps protect your vehi-
cle from unauthorized entry. Please
refer to your Owner’s Guide for
complete details on activating/
deactivating this feature.
ADDITIONAL FEA-
1
3
4
5
6
7
8
9
10
11
1
1
1
A
B
C
D
A
B
C
D
15
1
2
7
4
9
8
10
1
1
1
Hazard
Flasher
Control
3
Passenger
Air Bag
On/Off Switch
Hood
Release
11
Headlamp
and Panel
Dimmer
Control
16
ADDITIONAL FEA-
5
6
1
Check Engine Lamp
Illuminates briefly to ensure the
system is functional. If the light
turns solid or blinks after the
engine is started, one of the
engine’s emission control systems
may be malfunctioning. Drive your vehicle
in a moderate fashion (avoiding heavy
acceleration and deceleration) and have
your vehicle serviced at the first
available opportunity.
Always Tightly Secure Your Fuel Cap
Turn the fuel cap to the right 1/8 turn until it
clicks. If your "CHECK FUEL CAP" light on
the instrument panel illuminates, remove and
retighten the fuel cap. It may take up to five
starts to reset the light.
ABS Warning Lamp
Illuminates momentarily when
the ignition is turned to the ON or
START position. In an emergency,
apply continuous force on the
brake to prevent wheel lock when
braking on slippery surfaces – do not pump
your brakes.
Any pulsation or noise you
may feel or hear is normal.
Hazard Flasher Control
The hazard flasher control is located on
the top of the steering column. Press to
activate all hazard flashers simultaneously
in an emergency to warn traffic of vehicle
breakdown, approaching danger, etc.
Press the control again to turn the flashers off.
Gearshift/Overdrive Control (if
equipped)
Overdrive is the normal drive position for the
best fuel economy. Only deactivate (O/D
OFF) overdrive when: driving with a heavy
load, towing a trailer up or down steep hills,
or when additional engine braking is desired.
To deactivate, press the transmission control
switch on the end of the gearshift lever.
Single CD Radio
(if equipped)
2
1