


1
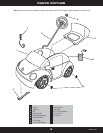
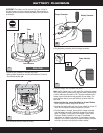
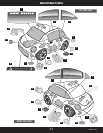
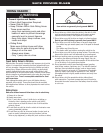
• Cut the steering wheel labels (#29, #30 and #31) from the larger
label sheet. Now, position the steering wheel labels, as shown in
the illustration, around the steering wheel.
Hint: These labels will be applied around the spokes on the
steering wheel. Carefully apply the center portion of each label
to the topside of each spoke. Gently smooth the label around
each spoke.
• Remove the backing from label 29 and apply the label to the
left spoke. Remove the backing from label 30 and apply the label
to the bottom spoke. Remove the backing from label 31 and apply
the label to the right spoke.
Steering Wheel
Left Spoke
Label 29
Bottom Spoke
Label 30
Right Spoke
Label 31
2
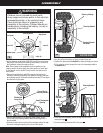
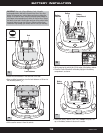
• With the large opening in the steering wheel upright, fit the
curved end of the steering column down into the large hole in
the windshield.
• Continue to insert the curved end of the steering column through
the small, rectangular opening in the floor of the vehicle.
Curved End of
Steering Column
Windshield
Large Hole
Small Rectangular
Opening
8
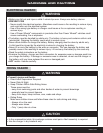
ASSEMBLY
Children can be harmed by small parts,
sharp edges and sharp points in the vehicle's
unassembled state, or by electrical items.
Care should be taken in unpacking and
assembly of the vehicle. Children should not
handle parts, including the battery, or help in
assembly of the vehicle.
WARNING
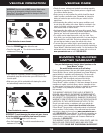
4
3
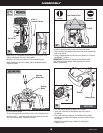
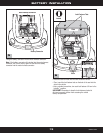
• Turn the vehicle on its side, so that the bottom faces you.
• Position the steering bracket behind the steering linkage, as shown.
• Fit the steering column through the hole in the steering bracket to
the second bend.
• Fit the end of the steering column through the hole in the
steering linkage
A
.
• Turn the steering bracket and fit it into place
B
.
Steering Linkage
Steering Bracket
Steering Bracket
2nd Bend
Steering Bracket
BOTTOM VIEW
DASH VIEW
A
B
Steering
Linkage
Steering
Column
P6830a-0920