


9
ASSEMBLY
F
J0713pr-0920
4
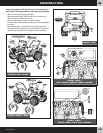
BOTTOM VIEW
3
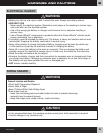
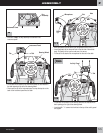
Children can be harmed by small parts,
sharp edges and sharp points in the
vehicle's unassembled state, or by electrical
items. Care should be taken in unpacking
and assembly of the vehicle. Children should
not handle parts, including the battery, or
help in assembly of the vehicle.
WARNING
1
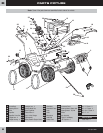
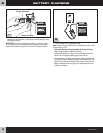
• Fit the steering wheel top and bottom together.
• Insert four #6 x
1
/
2
" screws into the holes in the steering wheel bottom
and tighten.
• Set the steering wheel aside.
• Insert a #8 x 1" screw through the hole in each end of the dash and
into the vehicle body. Tighten the screws.
Steering Wheel
Bottom
Dash
Vehicle
Body
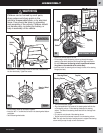
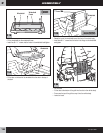
• Position the vehicle body on its side.
• Fit the straight end of the steering column up through the square
opening in the vehicle body and out through the large round hole in
the dash. Make sure the steering column is positioned between
the guides on the underside of the vehicle body.
• Insert the end of the steering column through the hole in the steering
linkage (see inset).
Guide
Square
Opening
Steering
Column
Steering
Column
Guide
INSET
Steering
Linkage
2
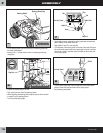
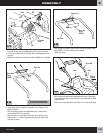
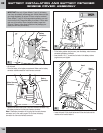
• Turn the vehicle body upright.
• Align the keyed hole in the center of the steering wheel with the ribs
on the steering column. Fit the steering wheel onto the steering
column. The base of the steering wheel should fit into the large hole
in the dash.
• Fit a cap nut onto the end of the steering column.
• Tap the cap nut with a hammer to secure it on the steering column.
Hint: You may want the help of another person to support the steering
column while you tap the cap nut with the hammer.
Steering Wheel
Steering Column
Cap Nut
Steering
Wheel Top