


9
2
1
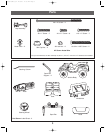
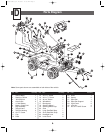
Battery
Compartment
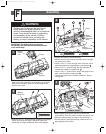
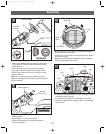
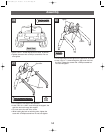
Dash
•Position the dash on the vehicle body.
• Make sure the motor harness connector wire is through
the groove in the dash.
• Insert a #10 x
1
/2" screw through each of the two corner
dash tabs nearest to the passenger compartment .
• Insert a #10 x 1" screw through the two dash tabs
nearest to the battery compartment .
• Insert a #10 x 1" screw into the hole in the center of the
dash, near the battery retainer clip .
• Tighten the screws with a Phillips screwdriver. Do not
over-tighten.
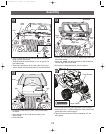
Battery Clamp
Assembly
Battery
Clamp Unit
• Insert two #10 x 1" screws through the holes in the battery
clamp unit and into the pegs in the dash.Tighten the
screws with a Phillips screwdriver. Do not over-tighten.
Motor
Harness
Connector
Wire
2
3
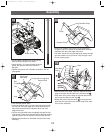
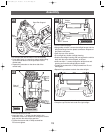
• Before applying the labels, wipe the surface of the
vehicle with a clean, dry cloth to remove any dust or oils.
• Place the labels exactly as shown in the illustrations.
•For best results, avoid repositioning a label once it has
been applied to the vehicle.
13
14
15
4
HI LO KC
21
23
16
Labels - Dash
17
12
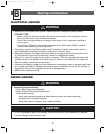
WARNING
Children can be harmed by small parts,
sharp edges and sharp points in the
vehicle’s unassembled state, or by electrical
items. Care should be taken in unpacking
and assembly of the vehicle. Children
should not handle parts, including the
battery, or help in assembly of the vehicle.
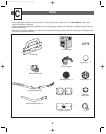
F
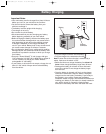
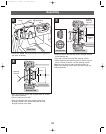
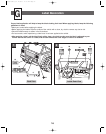
IMPORTANT! The battery clamp unit must be
assembled to the dash before assembling the dash
to the vehicle body.
Battery
Clamp
Unit
•Fit the battery clamp unit into the underside of the
dash so that the clamp fits into the grooves in the dash.
Make sure the battery clamp unit is flush against the
surface of the dash.
Clamp
Dash
Grooves
1
B7659a-0920.qrk 12/8/03 11:55 AM Page 9