


• Hook the cars together and place
them on the track. Make sure the
engine is in front.
Hint: We do not recommend using the
engine on carpets. For best performance,
use on the track provided or hard,
flat surfaces.
• Press the power button on
top of the engine. The
ready light turns on.
• Hold the remote controller
with the stick facing you.
Point the remote controller
toward the engine and
push the stick forward.
The engine moves forward
around the track.
• To stop the engine, pull the
stick backwards to the
stop position.
Hint: If you do not operate the
remote controller for a few minutes,
the engine shuts off and the ready
ight turns off. Press the engine
power button, and operate the
remote controller to restart.
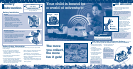
Your child is bound for
a world of adventure!
The more
you collect,
the more
fun it gets!
All Aboard!
READY
LIGHT
POWER
BUTTON
To prevent entanglement,
keep hair away from wheels.
WARNING
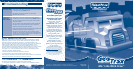
Fun Train Sounds with Tracktown Railway
™
sold separately
You can use this toy with the Tracktown Railway
™
to hear fun sound effects
Battery Installation
Engine
• Locate the battery compartment on the
back of the engine
• Loosen the screws in the battery
compartment door with a Phillips
screwdriver. Lift the battery compart-
ment door and insert three “AAA” (LR03)
alkaline batteries.
• Close the battery compartment door and
tighten the screws with a Phillips
screwdriver. Do not over-tighten.
• Do not mix old and new batteries or
batteries of different types: alkaline,
standard (carbon-zinc) or rechargeable
(nickel-cadmium).
• Insert batteries as indicated inside the
battery compartment.
• Remove batteries during long periods of
non-use. Always remove exhausted
batteries from the toy. Dispose of batteries
safely. Do not dispose of batteries in a fire.
The batteries may explode or leak.
• Never short-circuit the battery terminals.
• Use only batteries of the same or
equivalent type, as recommended.
• Do not charge non-rechargeable batteries.
• Remove rechargeable batteries from the
toy before charging.
• If removable, rechargeable batteries are
used, they are only to be charged under
adult supervision.
Battery
Information
Remote Controller
• Locate the battery compartment on the side of
the remote controller.
• Loosen the screw in the battery compartment
door with a Phillips screwdriver. Remove the
battery compartment door and insert three
“AAA” (LR03) alkaline batteries.
• Replace the battery compartment door and
tighten the screw with a Phillips screwdriver.
Do not over-tighten.
1.5V x 6
“AAA” (LR03)
Battery Safety Information
Batteries may leak fluids that can cause a chemical burn injury or ruin your toy. To avoid
battery leakage:
OFF
FORWARD
FORWARD
(With Sound Effects
When Used in Depot)
1
2
3
1
2
3
3-Position Remote Controller
Your child is bound for
a world of adventure!
Each sold separately & subject to availability.
SHOWN ACTUAL SIZE
We recommend the use of alkaline batteries
for longer battery life.
• Place the remote controller
into any of four the grooves
in the depot.
•Press the power button
on top of the engine. The
ready light turns on.
• Push and hold the stick on
the remote controller all
the way forward.
• You’ll hear fun sound
effects as the engine
heads around the track.
Hint: Sound effects can only
be heard when remote
controller is in the depot.
• To stop the engine, pull
the stick back to the
stop position.
Hint: This toy works
best if you have a clear
path between the remote
controller and the engine.
Point the remote controller
at the engine. The
maximum range of the
remote controller is about
12 feet.