655 and 655R Actuators
Instruction Manual
Form 1292
July 2007
8
pressurized, even when the valve has
been removed from the pipeline.
Process fluids may spray out under
pressure when removing the packing
hardware or packing rings, or when
loosening the packing box pipe plug.
D Check with your process or safety
engineer for any additional measures
that must be taken to protect against
process media.
The maintenance instructions are divided into two
sections: Actuator and Top-Mounted Handwheel.
Actuator
This procedure describes how the actuator can be
completely disassembled and assembled. When
inspection or repairs are required, disassemble only
those parts necessary to accomplish the job; then,
start the assembly at the appropriate step.
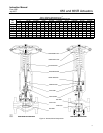
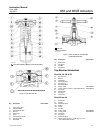
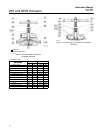
Key numbers refer to figure 4.
Disassembly
CAUTION
In the following procedure, do not
rotate the valve plug while it is seated
since this may cause damage to the
seating surfaces and thereby allow
excessive leakage. Also, during travel
adjustment, use tools carefully to avoid
damaging the valve plug stem. A
damaged stem could cut the packing
and allow leakage.
1. Rotate the handwheel (if one is used)
counterclockwise to be sure the handwheel is not
compressing the spring (key 6).
2. For complete disassembly, the actuator must be
removed from the valve, and the actuator stem
(key 8) must be completely disengaged from the
valve plug stem by rotating the actuator. Perform the
appropriate procedure according to the respective
valve action.
For Push-Down-To-Close Valves:
Note
To prevent the actuator stem (key 8)
from rotating while performing the
following procedure, make sure the
adjusting screw (key 10) remains
screwed into the yoke (key 7).
a. Loosen the two hex nuts (key 12).
b. Loosen the yoke locknut (figure 3) with a
hammer and punch, and unscrew it from the
valve bonnet.
c. While lifting the actuator so that the valve plug
is not forced against the seat, rotate the entire
actuator until the actuator stem disengages
completely from the valve plug stem.
For Push-Down-To-Open Valves:
a. Turn the adjusting screw (key 10)
counterclockwise to relieve all spring
compression. Then, move the valve plug, by
hand, off the seat.
b. Loosen the hex nuts (key 12), and unscrew
the valve plug stem out of the actuator stem as
far as it will go.
c. Turn the adjusting screw into the yoke (key 7)
to force the diaphragm (key 2) and diaphragm
plate (key 4) against the upper diaphragm casing
(key 1).
d. Loosen the yoke locknut (figure 3) with a
hammer and punch, and unscrew it from the
valve bonnet.
e. Rotate the entire actuator until the actuator
stem disengages from the valve plug stem.
3. Turn the adjusting screw (key 10)
counterclockwise out of the yoke (key 7) to relieve all
spring compression.
4. To remove the upper diaphragm casing (key 1),
unscrew the cap screws (key 19) for size 3A and 4A
actuators or the cap screws and hex nuts (keys 19
and 20) for all other sizes.
5. Remove the diaphragm (key 2); then, lift the
diaphragm plate (key 4) and actuator stem assembly
out of the actuator body. Also, remove the spring
and the lower spring seat (key 9).
6. For size 3A and 4A actuators, remove the lower
diaphragm casing (key 5).
7. Remove the cap screw (key 3), and separate the
diaphragm plate from the actuator stem.
8. For size 3B through 46 actuators, unscrew the
cap screws (key 21), and remove the lower


