


Copyright 2010 Firstech, LLC. | 2
Instructions
1. Remove (3) T-25 screws from the driver’s under dash panel.
2. Remove the driver’s under dash panel. Set it to the side.
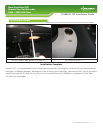
3. There is now a small area which will allow access to the rear of the EIS which can be accessed by
reaching up under the dash next to the center console. There is very limited room there and the
next few steps may take some time to complete. The EIS is the key cylinder. If you are using the EIS
removal tool or wish to remove the EIS, do it now. Unscrew the trim ring from the front of the EIS
and rotate it so the plugs face into the radio cavity through the small opening in the left side.
4. Reach up and remove (2) plugs from the EIS and pull them down.
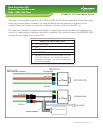
5. Route the T-Harness from the driver’s under dash area to the rear of the EIS area.
6. Plug the matching ends of the T-Harness into the rear of the EIS.
7. Plug the factory EIS harness into the other end of the T-Harness.
8. Once ALL connections are secured, turn on the valet switch and verify the LEDs visible inside
the control module are flashing.
9. Start the vehicle with the key to verify your work. If the vehicle starts and runs, you’ve made all
the connections correctly.
10. Shut the vehicle off.
11. Push the ‘Panic’ button once on the remote to test the remote start.
12. Once you are satisfied with its operation, shut the remote start off by pushing the
‘Panic’ button once.
13. Locate a place to secure the control module in the dash cavity.
14. Secure the module in its final location.
15. Drill a 3/4” hole in the under dash panel.
16. Shut the valet switch off.
17. Remove the wires from the valet switch, mount the valet switch in the hole drilled and reconnect
the wires.
18. Turn the Valet switch on.
19. Replace the under dash panel and Reinstall (3) T-25 screws in the driver’s under dash panel.
FT-MB211-DC Installation Guide
Data Controller (DC)
Remote Start for Mercedes
2005 - 2009 SLK Class
www.compustar.com
888.820.3690