


Page 2
IDENTIFY WHICH MODEL POWER VENTER YOU HAVE
CAUTION: Avoid applying excess pressure on the blower wheel when handling.
This will cause an imbalance of the blower wheel which will result in excessive
vibration and premature motor failure.
R
EMOVAL
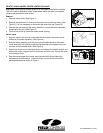
1. Remove motor cover. (See Figure 1)
2. Remove the electrical box cover and disconnect the conduit and wires. (See
Figure 2) It is not necessary to disconnect the wires from the Control Kit.
3. Remove the nuts securing the motor assembly, and pull the motor assembly
straight off of the unit. (See Figure 3)
4. Clean off any build-up inside the blower wheel housing.
I
NSTALLATION
1. Align the holes in the circular cover plate with the holes in the motor mount
bracket on the motor assembly. (See Figure 3)
2. Slide the motor assembly onto the protruding threaded studs on the power
venter body with the exhaust chute pointing downward, and replace the nuts
securely to the threaded studs. (See Figure 3)
3. Use the top knockout on the electrical box and reattach the flexible conduit and
wires to the motor using the conduit connector and wire nuts. Secure the cover
on the electrical box.
4. Seal around the edge of the motor mount bracket with the provided high
temperature silicone sealant. Install the motor cover with the side louvers
pointing downward as shown in Figure 1.
P/N 46252300 Rev F 01/08
Figure 1
Figure 2
Figure 3