


5
Starting Without Easy Start Feature
1) When you are ready to start your engine, make sure that the
ignition is switched off, the choke valve is closed and the
throttle valve is partly open. Confirm that fuel is filling the
fuel line to the carburetor then switch the ignition to the on
position. Flip the propeller smartly until the engine fires. With
the choke in the closed position, the engine will fire then quit.
2) Open the choke valve and set the throttle at a slightly high
idle position. Be sure to have a helper hold the model securely.
Give the propeller a few quick flips. When the engine starts,
allow it to idle for 30–45 seconds in order for it to warm up
to operating temperature. At this point you can proceed to
test the carburetor settings before flying your model. See the
following section regarding carburetor adjustment.
3) If the engine does not start, leave the throttle at the high idle
position, turn the ignition off, then on and close the choke
valve. Start the engine with throttle at the fast idle position
and the choke valve closed. The engine should fire and quit. If
it does, repeat step 2 above.
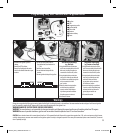
4) At this point, if the engine still will not start, unscrew the
spark plugs and check the contacts. Clean any possible
excess fuel (i.e. an indication of engine flooding) and screw
them in again. Further starting should only be done with the
throttle at idle position and the choke in the open position. If
the plug is dry, then probably not enough fuel has been drawn
into the carburetor. If that is the case, check for proper fuel
feed and then return to the instructions given in paragraph 1.
Starting the Engine Continued
Having started the engine, leave it running for about 5 minutes at a higher idle speed. Then run it for about 20 minutes, while
changing revolutions from idle to 1/2–3/4 of the range and shortly holding each position—gradually prolong the holding periods. After
10 minutes of operation, open the throttle to maximum for a period of about one minute. At this point, stop the engine and let it cool
down. Then restart it and check the adjustment. If everything is all right, you can make your first flight. During the first few flights. do
not overload the engine and do not let it run at high revolutions for long periods of time (very important during hot weather). Use up all
the fuel that was mixed with the oil that is included with your engine. From then on, fuel and oil should be mixed in the proportion 40:1.
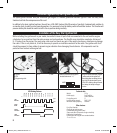
Carburetor Adjustment
First, start and warm the engine for 30–45 seconds before attempting to adjust the carburetor. In order to confirm that your engine is
properly adjusted, you should follow the procedure below.
1) Move the throttle from idle to 2/3 of the full throttle position quickly (fast acceleration). Then repeat three times – if the engine accelerates smoothly, go to
step 3 below. If acceleration is not smooth, go on to step 2.
2) Faulty acceleration and a tendency to quit is usually attributable to a poor fuel mixture in the medium rpm range. Stop the engine and recheck the fuel
feed (the fuel line must not be pinched or broken). Restart the engine and test acceleration again. If the problem persists, adjust the carburetor. Open
the low speed needle by 1/8 turn and retest. If acceleration is smooth, open the needle by another 1/8 turn—this should be done because the needle was
previously set too lean; if atmospheric conditions have changed recently you may have to readjust the needle. If the engine continues to not accelerate
properly, open the low speed needle by 10 minutes. If the engine’s operation does not improve, shut it off and check the basic setting, restart the engine
and test the acceleration. If the engine runs correctly, go to step 3. If it continues to not accelerate properly, open the low speed needle by another 10
minutes. If acceleration is faulty, the defect is likely to lie somewhere other than an incorrect adjustment.
3) If the engine accelerates correctly, according to the above test, set it at idle speed and accelerate to full speed. Repeat twice more. If the engine functions
correctly, go to step 4. If it cuts out, open the low speed needle by another 1/8 turn more.
4) If the engine reacts correctly set it at full speed. If revolutions do not drop, the engine has been adjusted successfully. If revolutions seem to drop, open the
high-speed needle by approx. 5–10 minutes.
Caution! The engine must be stopped while you adjust the carburetor in order to prevent injury by the propeller.
8103.3_EVO_4558.manual.indd 5 6/16/06 10:23:14 AM