


©2007 Edelbrock Corporation
Rev. 9/07 - JT/mc
Catalog #R09259S
Brochure #63-R09259S
Page 2 of 2
A Division of Edelbrock Corporation
2700 California Street, Torrance, CA 90503
Toll-Free Tech Line: 1-800-416-8628
Tech E-Mail: Edelbrock@Edelbrock.com
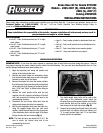
9. Using the rubber grommets supplied on the lines,
attach the lines using the stock guide brackets
located on the right and left side of the fender.
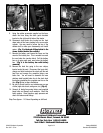
10. Disconnect stock brake line located on the front
down tubes of the frame leading to the rear master
cylinder. You may need to loosen the top of the
radiator bolt to make your disassembly and install
easier.
(Fig. 3 is the brake fitting bolted to the
frame, located behind the radiator).
11. Remove the battery, and loosen the lower and top
mount of the battery box. This is needed to access
the rear brake line junction block. Pull the battery
box up to gain more work area below the battery
box.
(Fig. 4 is the battery box with battery
removed)
12. Remove the hard line going to the rear caliper,
located under the seat. Disconnect the banjo bolt,
clamps and bolts located on the stock soft line and
hard line and remove the complete factory rear
brake line. You will need to assemble the new
stainless steel braided brake line to the stock hard
line before reinstalling the complete rear line on the
bike
(Fig. 5)
due to space limitations.
13. Be sure to check hose for any interferences on rear
of bike (right side shock, swing arm, etc.)
(Fig. 6)
.
14. Connect all brake lines using factory and supplied
banjo bolts and Russell crush washers. Bleed the
brake system. Close bleeders, apply pressure and
check for leaks around fittings.
Shop Time Approx. - 2.0 Hours Depending on skill level
Fig. 2 Fig. 3
Fig. 4
Fig. 5
Fig. 6