


Rev. 1/07
mc
©2007 Edelbrock Corporation
Brochure No. 84-5496
Page 1 of 4
EDELBROCK SHOCK
INSTALLATION INSTRUCTIONS
Please study these instructions carefully before installing your new Edelbrock shocks. If you have any questions, please call our
Technical Hotline at: 1-800-416-8628
, 7:00 am to 5:00 pm, Monday - Friday, Pacific Standard Time or e-mail us at
Edelbrock@Edelbrock.com.
IMPORTANT NOTES:
• Any time you are working under a vehicle, be sure to use the proper jackstands and
tire chocks to prevent any shifting or slipping of the car. Never use a jack only to
support the vehicle while changing shocks.
• Inspect shock brackets or mounting points before installation to make sure they are not
broken or bent.
•
Do not attempt to disassemble these shocks.
Return damaged shocks to
Edelbrock for any necessary service or repairs.
• Upon initial inspection, some new shocks may have a small amount of oil in the area
of the seal. This is a normal occurrence following manufacture and does not
indicate
a problem with your shocks.
• For good ride quality, tire pressure should be at original equipment manufacturer’s
recommended PSI (Pounds per Square Inch). Failure to adhere to the recommended
pressure will affect the ride quality and void the Edelbrock Limited Warranty.
PLEASE READ THESE INSTRUCTIONS ENTIRELY BEFORE BEGINNING
• Proper installation is a must to realize the maximum performance improvements.
Follow these steps carefully.
USE THE RIGHT SHOCK FOR YOUR VEHICLE
• Use Edelbrock shocks only for the applications for which they are listed. Each shock
is specifically tuned for that vehicle’s weight, suspension geometry, and other
characteristics.
• Compare original shock mounting style and hardware with your new shocks before
starting installation. If original hardware is not reusable, it should be replaced with
OEM quality and style hardware.
• Shocks are tuned to vehicle manufacturer’s recommendation for tire pressure, not
necessarily the max inflation pressure listed on sidewall of tire.
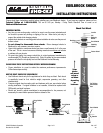
Nut/washer
Mounting Pin
Part of Vehicle
Part of Vehicle
Bolt
Nut
Stud Mount
Standard Bolt Mount
Shock Post Mount
Bushings
Some
shocks
will mount
rod up or
rod down
depending
on
hardware.
Jam Nut
Nut
Retaining
Washer
Part of Vehicle
Retaining
Washer
Post on Shock
Put Tie Wrap
Around Boot
Here
Part of Vehicle
Crossbar
Crossbar Mount
Bolts