


Proper Assembly of the Pump Station (Continued)
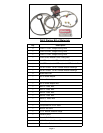
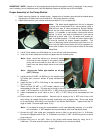
13. Install ¼ NPT x 6 AN fitting on inlet side of nitrous control valve. The control valve is the ball valve
used to control the flow of nitrous from the pump to the bottle being filled. Arrow on control valve
indicates flow direction.
14. Install male leg of brass ¼ NPT tee adaptor in outlet of nitrous control valve.
15. Install ¼ NPT x 6 AN fitting in the female port of tee adaptor that runs straight through.
16. Install ¼ NPT male x 1/8 NPT female reducer in remaining port of brass tee adaptor.
17. Install nitrous gauge in ¼ NPT male x 1/8 NPT female adaptor installed in brass tee adaptor.
18. Connect N
2
O Tee valve assembly to the 3/8 NPT x 6 AN fitting at the transfer pump outlet port using
4 ft. 6 AN hose.
19. Connect 2 ft. 6 AN hose to N
2
O control valve outlet.
Pump is now set up for use and should now be checked for leaks in the nitrous lines as well as in the drive
air lines prior to use.
1. Ensure all valves in system are in their closed positions.
2. Slowly crack open valve on source bottle and inspect nitrous lines and fittings for leaks. Find and re-
pair leaks as necessary.
3. Install 6 AN bottle nut with Teflon washer, that is included in kit, on bottle to be filled.
4. Connect 6 AN hose from nitrous control valve.
5. With the valve closed on the bottle to be filled, slowly open control valve.
6. Inspect nitrous lines and fittings for leaks. Find and repair leaks as necessary.
Please refer to “How To Fill Nitrous Bottles” section for bottle filling procedures.
How to Fill Nitrous Bottles
Safety: Never fill a bottle that is more than five years past its test date.
Warning: Never fill any cylinder above the “full” weight as stated on the cylinder label as “weight of cylinder
and gas”.
1. Check to be certain that the bottle you are about to fill is within the current hydro test dating. The month
and date (mm*yy format) are stamped into the neck of the bottle. Never fill a bottle that is more than five
years past its test date. Failure to do so can result in serious injury or death. These bottles should
be sent for re-certification. This can be done through most welding or scuba supply shops for a minimal
charge.
2. Place the cylinder you intend to fill on an accurate scale. Determine how much nitrous oxide is left in the
cylinder by weight. Subtracting this amount from the “weight of cylinder and gas” found on the bottle label
to give you the amount needing to be added. If there is only a small percentage left in the cylinder, open
the valve and relieve all the pressure in the cylinder. If a cylinder is more than 1/3 full and is going to be
“topped off”, it may be necessary in hot climates to place it in a refrigerator or freezer for a short period of
time to cool it off to approximately 45 degrees F. Lowering the temperature will also lower the bottle pres-
sure and allow a complete fill. In areas where daytime temperatures exceed 80 degrees F, this method of
cooling cylinders before filling may be necessary for all cylinders whether they are full or empty.
3. Connect nitrous control valve assembly to the cylinder to be refilled, using the 6 AN bottle nut and washer
included in kit.
Note 1: If the cylinder being refilled is equipped with a 4 AN fitting, use a 4AN x 6 AN adaptor fitting and
1 ft. 4 AN hose.
Note 2: If the cylinder being refilled is equipped with an 326 style of valve, use the #4 AN 326 nipple, 326
nut valve adaptor, a 4AN x 6 AN adaptor fitting and 1 ft. 4 AN hose.
Page 6