


1
PN 72700
12-Volt 10-lb./15-lb. Nitrous Bottle Heater
Installation Instructions
Features:
Durable, Long-Lasting Heating Element
Velcro® Straps for Easy Installation
Dual Thermostat Cartridges for Reliability
All Electrical Hardware Included
Please read these instructions carefully before you begin installation.
1. Secure the Edelbrock bottle heater around the bottle using the Velcro straps. Mount the heater
around the bottom section in a manner so that the end gap is at the top of the mounted bottle,
making sure that the electrical connections are free. Do not cover the bottle label.
2. Place thermostat assembly under one of the velcro straps. Position it between the bottle surface
and the strap, ensuring the thermostat is in full contact with the bottle. This is your bottle
temperature reference signal and it must be installed correctly or damage may occur.
3. Mount the relay assembly in an area close to the bottle in a location that will be as moisture free as
possible. Keep the relay assembly away from high traffic areas.
Hard or blunt impacts can damage
the relay.
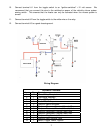
4. Route the red wire from the bottle heater to the blue wire on the relay.
5. Connect the black wire from the heater to a chassis ground. Remember to leave enough wire for
bottle removal and replacement before and after filling.
6. Connect one(1) wire from the thermostat to the black wire on the relay assembly.
7. Connect the other wire on the thermostat to a good chassis ground. Remember to leave enough
wire for bottle heater movement during bottle removal and replacement before and after filling.
8. Route the red wire on the relay harness, (that includes the inline fuse) directly to the positive side
battery post or starter solenoid post that the battery cable attaches to. This is done to ensure that
the maximum current draw is done through the relay and not the switch. Failure to attach this wire
directly to either of these two locations can result in possible electrical failure. Use appropriate
connector to splice into power wire (minimum 12-gauge wire).
9. Mount the bottle heater on-off toggle switch in the passenger compartment. Place it in a
convenient and visible location. Ensure that during the installation, the lighted portion of the switch
is working and easily visible.
Important Note: Please ensure that the bottle heater is installed snugly with no
ripples. The bottle heater must completely contact the bottle
.