


©2005 Edelbrock Corporation
Brochure #63-0399
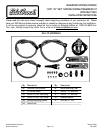
Catalog #71883
Rev. 05/05 - DC/mcPage 2 of 4
INSTALLATION INSTRUCTIONS
DRY COMPONENTS REMOVAL
1. Remove the 3AN nitrous line currently installed
leading from the second nitrous solenoid to the dry
nitrous nozzle.
2. Remove the dry nitrous nozzle and installed jet from
the nozzle collar. Leave the nozzle collar in place for
the time being. Later on during the installation, we
will determine if the dry nozzles mounting location
will be suitable for the E1 nozzle mounting location
or if this will have to be re-located.
3. Disconnect the 4AN feed line from the nitrous
solenoids. Leave the line in place since this line will
be used for the wet system as well.
4. Disconnect the positive solenoid wires from the blue
wire coming from the relay wiring harness.
5. Disconnect the ground wire from the first solenoid.
Make sure that you do not damage the ring terminal
because this ground will be re-used when the
solenoid is re-installed.
6. Disconnect the ground wire from the second
solenoid leading to the fuel pressure safety switch.
7. Remove the fuel pressure safety switch.
8. Using Teflon Paste, install one of the supplied red
4AN to 1/8”NPT fittings into the port where the fuel
pressure safety switch used to be mounted.
9. Disconnect the vacuum lines that were installed for
the dry nitrous system installation and return the
vacuum routing to the fuel pressure regulator back
to the factory configuration.
10. Remove the nitrous solenoid assembly from the
engine compartment.
11. Disassemble the nitrous solenoid assembly
carefully. You will be re-using one of the nitrous
solenoids for your wet nitrous system installation so
take care not to damage the wiring or solenoid body
upon disassembly. You will also re-use the blue 4AN
to 1/8”NPT INLET fitting and the blue 3AN to
1/8”NPT OUTLET fitting, so be careful not to damage
the thread on these fittings when disassembling.
This concludes the removal and disassembly of the dry
nitrous system. From this point on, we will be installing
components for the wet nitrous system. This includes
using both the new components that are supplied with this
kit, as well as re-using certain components that were
supplied with your dry nitrous system such as one of the
nitrous solenoids and the dry nitrous system wiring
harness.
WET COMPONENTS INSTALLATION
1. Using Teflon Paste, install the supplied red 3AN to
1/8”NPT fitting into the OUTLET of the Performer Fuel
Solenoid.
2. Using Teflon Paste, install the remaining red 4AN to
1/8”NPT fitting supplied with this kit into the INLET of
the Performer Fuel Solenoid.
3. Mount one of the new solenoid brackets supplied in
this kit to the bottom of the Performer Fuel Solenoid
using two of the supplied solenoid mounting screws.
4. Select which Performer Nitrous Solenoid you are going
to re-use. Using Teflon Paste, install the blue 4AN to
1/8”NPT fitting into the INLET side of the Performer
Nitrous Solenoid.
5. Using Teflon Paste, install the blue 3AN to 1/8”NPT
fitting into the OUTLET side of the Performer Nitrous
Solenoid.
6. Mount the remaining supplied solenoid bracket to the
bottom of the Performer Nitrous Solenoid using the
remaining two solenoid mounting screws.
7. Remove the intake boot to allow easy access to the
nozzle collar.
8. Verify the location of the nozzle collar. Make sure that
it is in a location where it has a fairly straight,
unobstructed shot into the manifolds plenum. Also,
make sure that the nozzle is located AFTER the MAF
sensor in the intake boot, if equipped. If the dry nozzle
collar is located in a good place, remove the dry
nozzle, dry nozzle collar and nut, and replace with the
supplied E1 nozzle mounting collar and nut. You will
need to enlarge the mounting hole in the intake boot
to allow the E2 collar to reach through the intake boot.
If the dry nozzle collar is located in a bad location,
such as before the MAF sensor, in the airbox, or far
upstream in the boot, use a 1/16” plug to fill the hole
and drill a new hole for the location of the E1 nozzle
collar and nut.
WARNING!!!
Before performing any of these steps, turn off
the bottle valve and purge the nitrous system of
pressure. Failure to do so may cause engine
damage and/or personal injury.