


Catalog #70024 & 70025
Brochure No. 63-0182
Page 2 of 4
©2003 Edelbrock Corporation
Rev. 7/03
INSTALLATION
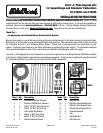
1. Install you new Victor Jr. Nitrous Plate using the
supplied gaskets on the carburetor pad of your intake
manifold. Be sure that one gasket is placed on the pad
under the Victor Jr. Nitrous Plate and one is placed on
top of the plate under the carburetor. Be sure that the
plate is installed with the text on the plate facing the
correct direction as pictured to the right. Failure to
mount the plate facing the correct way could
result in catastrophic engine damage.
2. Re-Install the carburetor.
3. Remove your current Performer RPM Nitrous Solenoid.
4. Remove the 4AN x ¼” NPT inlet fitting from the solenoid. Install one of the supplied 6AN x ¼” NPT Blue Filter
Fittings into the inlet port of the Performer RPM Nitrous Solenoid using only
Teflon Paste.
5. Remove the 4AN x 1/8” NPT Blue outlet fitting from the Performer RPM
Nitrous Solenoid. Install one of the supplied 3AN x 3AN x 1/8” NPT Blue Tee
fittings into the outlet fitting of the solenoid using only Teflon Paste.
6. Re-install the Performer RPM Nitrous Solenoid onto the bracket in the engine
compartment.
7. Remove your current Performer RPM Fuel Solenoid.
8. Remove the 4AN x 1/8” NPT Red outlet fitting from the Performer RPM Fuel
Solenoid. Install one of the supplied 3AN x 3AN x 1/8” NPT Red Tee fittings
into the outlet fitting of the solenoid using only
Teflon Paste.
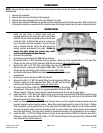
9. Re-install the Performer RPM Fuel Solenoid onto the bracket in the engine
compartment. Pictured to the right is a properly assembled Performer RPM
Nitrous Solenoid. Both your nitrous and fuel solenoids should look like the one pictured above.
10. Install the 6AN x ¼” NPT Blue Filter fitting into the inlet port of the new Performer RPM Nitrous Solenoid using
Teflon Paste only. Install the 3AN x 3AN x 1/8” NPT Blue Tee fitting into the outlet port of the Performer RPM
Nitrous Solenoid using
Teflon Paste only.
11. Install the assembled Performer RPM Nitrous Solenoid onto one of the supplied solenoid brackets using the
supplied solenoid bracket mounting screws. Mount this solenoid and bracket as close to the Victor Jr. Nitrous
Plate as possible on the opposite corner of the other Performer RPM Nitrous Solenoid on the intake manifold.
You may not want to solidly mount the bracket yet until you have installed the nitrous hoses from the solenoid
tee to the plate fittings. This may help to decide in the mounting location of the solenoids due to line lengths.
12. Install the 6AN x ¼” NPT Red fitting into the inlet port of the new Performer RPM Fuel Solenoid using Teflon
Paste only. Install the remaining 3AN x 3AN x 1/8” NPT Red Tee fitting into the outlet port of the Performer RPM
Fuel Solenoid using
Teflon Paste only.
DISASSEMBLY
NOTE: Be sure that the engine is cool, the fuel pressure has been relieved in the fuel system, and the battery has been
disconnected.
1. Remove the carburetor.
2. Remove both lines from the plate to the solenoids.
3. Remove the nitrous and fuel jet from the inlet fittings to the plate.
4. Remove the Performer RPM Plate and gaskets from the carburetor pad of the intake manifold. Make sure that all
of the gasket material is removed from the carburetor pad of the intake manifold and the pad is clean and smooth.