


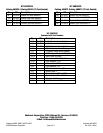

Catalog #s 68952, 68953, 68972, 68973
©2006 Edelbrock Corporation
Page 2 of 3
Brochure #63-68952
Rev. 5/06 - DA/mc
DISASSEMBLY
1. Disconnect battery negative cable from battery.
2. Raise vehicle and support with jackstands.
3. Use penetrating oil on all nuts and bolts to be
removed. This will prevent the possibility of broken
or stripped nuts and bolts.
4. Making sure the converter is cool, remove the
exhaust crossover pipe.
5. Remove O2 sensor being careful not to rupture or
destroy the unit. WARNING: Do not clean this unit
in any cleaning solvents and do not rupture wire.
6. Remove crossover exhaust pipe.
Left Side -- Remove bolts on left side exhaust
manifold, and remove from top side.
Right Side -- Disconnect A.I.R. or Air Injector
Reactor from A.I.R. manifold at clamped hose.
Remove A.I.R. manifold from exhaust manifold if your
vehicle has air conditioning. At this point, remove
alternator and ignition coil bracket assembly.
Remove bolts on right side of the exhaust manifold
and remove top side. If vehicle is equipped with
power steering, remove rear power steering pump
support bracket. Remove oil dipstick tube. Clean
and inspect all surfaces before assembly.
ASSEMBLY LEFT SIDE
1. Install tubular exhaust manifold on vehicle from top
side with gasket and six 8mm bolts (supplied).
2. Install dipstick tube and dipstick.
3. Install oil pressure sending unit, oil filter and rear
power steering support bracket if applicable.
4. Install O2 sensor. Use anti-seize on threads of
sensor and torque to 30 ft./lbs.
5. Re-route O2 sensor wire from wire loom to O2
sensor pigtail connector, making sure all wires are
clear of exhaust system. An O2 sensor wire
extension is provided if necessary.
6. Install rear power steering pump support bracket.
Use two 11/16" spacers provided to space out
bracket.
INSTALLATION INSTRUCTIONS
ASSEMBLY RIGHT SIDE
1. Install tubular exhaust manifold from top side with
gasket and six 8mm bolts (supplied)
2. Install A.I.R. manifold to tubular exhaust manifold
with spacer supplied and original stud bolt.
3. Connect A.I.R. hose and hose clamp.
4. If equipped with air conditioning, install ignition coil
bracket assembly and alternator. Use 13/16" spacer
provided to space out alternator bracket.
CROSSOVER PIPE ASSEMBLY
1. Assemble both lower pipes. Do not clamp tight at
this point.
2. Install crossover pipe assembly on vehicle with four
3/8” bolts, lock and flat washers and gaskets
supplied. Do not tighten at this time.
CATALYTIC CONVERTER
1. Install converter on crossover pipe assembly.
TIGHTENING SEQUENCE
1. Tighten converter support bracket bolts.
2. Align right side crossover flange with tubular exhaust
flange and tighten.
3. Align left side crossover flange with tubular exhaust
flange and tighten.
4. Install muffler-type clamp on crossover pipe slip joint
and tighten clamp.
5. Tighten catalytic converter.
6. Be sure all brake and fuel lines have adequate
clearance.
LOWER VEHICLE TO THE GROUND
1. Connect negative cable to battery. At this point, it
would be a good idea to look everything over and
make sure nothing is missed in assembly.
2. Start vehicle, bring up to normal operating
temperature and check for possible leaks.
3. Turn engine off and let cool, then tighten all bolts
again.