


2. Remove O2 sensor, being careful not to rupture or
destroy the unit.
W ARNING: Do not clean this unit in any cleaning solvent
and do not rupture wire.
3. Making sure the converter is cool, remove the exhaust
crossover pipe. Y ou may find it help ful to clamp the con -
verter to the crossmember using pieces of wood and C-
clamps. This will allow you to work the crossover pipe
loose from the converter more easily. If the pipe is frozen
to the converter, it can be heated with a Propane torch
(or equivalent) to help loosen the joint.
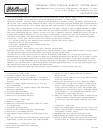
4. Unbolt air conditioning support bracket on frame and use
a crescent wrench to bend bracket end approximately 5
to move hoses away from exhaust manifold (see Figure
1).
ASSEMBLY - LEFT SIDE
1.Install T.E.S. flange gasket and one 3/8"-16 x 1" bolt, lock
washer, and flat washer at rearmost bolt hole (leave bolt
loose enough to accept T.E.S.).
2.Install left side T.E.S. manifold from bottom side.
3.Install all bolts and washers on left side and tighten.
4. Replace original equipment spark plug ends on cylinders
#5 and #7 with 60 connectors and boots provided in kit.
DISASSEMBLY - LEFT SIDE
1. Disconnect negative cable from battery.
2. Use penetrating oil on all nut s and bolt s to be removed.
This will prevent the possibility of broken or stripped nut s
and bolt s.
3. Remove air cleaner system (note position of line and
hose connections).
4. Disconnect A.I.R. (air injection reactor) tube from exhaust
manifold (if applicable).
5. Disconnect spark plug wires.
6. Disconnect temperature sensor wire.
7. Remove bolts and exhaust manifold.
DISASSEMBLY - RIGHT SIDE
1. Remove air cleaner box.
2. Remove air conditioning hose bracket under air cleaner
box (if applicable).
3. Disconnect spark plug wires.
4. Remove dipstick and both sections of dip stick tube.
5. Remove bolts and exhaust manifold .
6. Clean exhaust flange surfaces on cylinder heads at this
time.
7. Drill two 7/32" holes in the inner fender well p anel and pull
heater hoses to p anel and secure with clamps provided.
DISASSEMBLY - CROSSOVER PIPE
1. Raise vehicle and support with jackst ands.
' 1998 Edelbrock Corp. Rev 4/98
STAINLESS STEEL TUBULAR EXHAUST SYSTEM #6661
Application:
1992-’95 Chevrolet & GMC Suburban; 2500 Series, 2 & 4 W.D.,
7.4L V8 w/T.B.I., automatic & st d. transmission, w/o A.I.R.
INSTRUCTIONS
PLEASE study these instructions carefully before inst alling your new T ubular Exhaust System (T.E.S.). If you have any
questions or problems, do not hesit ate to cont act our T echnical Hotline at : 1-800-416-8628.
TUBULAR EXHAUST SYSTEM: These components are designed as a system to improve the exhaust ef ficiency of the
GM 7.4 Liter T.B.I. (Throttle Body Injection) V8 engine. They are constructed of 409 HP st ainless steel to better withst a nd
the high heat present with the T.B.I. engine, especially when used for towing or other heavy duty applications. The st ain -
less steel used for these systems is much more durable than mild steel, although it does not appear dif ferent in appear -
ance. These systems come with a coat of black paint for good looks and protection during shipping and storage, and
they can be identified by the p art numbers on each of the major components. Note that a magnet will stick to this type of
st ainless steel; magnetic attraction is not a valid test for these systems. A performance gain can be expected by the
inst allation of the system. This system requires no welding for inst allation and ret ains all O.E.M. emissions equipment.
SUGGESTED TOOLS FOR INSTALLATION: This vehicle has some metric fasteners.
3/8 ratchet socket set with extensions and universal 13mm and 15mm swivel sockets
Combination set of open-end wrenches
Jackstands, screwdrivers, pliers, crescent wrench, etc.
Drill motor and 7/32" drill bit
Liquid penetrant, (GM #1052627) anti-seize compound (GM #5613695)
W ARNING: The use of Thermal Wrap materials will void the warranty on your T ubular Exhaust System. Those products
can cause excessive heat and moisture buildup resulting in corrosion of the system.
SPECIAL NOTICE: This Edelbrock p art has received an Executive Order number (E.O. #) from the California Air
Resources Board (C.A.R.B.) making it legal for street use on pollution-controlled motor vehicles in all 50 st ates. To assist
you with emissions equipment certification, we have included a silver fan shroud decal to help testing personnel verify
that this p art is a legal replacement p art on the vehicle for which it is cat aloged. The adhesive-backed decal should be
af fixed to your fan shroud next to the existing emission and engine specification decal. Do not cover your original equip -
ment specification decal with the Edelbrock fan shroud decal.
NOTE: High temperature spark plug wires and boot s are recommended to withstand heat from TES.