


Catalog #s 66492, 66493
©2006 Edelbrock Corporation
Page 2 of 2
Brochure #63-66492
Rev. 9/06 - DA/mc
6. Tighten all bolts evenly at this time.
7. Replace spark plugs and wires.
8. Brake lines may be close; if so, loosen bolt that holds
brake line distribution block in place on bracket and
push line away from manifold, then tighten.
ASSEMBLY RIGHT SIDE
1. With manifold port gasket in place, start rear header
bolt (with lock and flat washer in place), leaving enough
room for the manifold to slip into position.
2. Place TES manifold into position behind bolt and slide
into position.
3. Start balance of header bolts (except for the third bolt
back) with lock washers.
4. Tighten manifold bolts at this time (except for third bolt
back).
5. Replace spark plugs and wires.
Qty. Description
❑ 1 Header left side #25-9267 (#66492)
❑ 1 Header right side #25-9268 (#66492)
❑ 1 Header left side #25-9097 (#66493)
❑ 1 Header right side #25-9098 (#66493)
❑ 2 Manifold port gaskets
❑ 4 Hardened washers; 3/8”
❑ 14 Header bolts; 3/8” - 16 x 1”
❑ 3 Ferry bolts; 3/8” - 16 x 2-1/4”
KIT CONTENTS
Edelbrock Corporation, 2700 California St., Torrance, CA 90503
Tech Line: 1-800-416-8628
E-Mail: Edelbrock@Edelbrock.com
Qty. Description
❑ 4 Hex bolts; 7/16” - 14 x 2-1/2”
❑ 1 Hex bolt; 5/16” - 18 x 3/4”
❑ 1 Hex nut; 5/16” - 18
❑ 16 Lock washers; 3/8”
❑ 1 Flat washer; 5/16”
❑ 3 Spacer tubes; 5/8” x 1-1/8”
❑ 1 Spacer bracket
6. Install original EGR tube fitting into T.E.S. manifold. Use
a large wrench to support the manifold fitting to
eliminate possible damage.
7. Replace EGR tube and valve at this time.
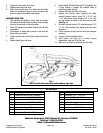
8. Replace A.I.R. diverter valve, plumbing and intake
manifold support bracket, using 3/8" x 2-1/4" bolt,
1-1/8" tube spacer, spacer bracket, 5/16" x 3/4" bolt,
nut and washers as shown in the third bolt hole back
(
See Fig. 1).
9. Re-attach exhaust pipes to TES manifolds using 7/16"
x 2-1/2" bolts provided and original nuts from stock
manifolds.
10. Check to be sure all brake and fuel lines have adequate
clearance.
11. Connect all parts including battery.
12. Start engine and bring up to normal running
temperature, then turn off and let cool.
13. When cool, re-tighten all manifold nuts and bolts.
Fig. 1
A.I.R. transfer tube connection and hardware; right side