


Page 10
BRAKE INSTALLATION
1. Brake Mounting Flange
To assure correct brake action, the mounting
flange must be square and concentric with the
axle spindle. A flange that is not properly
installed will contribute to rapid lining wear and
improper brake action.
The 10" DEMCO brake is designed to inter-
change with existing equipment mounting on
flanges with (4) holes on 4" B.C. and a 3"
register diameter. Several manufacturers of-
fer complete axles with flanges attached, or
you may choose to install flanges yourself.
Two types of cluster plates are used. One with
4" B.C. square pattern for conventional hubs
and one with 4" B.C. rectangular pattern for
new departure hubs.
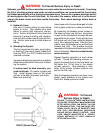
Use a flange welding fixture to properly posi-
tion the flange for welding. Bolt the flange to
the welding fixture securely with bolts.
Install the fixture (and flange) onto the spindle
and tighten spindle nut. If flange is being
installed on a round axle, rotate to insure
“wheel cylinder up” location when the axle is
installed.
Do not to make a continuous weld around the
flange. First, tack weld on all four sides be-
tween the bolts. Follow this with a full weld up
each side of the axle. It is usually not advisable
or necessary to weld across the top and bottom
of the axle. The bottom of the axle is its most
highly stressed area and a weld at this point will
weaken the axle. Allow the axle, spindle, and
flange to cool before removing welding fixture.
2. Installing Brakes
Place the brake against spindle flange. In
mounting the brake, be sure the hydraulic
wheel cylinder is at the top. Brakes are also
marked as “RIGHTS” and “LEFTS”. The brake
designated as “LEFT” travels on the driver’s
side of the road.
3. Installing Brake Drum
II
II
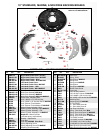
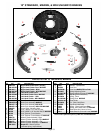
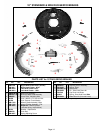
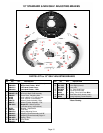
INSTRUCTIONS FOR 10" BRAKES
When the brakes have been correctly as-
sembled to the axle flanges, the hub and drum
assemblies may be mounted on the axle
spindle.
Two types of hubs may be used. The new
departure hub is greased for life and does not
need packing. The conventional hub however
is packed as follows.
Pack the inside bearing with suitable wheel
bearing grease. Force grease through and
around the rollers. Place the bearing in the hub
and install the grease seal flush with the end of
the hub using an arbor press or soft mallet.
Remove excess grease.
To avoid damage to bearing seal, lubricate
seal seat prior to putting on the hub. Grease,
pack and install the outer bearing on spindle.
Place flat washer and spindle nut on spindle.
Turn drum as you tighten nut. When a pro-
nounced drag is felt in the bearings, stop
turning the hub and back off the nut one
complete turn and retighten with your fingers
(not any tighter). Now install the cotter pin and
dust cap.
Caution: Do not pack hub full of grease.
Excessive grease may leak into brake drums
causing brake failure.
Wheels may now be mounted on the trailers.
4. Adjusting Brakes
Self adjusting brakes must be adjusted the
first time only to assure having brakes the first
few times they are applied. Insert a brake
adjusting tool or screw driver into the slotted
hole. With the handle up and the bit down and
against the adjusting nut, pull down on the
handle. While spinning the wheel adjust the
cog wheel up until you start to get a little brake
drag on the wheel. Do not over tighten the
adjusting nut. You can not back the nut off
unless you hold the adjusting shoe away from
the nut while turning it back.
ALWAYS ROTATE DRUM IN DIRECTION
OF FORWARD ROTATION ONLY.