


METHOD 2, ADJUST SPEED
1. Make sure the key is off so the gauge is not powered.
2. Press and hold the function switch.
3. Turn the key on. With the switch still held, start the bike. The display will show “ -- “.
4. Release the function switch. The display will switch between “AUtO” (auto cal), “AdJ” (adjust), “CYL”
(cylinder select), and “SEt” (shift bar).
5. When “AdJ” is displayed press the function switch. This will place the unit in calibration adjustment mode.
6. Release the function switch. The speed display will flash to indicate that it is in the adjust mode. The
tachometer will operate normally.
7. Drive at a known speed. Following another vehicle that is driving at a constant, known speed can do this.
8. Press the function switch. The speed reading will begin increasing until the function switch is released. The
next time the function switch is pressed, the speed reading will begin decreasing until it is released.
9. Once the speedometer is reading correct release the function switch. The new calibration will be saved if no
adjustments are made for 7-10 seconds.
TACHOMETER
The tachometer is used by connecting the green wire from the main power harness to the negative side
of the coil or to an ignition module tach output. The tachometer is adjustable for 1, 2, 4, 6, or 8 cylinder settings.
The 1 cylinder setting is used for single-fire ignition systems without a buffered tach output.
The following instructions are used to set the tachometer calibration:
1. Make sure the key is off so the gauge is not powered.
2. Press and hold the function switch.
3. Turn the key on. The display will show “ -- “.
4. Release the function switch. The display will switch between “AUtO” (auto cal), “AdJ” (adjust), “CYL”
(cylinder select), and “SEt” (shift bar).
5. When “CYL” is displayed press the function switch. This will place the unit in the tach calibration mode.
6. Release the function switch. The display will switch between “1CYL”, “2CYL”, “4CYL”, “6CYL”, and “8CYL”.
7. When the desired setting is displayed press the function switch. The display will show “tACH”.
8. Release the function switch. The system will now start up normally with the new setting.
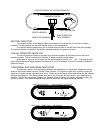
TACHOMETER RED LINE/SHIFT INDICATOR
A single bar will light up to indicate a shift point or red line. The rpm where the bar lights up is user
selectable and can be turned off completely if desired. The bar is factory set to about 5000 rpm.
The following instructions are used to set the tachometer warning bar:
1. Make sure the key is off so the gauge is not powered.
2. Press and hold the function switch.
3. Turn the key on. The display will show “ -- “.
4. Release the function switch. The display will switch between “AUtO” (auto cal), “AdJ” (adjust), “CYL”
(cylinder select), and “SEt” (shift bar).
5. When “SEt” is displayed press the function switch. This will place the unit in the shift/red line set mode.
6. Release the function switch. The bar display will start at 2 and begin moving up. After it reaches the top it
will go out and then start back at 2.
7. When the desired rpm setting is displayed press the function switch. To disable this feature, press the
function switch while the bar is not displayed. The display will show “tACH” once the new setting is stored.
8. Release the function switch. The system will now start up normally with the new setting.
TRIP ODOMETER
The trip odometer is activated by the push button function switch located on the back, left side of the
unit. Pressing and releasing the button will toggle the display from the trip mileage to the standard speedometer
reading or from the speedometer to the trip odometer. Pressing and holding the button while the trip odometer
is displayed will reset the trip odometer. The trip odometer will read from 0 to 999.9 miles. While the trip
mileage is displayed the unit will occasionally flash “trIP” to indicate it is in trip odometer display mode.
ODOMETER
The trip odometer is activated by the push button function switch located on the back, left side of the
unit. Pressing and holding the button will while the speed is displayed will cause the unit to read out the
odometer mileage. The odometer will read from 0 to 99,999 miles. The speed display will first show “odo”, then
the thousands of miles, then the hundreds of miles.
For example, 34,792 miles would be displayed as “odo”, “ 34”, “ 792”, “ “ and then return to the
speedometer reading.