


Intro Operation Customer
Assistance
Warranty
Notice
Main Icons
S
econdary Icons
Caution Warning
Installation
Customer
Assistance
Intro Operation Customer
Assistance
Warranty
Notice
Main Icons
Secondary Icons
Caution Warning
Installation
Customer
Assistance
Install Batteries
Waterproof Sealing
Battery Compartment Lock
R
echargeable Batteries
Intro O
p
e
ra
tio
n
Cu
sto
me
r
Assista
n
ce
Wa
r
ra
nty
Notice
Main Icons
Secondary Icons
Caution Warning
Installation
Customer
Assistance
25
Nothing comes close to a Cobra
®
Batteries and Charger
I
ntro Operation Customer
A
ssistance
W
arranty
N
otice
S
econdary Icons
C
aution Warning
Installation
C
ustomer
A
ssistance
Installation
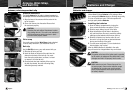
Batteries and charger
•
The radio is shipped with six rechargeable NiMH
(Nickel-Metal Hydride) Batteries in the package. When
your rechargeable Batteries begin to discharge too quickly,
it is time to install new ones. It will also operate with
six high quality alkaline
Batteries.
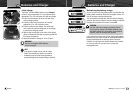
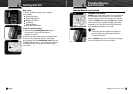
Installing the batteries
1. Open the battery compartment by turning the
screw counter-clockwise one-quarter (
1
⁄4) turn.
2. Slide the empty battery tray out of the radio.
3. Align the batteries with the slots in the battery
tray and insert them. Be sure to match the polarity
markings on the batteries with those on the tray.
4. Slide the full battery tray into the radio. Be sure
the seal is in its groove and not pinched between
the tray and the body of the radio.
5. Turn the screw one-quarter (
1
⁄4) turn clockwise to
lock the battery tray in place.
After the NiMH batteries are installed in the radio,
they will need to be charged before they can be used.
CAUTION
The gasket on the base of the battery pack is essential
for the radio to be waterproof. Be certain that it is not
dislodged and that it fits properly into the radio.
CAUTION
NiMH batteries are toxic. Please dispose of the
old ones properly. Some marine suppliers accept
old batteries for recycling and many municipal
waste disposal agencies have special provisions
for battery disposal.
Intro Operation Customer
A
ssistance
Warranty
Notice
Main Icons
Secondary Icons
Caution Warning
Installation
Customer
A
ssistance
24
English
Antenna, Wrist Strap,
and Belt Clip
I
ntro Operation Customer
A
ssistance
W
arranty
N
otice
S
econdary Icons
C
aution Warning
Installation
C
ustomer
A
ssistance
Installation
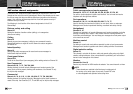
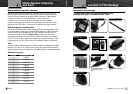
Antenna, wrist strap and belt clip
•
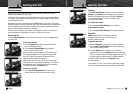
Antenna installation
The flexible Antenna for the radio is shipped separately in
the package and must be attached before you use the radio.
1. Align the base of the antenna with the socket in the
top of the radio.
2. Screw it all the way into the socket. Be sure that
the seal seats properly.
CAUTION
Operating the radio without the antenna in place
may damage the unit. The radio is not waterproof
until the antenna and battery pack are in place
with their seals properly seated.
Wrist strap
Your radio comes with the Wrist Strap already attached.
It can be easily removed if you choose not to use it.
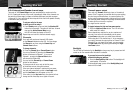
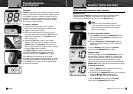
Belt clip
Use the Belt Clip to carry your radio around with you.
1. Slide the clip onto your belt.
2. Insert the knob on the back of the radio into the
channel on the back of the belt clip. You must
have the radio upside-down, as shown, to insert
or remove it from the belt clip.
3. Once the knob has been inserted all the way into
the belt clip channel, the radio will swing freely
while being securely retained.
Install Antenna
Wrist Strap
Slide Belt Clip onto Belt
Insert Knob onto Belt Clip
Secure Radio