


have factory-delayed courtesy lights). If a sensor is malfunctioning, you will receive the
usual 2 chirps and 2 flashes, then, 10 seconds later, there will be 4 chirps and 4 flashes.
NOTE: Since this is a warning indication, you will hear the 4 chirps even if you
have the chirp muting feature turned on.
Specific malfunction identification: The system can also indicate the specific
trigger or sensor that is malfunctioning. If you get the 4-chirp/4-flash signal upon
arming, perform the following to identify the malfunctioning trigger or sensor:
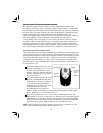
1. Remotely disarm, then turn on the ignition. The LED status indicator inside your
vehicle will blink 1-3 times, pause, then repeat.
2. Count the number of blinks in one cycle between pauses (for your convenience, the
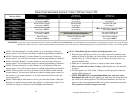
blink cycle repeats a total of 5 times) and refer to the chart below:
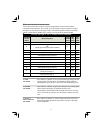
Number of LED blinks between pauses Trigger/sensor indication
1 blink
Piezo Sensor
2 blinks*
Door trigger*
3 blinks
Hood or trunk trigger
* If your vehicle has a factory-installed feature that turns off or dims the interior courtesy lights
several seconds after you exit the vehicle, the system cannot provide this indication.
Automatic malfunction bypass
To provide the utmost protection even if a system component malfunctions, your
Concept 20 system will automatically bypass any faulty point and arm all other triggers
and sensors to provide the utmost possible protection until you can have the system
serviced by your local Authorized Clifford Dealer. If you accidentally armed the system
with the hood, trunk or a door open, just close the open point and the system will again
monitor that point.
Multiple-event TotalRecall™
The system memory records the identity of the last 8 activated or malfunctioning
triggers and sensors, which allows your installer to instantly track down a malfunction.
To identify the triggers and sensors held in memory, use the following procedure:
1. With the ignition OFF, flick the PlainView valet switch to its latched side.
2. Press button 1 to “arm” the system, then again to “disarm.”
3. The LED will blink 1–3 times to indicate the most recently activated point, pause,
blink 1-3 times to indicated the next most recently activated point, and so on.
4. Write down the number of blinks between pauses and refer to the chart above.
5. Return the PlainView switch to its normal center position.
Smart prior intrusion attempt alert
If you hear three chirps when you remotely disarm, it means that a trigger or sensor was
activated in your absence. When you enter the vehicle and turn on the ignition (or start
the engine), the LED will blink 1–3 times, pause, then repeat the blink cycle 4 more
times. Count the number of blinks in any one cycle and refer to the chart above.
18